The LilyPond Snippet Repository ♪♫

What's this? Searching the LSR Browse by date Contributing Snippet database Browsing items 0−851 out of 940

„Schleifer“ ornament implemented as modified grace note

Implementation by Martin Straeten of the Schleifer ornament as used by Johann Sebastian Bach, contributed to the user mailing list here. In this case, it functions like a set of (always?) two grace notes, hence using a modified grace note to represent it in LilyPond makes sense.

Code styling and user interface by Simon Albrecht 2024.

„Schleifer“ ornament implemented as modified grace note

(Correctly aligned) different dispersions of text in different stanzas

If different stanzas of a song have different amount of syllables the dispersion of the text may differ from stanza to stanza. This snippets shows a possibility how notes of the second stanza can be printed as cue notes when they differ from the notes of the first stanza. The lyrics of the different stanzas are aligned correctly according to the voice of the respective stanza.

(Correctly aligned) different dispersions of text in different stanzas

[OBSOLETE] Adding a QR code

This snippet lets you draw a QR-code, for example to provide a link to the composer's, or the music editor's website.

Actually encoding the URL into a QR-code is not done here (this just draws the QR-code from a grid of "black" or "white" values), but see the code for a short Python snippet you can use to avoid having to fill for each small square if it's black or white.

This snippet is obsolete starting from LilyPond 2.25.3, which adds a \qr-code markup command that takes a URL directly instead of a grid of "black" and "white" values. It is used like \markup \qr-code #10 "https://lilypond.org".

[OBSOLETE] Adding a QR code

A function to repeatedly print a given pattern with different notes

This snippet describes a function \changePitch, to repeatedly print a given rhythm with different notes. Its syntax is
\changePitch \pattern \newnotes
This will replace notes in \pattern by notes in \newnotes. If the note-count in \newnotes is greater, the pattern is copied repeatedly. Rests or skips are allowed, and the function also works for chords. More detailed documentation (in pdf format), and also the most recent "changePitch.ly" can be found here.

A function to repeatedly print a given pattern with different notes

Abbreviating bass note changes

A common practice in lead sheets is to abbreviate chord changes when only the bass note is changed. s, Cmaj7, Cmaj7/B would be written as Cmaj7, /B, for example. There is no simple way to do this in LilyPond, but it is possible to use a whiteout hack like snippet #309 to accomplish the desired effect.

Abbreviating bass note changes

Abbreviations for articulations

Some articulations may be entered using an abbreviation.

Abbreviations for articulations

Absolute positioning of markup elements (laying out tables)

Positioning markup elements relative to one another is complicated by the fact that the compiler will automatically place each element after the previous one, and you have to take this into account when positioning each element. The \combine command helps, but it can only take two arguments.

The \overlay-markup command takes a list of markup elements, it becomes much easier to lay out complex markup into specific arrangements, such as tables.

Absolute positioning of markup elements (laying out tables)

Acciaccatura markup

Here is a solution to print an acciaccatura in markup (for example, to give an execution hint for an appoggiatura, as found in baroque music).

Acciaccatura markup

Accidental adjustments for single-voice polyphony

LilyPond currently does not consider simultaneous notes to automatically determine the correct accidentals; it only looks at previous notes and key signatures. As a consequence, it is necessary to do some manual adjustments.

Unfortunately, these adjustments are quite complex. The Scheme code in this snippet provides a new engraver custom_accidental_placement_engraver that introduces a details subproperty flag called capture for the Accidental grob. If this flag is set, the current voice captures the accidental so that it is no longer aligned with the other accidentals in a note column. Together with other properties (force-hshift and ignore-collision) it is possible to achieve the desired result.

Accidental adjustments for single-voice polyphony

Accordion register symbols

Accordion register symbols are available as \markup as well as as standalone music events (as register changes tend to occur between actual music events). Bass registers are not overly standardized. The available commands can be found in 'Discant symbols' in the Notation Reference.

Accordion register symbols

Accordion-discant symbols

This snippet has been obsoleted by predefined markup commands, see 'Discant symbols' in the Notation Reference. It's still useful as a simple demonstration of how to combine symbols: the placement of the symbols added with \markup can be tweaked by changing the \translate-scaled arguments. \translate-scaled is used here rather than \translate in order to let the positioning of the symbol parts adapt to changes of font-size.

Accordion-discant symbols

Add wings to all repeat barlines (simple version)

After switching from Sibelius, I missed having all my repeat barlines have "wings" on them. It's not documented in the Lilypond documentation, but it's not too hard to accomplish. Just add this inside your Staff:

\set Score.startRepeatType = #"[|:" \set Score.endRepeatType = #":|]" \set Score.doubleRepeatType = #":|][|:"

Add wings to all repeat barlines (simple version)

Adding a figured bass above or below the notes

When writing a figured bass, you can place the figures above or below the bass notes, by defining the BassFigureAlignmentPositioning.direction property (exclusively in a Staff context). Choices are #UP (or #1), #CENTER (or #0) and #DOWN (or #-1).

This property can be changed as many times as you wish. Use \once \override if you don't want the override to apply to the whole score.

Adding a figured bass above or below the notes

Adding a laissezVibrer tie to only one note of a chord [obsolete in 2.23]

Sometimes it is required to apply a laissezVibrer tie to a specific note in a chord, for instance in a piano fingering where one finger of a chord should temporarily act as a pivot while the other fingers are moving to the the next chord. Here is a way to achieve it.

Adding a laissezVibrer tie to only one note of a chord [obsolete in 2.23]

Adding a Special Post Event Function to Implement Precise MIDI Velocity Value Control

This is a small hack to output MIDI file with precise velocity value control. This snippet adds a post event function \vel which enables you to set MIDI velocity value directly on any note event. This is accomplished by overriding dynamicAbsoluteVolumeFunction.

Adding a Special Post Event Function to Implement Precise MIDI Velocity Value Control

Adding accidentals to a trillspanner

By overriding bound-details, you can insert an accidental after the trill sign in a trillspanner. However, this can look ugly since the accidental isn't aligned. With a few tweaks to the script size and position, you can achieve quite pleasing results.

Adding accidentals to a trillspanner

Adding ambitus per voice

Ambitus can be added per voice. In this case, the ambitus must be moved manually to prevent collisions.

Adding ambitus per voice

Adding an extra staff

An extra staff can be added (possibly temporarily) after the start of a piece.

Adding an extra staff

Adding an extra staff (2)

To add an extra staff after the start of a piece, you can choose between having brackets or braces when you go over a new line:

=> Use PianoStaff instead of StaffGroup or ChoirStaff in the code.

You may wish to remove the clef and not only the key:

=> See both \overrides in the code.

You may wish to remove also the little part of staff at the beginning of the extra staff:

=> Use #'stencil = ##f instead of #'transparent = ##t for both \overrides.

If you want to keep the little beginning of staff, keep at least one #'transparent = ##t.

Adding an extra staff (2)

Adding an extra staff at a line break

When adding a new staff at a line break, some extra space is unfortunately added at the end of the line before the break (to fit in a key signature change, which will never be printed anyway). The workaround is to add a setting of Staff.explicitKeySignatureVisibility as is shown in the example.

Adding an extra staff at a line break

Adding an ottava marking to a single voice

If you have more than one voice on the staff, setting octavation in one voice transposes the position of notes in all voices for the duration of the ottava bracket. If the octavation is only intended to apply to one voice, the Ottava_spanner_engraver should be moved to Voice context.

Adding an ottava marking to a single voice

Adding articulation marks using Scheme (advanced)

Using make-music, you can add various stuff to notes. In this example tenuto lines are added to the notes, and tied notes are disregarded.

Adding articulation marks using Scheme (advanced)

Adding articulation marks using Scheme (simple)

Using make-music, you can add various stuff to notes. In this example staccato dots are added to the notes. For this simple case, it is not necessary to use scm constructs.

Adding articulation marks using Scheme (simple)

Adding articulations from a template

Repeating the same articulations a great number of time can be a bit time-consuming to enter.

The function copyArticulations here, automates the job by copying the articulations from a pattern into your music.

As the music is rarely always the same, a few extra functions can give you some flexibility.

The code of the image below is the following:


  \copyArticulations 
      { c( c) c-. c-. }          %% the pattern
      {                          %% the music
        c16 d e f g a b c b8 a g f
        \notCA e1
        \nSkipArti #2
        r8 d16 e f g a b c8 g e g
        \notCA c,1
      }  

Here, \notCA allows you to keep the music untouched and \nSkipArti #2 skips 2 notes (so 2 articulations) in the pattern.

Download the code of this function here : copyArticulations.ly.

Adding articulations from a template

Adding augmentation dots

To obtain dotted note lengths, simply add a dot (`.') to the number. Double-dotted notes are produced in a similar way.

Adding augmentation dots

Adding automatic octaves to a melody

<p>This macro allows you to get octaves from a sequence of single notes (this is particularly useful in piano music). <p>The function takes two arguments: the first one is a number (#1 adds notes an octave above, #-1 an octave below, etc), the second one is the music to deal with. <p>Beware: the function can handle chords, but tends to reverse the intervals.

Adding automatic octaves to a melody

Adding bar lines to ChordNames context

To add bar line indications in the ChordNames context, add the Bar_engraver.

Adding bar lines to ChordNames context

Adding beams, slurs, ties etc. when using tuplet and non-tuplet rhythms

LilyPond syntax can involve many unusual placements for parentheses, brackets etc., which might sometimes have to be interleaved.

For example, when entering a manual beam, the left square bracket has to be placed after the starting note and its duration, not before. Similarly, the right square bracket should directly follow the note which is to be at the end of the requested beaming, even if this note happens to be inside a tuplet section.

This snippet demonstrates how to combine manual beaming, manual slurs, ties and phrasing slurs with tuplet sections (enclosed within curly braces).

Adding beams, slurs, ties etc. when using tuplet and non-tuplet rhythms

Adding double and triple tonguing indications for woodwind

Double and triple tonguing indications can be added to notes by tweaking the appearance of staccato articulations.

Adding double and triple tonguing indications for woodwind

Adding drum parts

Using the powerful pre-configured tools such as the \drummode function and the DrumStaff context, inputting drum parts is quite easy: drums are placed at their own staff positions (with a special clef symbol) and have note heads according to the drum. Attaching an extra symbol to the drum or restricting the number of lines is possible.

Adding drum parts

Adding extra fingering with Scheme

You can add additional elements to notes using map-some-music. In this example, an extra script is attached to a note.

In general, first do a \displayMusic of the music you want to create, then write a function that will work on the appropriate parts of the music for you.

Adding extra fingering with Scheme

Adding fingerings (or string numbers or stroke fingerings) outside of the music code

The scheme function \addFingering adds fingerings to a music part respecting fingeringOrientations even if single notes are not in chord brackets (<_. p="p"> In the example below, the music code is just set as follow :

    music = \relative c' { 
                c4 d  
                g f  
                c b a b
                1
            }
The fingering code is set in a string parameter :

    \addFingering \music
            #"012345           % mes 1
              xxxx '1-2''3-4'  % mes 2
              -1+2-3+4         % mes 3
              1234             % mes 4
              "

The rules are :

Each digit [0-5] is attached to the corresponding note in the music.

You can use a letter (here x) to skip a note, or if you want to skip n consecutive notes, use the syntax *nx ( for ex *15x will skip 15 notes).

Instead of one digit, you can add a substitution fingering by enclosing several digits between 2 apostrophes, with - (minus) as separator char, like that '1-2-3'.

+ and - (plus/minus) before a digit mean respectively direction UP and DOWN.They override fingeringOrientations set before.

Comments can be added at the end of the line and must start with a percent sign (%).

All other characters not mentioned above are ignored.

Notes :

1-If you are curious to know how to add various \override, you can uncomment the commented lines of the code of this snippet, but you'll need first to download here the file called "extractMusic.ly".

2-You can also use \displayLilyMusic to get single notes with fingering instructions embedded in chord brackets.

3-Two similar functions \addStringNumber and \addStrokeFinger are also provided. You can quickly add by the same way, respectively string numbers and stroke fingerings.

Adding fingerings (or string numbers or stroke fingerings) outside of the music code

Adding fingerings to a score

Fingering instructions can be entered using a simple syntax.

Adding fingerings to a score

Adding fingerings to a score using markup objects

Fingerings can be entered as markup objects, for example to specify fingering changes on a single note.

Adding fingerings to a score using markup objects

Adding fingerings to chords

Fingerings for chords can be obtained by adding them to individual pitches.

Adding fingerings to chords

Adding fingerings to tablatures

To add fingerings to tablatures, use a combination of \markup and \finger.

Adding fingerings to tablatures

Adding indicators to staves which get split after a break

This snippet defines the commands \splitStaffBarLine, \convUpStaffBarLine, and \convDownStaffBarLine. These add arrows at a bar line to denote that several voices sharing a staff will each continue on a staff of their own in the next system, or that voices split in this way recombine.

Adding indicators to staves which get split after a break

Adding instrument name and clef change to cue notes

Lilypond provides the \cueDuring and \transposedCueDuring commands to add cue notes. However, these commands do neither print any cue instrument name, nor do they allow the cue notes to be in a different clef than the quoting voice.

To be able to add cue instrument names and/or clef changes, as a workaround, you can define your own function that sets instrumentCueName and the clef for the staff. At the end of the cue music (typically R1*2), you'll have to reset them again. This snippet combines these steps into one function:

The example also shows how to modify properties of the displayed cue instrument names: They are generated as InstrumentSwitch objects, which support all different kinds of interfaces, like the font-interface to modify font settings.

The disadvantage of this solution is that you always have to manually give the instrument name and clef of the quoting voice, because otherwise the function is not able to reset these. However, there is currently no way known to me how to set the instrument name and clef for a quoted voice automatically.

Adding instrument name and clef change to cue notes

Adding line between fingerings or a glissando between nonadjacent notes

Need a glissando between two nonadjacent notes or a line between two fingerings?

\guide = dashed line.

\gliss = glissando line.

Adding line between fingerings or a glissando between nonadjacent notes

Adding line breaks in MIDI Karaoke lyrics without disrupting printed score

Lyrics can be added with the \addlyrics command, and they will appear in both the layout and midi. The MIDI Karaoke standard allows for the concept of line breaks, usually introduced with either a slash or a backslash at the beginning of a lyric syllable, but placing either of those characters in the lyrics is both messy in the .ly file and disruptive to the printable version (either character will display in the end result).

The perfect solution is to start the lyric syllable with \n - at least, it seems to work with vanBasco's Karaoke Player for Windows (confirmation with other players requested!) However, this is immensely ugly in the LilyPond source:

\addlyrics {
  "\nDoe," a deer, a fe- male deer,
  "\nRay," a drop of gol- den sun,
  "\nMe," a name I call my- self,
  "\nFar," a long long way to run!
}
It's especially ugly if the first word of the line has more than one syllable (the quote in the middle of the word).

With a bit of Scheming, this can be made far cleaner. The function recursively searches its argument for LyricEvents and replaces any leading exclamation mark with a newline.

\addlyrics {
  \lyr {
    !Doe, a deer, a fe- male deer,
    !Ray, a drop of gol- den sun,
    !Me, a name I call my- self,
    !Far, a long long way to run!
  }
}

Adding line breaks in MIDI Karaoke lyrics without disrupting printed score

Adding links to objects

To add a link to a grob stencil you can use add-link as defined here. It works both with \override and \tweak.

Drawback: point-and-click is disturbed for the linked grobs.

Limitation: Works for PDF only.

The linked objects are colored with a separate command. Note that the links are not displayed and are not clickable from inside the LSR.

Adding links to objects

Adding markups in a tablature

By default markups does not show in a tablature.

To make them appear, simply use the command \revert TabStaff.TextScript.stencil

Adding markups in a tablature

Adding metronome ticks to a piece of music

If you need to produce a piece of music with metronome ticks, optionally only in the midi, you can use this boilerplate code. Note that it sounds nicer than it looks :) .

Adding metronome ticks to a piece of music

Adding notes

A note is printed by specifying its pitch and then its duration.

Adding notes

Adding notes to the notes of a melody

If you want to add notes to the existing notes of a melody (to make chords), you generally have to copy your melody then add lots of <_ to="to" each="each" note="note" which="which" can="can" be="be" a="a" time-consuming.p="time-consuming.p"> The \addNote function here makes it faster and simpler.

The syntax is : \addNote \melody \newNotes

Here :

melody = \relative {c'4.-> d8-. c4(\p b8) r c4\f c c2}

newnotes = {e f e d e s e}

Note that with this function, you can easily create some other useful functions. For example, a function \doubleOctave is shown here. This doubles each note with the note an octave higher.

Adding notes to the notes of a melody

Adding or modifying Script articulations

Scripts may be defined as stencil expressions, by defining their stencil property.

Adding or modifying Script articulations

Adding orchestral cues to a vocal score

This shows one approach to simplify adding many orchestral cues to the piano reduction in a vocal score. The music function \cueWhile takes four arguments: the music from which the cue is to be taken, as defined by \addQuote, the name to be inserted before the cue notes, then either #UP or #DOWN to specify either \voiceOne with the name above the staff or \voiceTwo with the name below the staff, and finally the piano music in parallel with which the cue notes are to appear. The name of the cued instrument is positioned to the left of the cued notes. Many passages can be cued, but they cannot overlap each other in time.

Adding orchestral cues to a vocal score

Adding parentheses around an expressive mark or chordal note

The \parenthesize function is a special tweak that encloses objects in parentheses. The associated grob is ParenthesesItem.

Adding parentheses around an expressive mark or chordal note

Adding punctuation to the end of an extender in melismata

Punctuation can be added to the end of an extender in melismata by overriding the default stencil for LyricExtender.

For convenience, this snippet applies the stencil override as a tweak to the extender event.

Adding punctuation to the end of an extender in melismata

Adding rests

Rests are entered like notes, with the note name r, so just type r followed by the duration.

Adding rests

Adding the current date to a score

With a little Scheme code, the current date can easily be added to a score.

Adding the current date to a score

Adding the current date to the tagline

There are a couple ways to get the current date in your score - using Scheme and a header that suits you (as you may find in the Adding the current date to a score example), or placing the same Scheme code in a \markup block.

One more option is to place the date in the tagline. This places the date at the bottom of the last page and appears like this -

Engraved on April 26, 2009 with Lilypond 2.12.2 (http://lilypond.org)

The format of the date can be changed according to these parameters:

Adding the current date to the tagline

Adding timing marks to long glissandi

Skipped beats in very long glissandi are sometimes indicated by timing marks, often consisting of stems without noteheads. Such stems can also be used to carry intermediate expression markings.

If the stems do not align well with the glissando, they may need to be repositioned slightly.

Adding timing marks to long glissandi

Adding volta brackets to additional staves

The Volta_engraver by default resides in the Score context, and brackets for the repeat are thus normally only printed over the topmost staff. This can be adjusted by adding the Volta_engraver to the Staff context where the brackets should appear; see also the Volta multi staff snippet.

Adding volta brackets to additional staves

Additional voices to avoid collisions

In some instances of complex polyphonic music, additional voices are necessary to prevent collisions between notes. If more than four parallel voices are needed, additional voices can be added by defining a variable using the Scheme function context-spec-music.

Additional voices to avoid collisions

Adjusting figured bass alteration glyphs

In figured bass, specially designed glyphs for 6\\, 7\\, and 9\\ are used by default. Similarly, specially designed glyphs for symbols 2\+, 4\+, and 5\+ are used by default if plus signs appear after the number.

To change that, pass an alist to figuredBassPlusStrokedAlist and set the glyph in question to #f (or omit it).

Adjusting figured bass alteration glyphs

Adjusting grace note spacing

The space given to grace notes can be adjusted using the spacing-increment property of Score.GraceSpacing.

Adjusting grace note spacing

Adjusting lyrics vertical spacing

This snippet shows how to bring the lyrics line closer to the staff.

Adjusting lyrics vertical spacing

Adjusting slur positions vertically

Using \override Slur.positions it is possible to set the vertical position of the start and end points of a slur to absolute values (or rather, forcing LilyPond's slur algorithm to consider these values as desired). In many cases, this means a lot of trial and error until good values are found. You probably have tried the \offset command next just to find out that it doesn't work for slurs, emitting a warning instead.

The code in this snippet allows you to tweak the vertical start and end positions by specifying relative changes, similar to \offset.

Syntax: \offsetPositions #'(dy1 . dy2)

Adjusting slur positions vertically

Adjusting the shape of falls and doits

The shortest-duration-space property may be tweaked to adjust the shape of falls and doits.

Adjusting the shape of falls and doits

Adjusting the spacing of full measure notes

Notes that occupy a complete measure are given some extra spacing from the preceding bar line. This can be adjusted using the full-measure-extra-space property of NonMusicalPaperColumn. The default is 1. A value of zero removes the extra space allowed; -1 removes the space completely. Positive numbers greater than 1 increase the spacing.

Adjusting the spacing of full measure notes

Adjusting vertical positioning of lyric hyphens

For joining syllables, LilyPond doesn't use the hyphen of the text font but instead draws a simple line with variable length. Its standard vertical position doesn't always fit the proportions of the text font. When using a font with a large x-height, it may be too low.

You can adjust the vertical positioning of the hyphens manually. To get a good result you may want to insert a “real” hyphen for comparision (the l-e in the snippet).

Adjusting vertical positioning of lyric hyphens

Affecting items only on the left or rigth of a linebreak (BarLines, KeySignatures, Clefs etc)

If you want to affect the behaviour (color, rotation, translate etc.) of an item at a linebreak only on the left or the right side (like BarLines, KeySignatures, Clefs, TimeSignatures etc.) use the definitions and functions as defined here. Several other definitions are possible by using this examples.

Affecting items only on the left or rigth of a linebreak (BarLines, KeySignatures, Clefs etc)

Aiken head thin variant noteheads

Aiken head white notes get harder to read at smaller staff sizes, especially with ledger lines. Losing interior white space makes them appear as quarter notes.

Aiken head thin variant noteheads

Airy tone

\airytone takes three arguments: a circle radius, a degree of fullness (from 0 - 1) and a line thickness. Generally, in the modern rep, an open circle (0) corresponds to all air and a full circle (1) corresponds to a full, robust tone.

Airy tone

Aligning and centering instrument names

The horizontal alignment of instrument names is tweaked by changing the Staff.InstrumentName.self-alignment-X property. The \layout variables indent and short-indent define the space in which the instrument names are aligned before the first and the following systems, respectively.

Aligning and centering instrument names

Aligning and centering instrument names (advanced)

Here is an advanced macro to produce automatically centered instrument names: use \instrument for a single line instrument name, and \instruments for a multi line instrument name.

Aligning and centering instrument names (advanced)

Aligning bar numbers

Bar numbers by default are right-aligned to their parent object. This is usually the left edge of a line or, if numbers are printed within a line, the left hand side of a bar line. The numbers may also be positioned directly over the bar line or left-aligned to the bar line.

Aligning bar numbers

Aligning columns from different markups

One can use \markup \fill-line { \column { "line1" "line2" ... } \column { "line1" "line2" ... } } to create text markup in multiple columns (for example, writing out the text of various stanzas after the score). However, the column widths are calculated from the contents, so columns from different markups are not aligned with each other.

However, one can write a \columns macro, which makes each column exactly 1/n of the line-width, thus aligning even columns of different markups. The syntax stays the same, only that one has to use \columns instead of \fill-line:
\markup \columns {
  \column{"default column 1" "line 2"}
  \column{"column 2, wider than the rest" "line 2"}
  \column{"c 3" "line 2"}
}

Aligning columns from different markups

Aligning marks with various notation objects

If specified, text marks may be aligned with notation objects other than bar lines. These objects include ambitus, breathing-sign, clef, custos, staff-bar, left-edge, key-cancellation, key-signature, and time-signature.

In such cases, text marks will be horizontally centered above the object. However this can be changed, as demonstrated on the second line of this example (in a score with multiple staves, this setting should be done for all the staves).

Aligning marks with various notation objects

Aligning syllables with melisma

By default, lyrics syllables that start a melisma are left aligned on their note. The alignment can be altered using the lyricMelismaAlignment property.

Aligning syllables with melisma

Aligning the ends of hairpins to NoteColumn directions

The ends of hairpins may be aligned to the LEFT, CENTER or RIGHT of NoteColumn grobs by overriding the property endpoint-alignments, which is a pair of numbers representing the left and right ends of the hairpin. endpoint-alignments are expected to be directions (either -1, 0 or 1). Other values will be transformed with a warning. The right end of a hairpin terminating at a rest is not affected, always ending at the left edge of the rest.

Aligning the ends of hairpins to NoteColumn directions

Allowing fingerings to be printed inside the staff

By default, vertically oriented fingerings are positioned outside the staff; that behavior, however, may be disabled. Attention needs to be paid to situations where fingerings and stems are in the same direction: by default, fingerings will avoid only beamed stems. That setting can be changed to avoid no stems or all stems; the following example demonstrates these two options, as well as how to go back to the default behavior.

Allowing fingerings to be printed inside the staff

Alphabetically sorted index

Sometimes you may want to get a sorted index of the pieces contained in a book. Often the \table-of-content command does this job quite well. However, the problem with it is that it always sorts by page numbers. For books containing many songs it is common to have an index sorted by letters or topics.

Both is possible with this snippet. It takes the code of LilyPond's ly/toc-init.ly file and defines three new commands \indexItem, \indexSection, and \index. The first two are used to define index items, the last one will create the output.

\indexItem and \indexSection both take two arguments (string, markup). The first is used to calculate the order of the items in the output, the second one contains the markup that is actually printed.

  \markuplist \index

  \indexItem #"Berta" \markup "Berta"
  \indexItem #"Clown" \markup "Clown"
  \indexItem #"Adam" \markup "Adam"

By setting the first argument of \indexItem and \indexSection to a different value than the second it is possible to create heavily customized sorted indices. For example, a topic-based index can be achieved by

  \markuplist \index

  \indexSection #"spring" \markup \smallCaps "Songs of Spring"
  \indexItem #"spring - I Like the Flowers" \markup "I Like the Flowers"
  \indexItem #"spring - Der Winter ist vergangen" \markup "Der Winter ist vergangen"

  \indexSection #"rock" \markup \smallCaps "Rock Songs"
  \indexItem #"rock - Stairway to Heaven" \markup "Stairway to heaven"
  \indexItem #"rock - Nothing Else Matters" \markup "Nothing Else Matters"

Limitations:

It is not yet possible to create multiple indices, for example, an alphabetically sorted and a topic-based one. To achieve that a few additions to the snippet would be necessary, which I had not yet time to implement.

Alphabetically sorted index

Altering the length of beamed stems

Stem lengths on beamed notes can be varied by overriding the beamed-lengths property of the details of the Stem. If a single value is used as an argument, the length applies to all stems. When multiple arguments are used, the first applies to eighth notes, the second to sixteenth notes and so on. The final argument also applies to all notes shorter than the note length of the final argument. Non-integer arguments may also be used.

Altering the length of beamed stems

Altering the number of stems in a beam

You can alter the number of stems in a beam. In this example, two sets of four 32nds are joined, as if they were 8th notes.

Altering the number of stems in a beam

Altering the shape of a default slur with a list of offsets

If you want to adjust the shape of a slur, one way is to specify a new list of control-points. This function offers a different approach by allowing you to adjust existing control-points. This is done by entering a list of offsets (in staff spaces) to the default coordinates:

\shapeSlur #'(x1 y1 x2 y2 x3 y3 x4 y4)

Setting a value to 0 leaves the default coordinate unchanged, so it is easy to maintain a slur's attachment-points while changing its interior.

Altering the shape of a default slur with a list of offsets

Altering the shape of a default slur with a list of offsets [revised]

If you want to adjust the shape of a slur, one way is to specify a new list of control-points. This function offers a different approach by allowing you to adjust existing control-points. This is done by entering a list of offsets (in staff spaces) to the default coordinates:

\shapeSlur #'(x1 y1 x2 y2 x3 y3 x4 y4)

Setting a value to 0 leaves the default coordinate unchanged, so it is easy to maintain a slur's attachment-points while changing its interior.

This snippet is a revised version, by David Nalesnik, of the original (snippet 639).

Altering the shape of a default slur with a list of offsets [revised]

Alternate lyrics context for song sheets

When preparing song sheets, it's sometimes useful to have the lyrics of all the verses inside the score, correctly lined up to the notes. However, this makes it easy for the singer to mix up verses -- especially when changing systems. A common solution is to alternate the display properties of the lyric lines. This snippet demonstrates how to use such an approach in LilyPond.

Alternate lyrics context for song sheets

Alternate lyrics context for song sheets (alternate)

When preparing song sheets, it's sometimes useful to have the lyrics of all the verses inside the score, correctly lined up to the notes. However, this makes it easy for the singer to mix up verses -- especially when changing systems. A common solution is to alternate the display properties of the lyric lines. This snippet demonstrates how to use such an approach in LilyPond.

Alternate lyrics context for song sheets (alternate)

Alternating beam directions

The eighth notes may be seemingly attached to different beams, and the corresponding notes connected by ties. Such a situation may occur, for example, in the cello suites.

Alternating beam directions

Alternative bar numbering

Two alternative methods for bar numbering can be set, especially for when using repeated music.

Alternative bar numbering

Alternative breve notes

Breve notes are also available with two vertical lines on each side of the notehead instead of one line and in baroque style.

Alternative breve notes

Ambitus

Ambitus indicate pitch ranges for voices.

Accidentals only show up if they are not part of the key signature. AmbitusNoteHead grobs also have ledger lines.

Ambitus

Ambitus after key signature

By default, ambitus are positioned at the left of the clef. The \ambitusAfter function allows for changing this placement. Syntax is \ambitusAfter grob-interface (see Graphical Object Interfaces for a list of possible values for grob-interface.)

A common use case is printing the ambitus between key signature and time signature.

Ambitus after key signature

Ambitus with multiple voices

Adding the Ambitus_engraver to the Staff context creates a single ambitus per staff, even in the case of staves with multiple voices.

Ambitus with multiple voices

Analysis brackets

Brackets can be used in musical analysis to indicate the structure of the pieces.

As demonstrated in the second measure, such analysis brackets can be nested.

Analysis brackets

Analysis brackets above the staff

Simple horizontal analysis brackets are added below the staff by default. The following example shows a way to place them above the staff instead.

Analysis brackets above the staff

Analysis brackets with labels

Text markup may be added to analysis brackets through the text property of the HorizontalBracketText grob. Adding different texts to brackets beginning at the same time requires the \tweak command.

Bracket text will be parenthesized after a line break.

Analysis brackets with labels

Ancient accidentals

Accidentals are available in different ancient styles, which all are collected here.

Ancient accidentals

Ancient fonts

Shown here are many of the symbols that are included in LilyPond's ancient notation.

Ancient fonts

Ancient headword

Ancient headword

Ancient headword

Ancient notation template -- modern transcription of gregorian music

This example demonstrates how to do modern transcription of Gregorian music. Gregorian music has no measure, no stems; it uses only half and quarter note heads, and special marks, indicating rests of different length.

Ancient notation template -- modern transcription of gregorian music

Ancient time signatures

Time signatures may also be engraved in an old style.

Ancient time signatures

Anglican psalm template

This template shows one way of setting out an Anglican psalm chant. It also shows how the verses may be added as stand-alone text under the music. The two verses are coded in different styles to demonstrate more possibilities.

Anglican psalm template

Appending a note to the tuplet text (using a scheme wrapper function)

Sometimes you might want to show the basic beat in the tuplet number text, i.e. 3:2 quarternote, were quarternote is really a note. The quick and dirty way is to manually set \override TupletNumber #'text = #(markup #:italic "3:2" #:fontsize -5 #:note "4" 1). However, then you'll have to change it as soon as you want to use a 4/6 tuplet.

The better way is to write your own function for #'text, which extracts the tuplet fraction from the tuplet object, formats the tuplet text using the internal function and then appends the note you want. In other words, we simply write a function, which wraps the internal formatter function and modified its result:

#(define-public ((tuplet-number::append-note-wrapper function note) grob)
  (let* ((txt (function grob)))
    (markup txt #:fontsize -5 #:note note UP)))

You simply pass the normal formatter function (i.e. tuplet-number::calc-fraction-text for 3:2 or tuplet-number::calc-denominator-text for 3) and the duration of the note to append:

  \override TupletNumber #'text = #(tuplet-number::append-note-wrapper tuplet-number::calc-denominator-text "8")

Appending a note to the tuplet text (using a scheme wrapper function)

Applying note head styles (shapes) based on pitch or note name

The shapeNoteStyles property can be used to set custom note head styles for each step of the scale (as set by the key signature or the "tonic" property). The note head style you designate for G will also be used for G# and Gb, as in shape note notation.

The method used in this snippet lets you assign custom note heads based on a note's pitch or full name. This allows you to assign different note heads for naturals, sharps, and flats, for example. In this snippet sharp and flat notes are given a square note head shape. [This is based on the snippet "Coloring notes depending on their pitch".]

Applying note head styles (shapes) based on pitch or note name

Applying note head styles depending on the step of the scale

The shapeNoteStyles property can be used to define various note head styles for each step of the scale (as set by the key signature or the tonic property).

This property requires a set of symbols, which can be purely arbitrary (geometrical expressions such as triangle, cross, and xcircle are allowed) or based on old American engraving tradition (some latin note names are also allowed).

That said, to imitate old American song books, there are several predefined note head styles available through shortcut commands such as \aikenHeads or \sacredHarpHeads.

This example shows different ways to obtain shape note heads, and demonstrates the ability to transpose a melody without losing the correspondence between harmonic functions and note head styles.

Applying note head styles depending on the step of the scale

Applying tweaks to one voice in \partCombine

When using \partCombine, commands applying to a Voice context affect both parts since when are merged in the same Voice. This snippet defines a music function to apply tweaks to all elements of a certain kind in a music expression. This can be used to apply modifications to all grobs caused by elements of a music expression regardless of the context structure. Possible values for the event-class argument are listed at the Internals Reference

Applying tweaks to one voice in \partCombine

Appoggiatura or grace note before a bar line

By default, appoggiaturas and grace notes that occur on the first beat of a measure are printed after the bar line. They can however be printed before, simply by adding an invisible BarLine and then the visible one, as demonstrated here.

Appoggiatura or grace note before a bar line

Arabic chant

Writing chants from right to left.

Arabic chant

Arabic improvisation

For improvisations or taqasim which are temporarily free, the time signature can be omitted and \cadenzaOn can be used. Adjusting the accidental style might be required, since the absence of bar lines will cause the accidental to be marked only once. Here is an example of what could be the start of a hijaz improvisation:

Arabic improvisation

Arpeggio bracket

In a score where you've printed many chords with \arpeggio signs, you may want to tell the player that one particular chord must not be arpeggiated. This can be done quite easily by adding a square bracket instead of the arpeggio sign.

Arpeggio bracket

Arpeggios in polyphonic music

If you need to attach an arpeggio a chord that is notated as separate voices in polyphonic music, you can create single-node chords and set connectArpeggios = ##t.

N.B. This only works inside a GrandStaff or a PianoStaff.

Arpeggios in polyphonic music

Arranging separate lyrics on a single line

Sometimes you may want to put lyrics for different performers on a single line: where there is rapidly alternating text, for example. This snippet shows how this can be done with \override VerticalAxisGroup.nonstaff-nonstaff-spacing.minimum-distance = ##f.

Arranging separate lyrics on a single line

Arrow notation and transposition for quarter tones

If you use arrow notation for quarter tones, and distinguish a raised natural from a lowered sharp, you can define extra note-names to enter notes with these distinct alterations.

You list all the pitch-changes that your notation distinguishes, and then choose what symbols to use for each pitch pitch-change. Transposition uses your defined pitches: \transpose bes, c \music takes the difference between your pitch bes and your pitch c and shifts every pitch in \music by that amount. If the resulting pitches have an alteration with an entry in the glyph-name-alist, that symbol is printed. A missing entry generates a warning. You can put as many alterations in glyph-name-alist as you like.

Arrow notation and transposition for quarter tones

Arrows

The standard way to create an arrow is to combine a line with an arrow-head glyph.

However the line and the glyph will not follow the same scale when the global-staff-size changes.

Here's a markup function that helps create ready-to-use arrows without this problem.

The syntax is \arrow #'type #'fletching #'axis #'direction #'length #'boldness.

Example (at default global-staff-size):

\markup{
  \scale #'(1.8 . 1.8) \arrow #"open" ##f #Y #UP #3 #0.14
}

gives the same output as

\markup{
  \combine \fontsize #5 \arrow-head #Y #UP ##f
  \override #'(thickness . 2.4) \draw-line #'(0 . -5.4)
}

The arrows below are shown with optimal boldness (the one each arrow type was designed for).

Arrows

Arrows-line function with text spanners

use arrow line function (with rotation) for describe an expression or glissando

Arrows-line function with text spanners

Associate drumnotes with custom NoteHead stencils

This snippet shows how to associate drum-notenames with custom stencils which will automagically be used as the standard notehead for the assigned drumnote.

In your ly-code you need to have these stencils defined. A simple example can be found in this snippet. Additionally there are two more examples used in this snippet for demonstration.

The second step is to customise the list (stencil-mapping) where the drumnotes are assigned to new stencils. List only those drumnotes you want to have displayed with your own notehead and be sure to put the full notename, not its abbreviation, e.g. 'bassdrum will work, 'bd won't.

Off course this will also work with custom drumstyle-Tables and, if used, with custom drum-notenames.

Associate drumnotes with custom NoteHead stencils

Associating lyrics with voices in \ChoirStaff

If you use ChoirStaff and set lyrics with explicit durations (instead of using \lyricsto), then you have to use \set associatedVoice to associate the lyrics with the correct voices.

Associating lyrics with voices in \ChoirStaff

Asymmetric slurs

Slurs can be made asymmetric to match an asymmetric pattern of notes better.

Asymmetric slurs

autochange music with a different pitch

The \autochange command usually allows to switch staves when reaching the middle C. However, here is a way to specify a different pitch as the "turning point".

autochange music with a different pitch

Automatic beam subdivisions

Beams can be subdivided automatically. By setting the property subdivideBeams, beams are subdivided at beat positions (as specified in baseMoment).

Automatic beam subdivisions

Automatic beams two per two in 4/4 or 2/2 time signature

In a simple time signature of 2/2 or 4/4, 8th notes are beamed by default as two sets of four.

Using a macro which overrides the autobeaming behavior, this snippet changes the beaming to quarter note beats.

Automatic beams two per two in 4/4 or 2/2 time signature

Automatic click track

Here is a simple function to automatically add a MIDI click track to any music expression, without altering the graphical output.

Automatic click track

Automatic Fretboards Barre

When automatic fretboards are used, barre indicators will be drawn whenever one finger is responsible for multiple strings.

If no finger indications are given in the chord from which the automatic fretboard is created, no barre indicators will be included, because there is no way to identify where barres should be placed.

Automatic Fretboards Barre

Automatic scaling of cadenza-like patterns in metered music

This snippet demonstrates how a (fairly simple) Scheme function may be used similarly to \scaleDurations, to automatically scale all durations in a given music expression to make it fit inside a target duration.

This is especially useful in polyphonic music where one voice has to play a cadenza-like melody while other voices go on providing a regular accompaniment in standard meter, as illustrated in this example from Chopin’s Nocturne op.15 n°2.

Automatic scaling of cadenza-like patterns in metered music

Automatic slash for slashedGrace and acciaccatura

By default, LilyPond adds a slash to slashedGrace and acciaccatura only in the case of a single grace note, but not when dealing with a group of beamed grace notes. This function automatically adds slashes in those other cases.

Automatic slash for slashedGrace and acciaccatura

Automatic spacing behavior

By default, LilyPond takes stem directions and head positions into account to correctly handle optical spacing. This feature is what makes LilyPond-engraved scores so beautiful to see, to read, and to play :-)

Automatic spacing behavior

Automatically adding fingering diagrams for tin whistle

These functions may be used to automatically add fingering diagrams and reformatted note names to tin whistle music, with the whistle referred to being the common D whistle.

The fingering diagram function makes no attempt to deal with alternate fingerings. It is strictly one diagram per note, doing a fairly simple, straight forward one to one substitution.

The reformatted note names are in line with what I'm told the local tin whistle players expect - the lower octave being printed in upper case, and the upper octave printed in lower case with a plus sign underneath the note name, with the topmost D getting 2 plus signs.

Typically I use this code in combination with the tiedNoteToSkip function from http://lsr.di.unimi.it/LSR/Item?id=760 to avoid having the note name printed again for a tied note. Simply use each function as described in their descriptions, and (so far, at least) they work just fine with each other.

Automatically adding fingering diagrams for tin whistle

Automatically adjusting lyric placement for natural note spacing

This snippet gets rid of uglinesses in note spacing caused by lyrics. By default, LilyPond always puts a lyric word exactly centered under the note it attaches to. When there is a long lyric word, LilyPond reserves space between notes so that there will be no collisions in the lyrics. However, this can lead to uneven note spacing. This snippet completely removes the presence of lyrics in note spacing so that it is natural according to the note lengths, and uses a spacing algorithm that shifts lyrics automatically in order to avoid collisions.

Automatically adjusting lyric placement for natural note spacing

Automatically change durations

shiftDurations can be used to change the note lengths of a piece of music.

It takes two arguments – the scaling factor as a power of two, and the number of dots to be added as a positive integer.

Automatically change durations

Automatically changing the stem direction of the middle note based on the melody

LilyPond can alter the stem direction of the middle note on a staff so that it follows the melody, by adding the Melody_engraver to the Voice context.

The context property suspendMelodyDecisions may be used to turn off this behavior locally.

Automatically changing the stem direction of the middle note based on the melody

Automatically coloring grobs to indicate when their direction has been manually set

When editing a piece of music, it can be helpful to see when the directions of slurs, stems, or other grobs have been manually set (as opposed to being automatically set by LilyPond). This snippet changes the color of grobs when their direction has been manually set. Red indicates up, and blue indicates down. It can be applied to all grobs, or just to certain types of grob (i.e. just Slur, or just Slur and TextScript).

Automatically coloring grobs to indicate when their direction has been manually set

Automatically convert beams [ ] into slurs ( ) to indicate melisma

Traditionally, vocal scores used beams to indicate melisma, while modern vocal scores tend to use slurs. With this snippet's \beamsToSlurs music function you can easily produce either type of output from the same music input, allowing you to have both traditional and modern vocal engraving with one unique source. The function automatically converts manually typeset beams: [ ] ...into slurs: ( ).

Automatically convert beams [ ] into slurs ( ) to indicate melisma

Automatically creating a drone part from a given melody

If you want to automatically create a "drone part" to go with a melody (for example, for a MIDI file of bagpipe music) you can use the \dronify music function in this snippet.This function takes two arguments, a drone pitch and a melody, and returns the melody as follows:(1) the pitch of each note is changed to the drone pitch,(2) ties are added between all the notes for a continuous drone sound,(3) rests in the melody are mirrored by rests in the drone part.

Automatically creating a drone part from a given melody

Automatically display key names above key signatures

This snippet automatically displays the name of the key above the key signature. This is helpful when learning the key signatures, or to easily see whether a key is major, minor, or modal (dorian, phrygian, lydian, etc.). It works by creating a custom key signature engraver.

Automatically display key names above key signatures

Avoiding collision in single staff polyphony

When you typeset some polyphonic music on a single staff, especially when you have different dotted note heads, you sometimes meet collision between note heads, and don't want them to merge automatically. Using \override NoteColumn #'force-hshift = #X.Y allows you to separate these colliding note heads, inserting the appropriate amount of blank space (X.Y) between them.

Avoiding collision in single staff polyphony

Avoiding collisions with chord fingerings

Fingerings and string numbers applied to individual notes will automatically avoid beams and stems, but this is not true by default for fingerings and string numbers applied to the individual notes of chords. The following example shows how this default behavior can be overridden.

Avoiding collisions with chord fingerings

Bach's Accent steigend and Accent fallend

In the "15 Inventions and 15 Symphonies" (aka "Two- and Three-Part Inventions"), Bach uses an articulation sign, called "Accent steigend" or "Accent fallend," to indicate a grace-like note ascending or descending to the articulated note. The sign is placed about where the head of a grace note would go. It looks like a large backwards comma, or small left parenthesis. This articulation occurs in Inventio 3, shown in the third bar of the example. I defined a variable, \BachAccentFallendFromGrace that modifies an appropriately placed grace note to look like the Accent fallend. The Accent steigend should have the vertical placement adjusted slightly differently.

Bach's Accent steigend and Accent fallend

Background color

Although LilyPond does not allow to specify a background color, it is possible to give the illusion of a colored background by printing a large colored box under the score, as demonstrated here.

Background color

Baroque lute tablature

This snippet shows how to create an 11-choir baroque lute tablature.

It can be adapted to any kind of lute or tunings and with any type of font (e.g. Bravura) for an old looking output.

Midi output and worksheet for guitar transcriptions are also included.

Baroque lute tablature

Baroque Slash ornaments between chords

Slashes between notes of a chord - a Baroque ornament indicating that the lower neighbor notes should be struck almost simultaneously in a light arpeggio.

Baroque Slash ornaments between chords

Basic Grace Echo Purger

One subtype of the 'grace synchronisation issue' is the 'grace echo'. If a score wide collected event comes from at least one voice 'in time' while from one or more other voices it comes 'after the grace notes which do not exist in this/these voice(s)' the resulting grob will be created multiple times.

For metronome marks, bar lines and time signatures a very simple workaround is to just delete these echoed grobs. Here is an engraver which will do this job. Bar lines and time signatures will also be checked for equality and are only removed by this engraver if they are identical.

Additionally, by setting a grob proptery #'keep-grace-echo = ##t you can inhibit this grob removal to obtain a special output.


See also:

Basic Grace Echo Purger

Basic Roman Numeral and Figured Bass Analysis

If you need to create some basic roman numeral and figured bass analysis within the body of a score, you can create a staff with the standard engravers removed and add markup to spaces.

Basic Roman Numeral and Figured Bass Analysis

Beam endings in Score context

Beam-ending rules specified in the Score context apply to all staves, but can be modified at both Staff and Voice levels:

Beam endings in Score context

Beam grouping with non-standard time signatures

There are no default automatic beam groupings specified for a number of non-standard time signatures, including 2/8, 7/8 and 10/8. If automatic beams are required the grouping must be specified using <code>beatStructure</code>. This example groups beams in 7/8 time in the pattern 2-3-2.

Beam grouping with non-standard time signatures

Beams across line breaks

Line breaks are normally forbidden when beams cross bar lines; this behavior can be changed using enabling Beam.breakable.

Beams across line breaks

Beat hints for rhythm

This snippet shows how to print beat hints above a rhytmic staff.

Beat hints for rhythm

bendAfter supports microtonal bends

\bendAfter can be used to create falls and doits. It can also be used with non-integer arguments to create microtonal bends.

bendAfter supports microtonal bends

Blanking staff lines using the \whiteout command

The \whiteout command underlays a markup with a white box. Since staff lines are in a lower layer than most other grobs, this white box will not overlap any other grob.

Blanking staff lines using the \whiteout command

bold tenuto

A tenuto with more thick lines, e.g. for better readability in poor lighting conditions.

Internally a new stencil function is defined for the articulation scripts, which checks the type of articulation. If it's tenuto or portato, the alternate graphic is returned, in all other conditions the basic function ly:script-interface::print is called.

bold tenuto

Book parts

\bookpart can be used to split a book into several parts. Each part last page can be affected by ragged-last-bottom. Header and footer markups can detect a part last page, and make the difference with the book last page.

Book parts

Bracketed accidentals

The code in this snippet defines a new command \bracketAcc to put brackets around an accidental. It also works in chords. Note that you have to use a trailing ‘?’ character after the note in the input to enforce a cautionary accidental.

Bracketed accidentals

Bracketed or parenthesized alternative KeySignature

Sometimes bracketed or parenthesized KeySignatures indicate an alternative key.

The here proposed alternativeKey-function tries to do so.

It takes three arguments: the tonic-pitch of the original key, the tonic-pitch of the alternative key and the scale. An optional argument is provided as well. It determines whether to use brackets or parentheses, possible settings are 'bracketified (default) or 'parenthesized. Other settings will issue a warning and the alternative KeySignature will be printed without any brackets or parentheses.

Limitations

- works only for minor and major, other scales are not supported

- it's not possible to use a different scale for the alternative key

Bracketed or parenthesized alternative KeySignature

Bracketed Passages

Code to make Lilypond draw left and right brackets vertically spanning a staff. This is intended to indicate an optional passage of music.

Bracketed Passages

Brackets indicating "Hauptstimme" and "Nebenstimme"

Brackets indicating "Hauptstimme" and "Nebenstimme" were first used by Arnold Schoenberg, Alban Berg, and Anton Webern. If you want to print them, use the following code. The brackets, defined with postcript, will scale with customized staff-sizes, too.

Brackets indicating "Hauptstimme" and "Nebenstimme"

Breaking vertical alignment of dynamics and textscripts

By default, LilyPond uses DynamicLineSpanner grobs to vertically align successive dynamic objects like hairpins and dynamic text. However, this is not always wanted. By inserting \breakDynamicSpan, which ends the alignment spanner prematurely, this vertical alignment can be avoided.

Breaking vertical alignment of dynamics and textscripts

Breathing signs

Breathing signs are available in different tastes: commas (default), ticks, vees and railroad tracks (caesura).

Breathing signs

Broken Crescendo Hairpin

In order to make parts of a crescendo hairpin invisible, the following method is used: A white rectangle is drawn on top of the respective part of the crescendo hairpin, making it invisible. The rectangle is defined as postscript code within a text markup.

The markup command with-dimensions tells LilyPond to consider only the bottom edge of the rectangle when spacing it against the hairpin. The property staff-padding prevents the rectangle from fitting between the hairpin and staff.

Make sure the hairpin is in a lower layer than the text markup to draw the rectangle over the hairpin.

Broken Crescendo Hairpin

Broken TextSpan for gradual tempo changes on page turns

If you have a tempo change like a ritenuto or accelerando over a system and a page turn, the text on the next page is in parenthesis.

An added level of difficulty is understanding the order of the text in a broken TextSpanner in relation to the code.

Furthermore, a null value, or string with a space (" ") added to the 2nd text right-broken.text overwrites its default value right.text.

And this is especially more common and probable in scores with fewer systems per page, e.g. orchestral scores, music for band.

See Gould, Behind Bars: "Indicating continuing tempo change", page 185.

Broken TextSpan for gradual tempo changes on page turns

Caesura ("railtracks") with fermata

A caesura is sometimes denoted by a double railtracks breath mark with a fermata sign positioned above. This snippet shows an optically pleasing combination of railtracks and fermata.

Caesura ("railtracks") with fermata

Center Lyric Syllables (ignoring punctuation)

When a lot of verses have the same text, but with difference punctuation, e.g. because some verses are in quotation marks, it looks awkward because the text doesn't line up vertically. Even when there is only a single verse, it can look awkward to have the punctuation be included in the width of the syllable when centering it beneath the note. Settings for 'self-alignment-X and lyricMelismaAlignment are respected.

It looks much nicer to center the text of the syllable and then put the punctuation around it.

Center Lyric Syllables (ignoring punctuation)

Center text below hairpin dynamics

This example provides a function to typeset a hairpin (de)crescendo with some additional text below it, such as molto or poco. The added text will change the direction according to the direction of the hairpin. The Hairpin is aligned to DynamicText.

The example also illustrates how to modify the way an object is normally printed, using some Scheme code.

Center text below hairpin dynamics

Centered measure numbers

Scores of large ensemble works often have bar numbers placed beneath the system, centered horizontally on the measure's extent. This snippet shows how the Measure_counter_engraver may be used to simulate this notational practice. Here, the engraver has been added to a Dynamics context.

This snippet presents a legacy method: starting from LilyPond 2.23.3, \set Score.centerBarNumbers = ##t is enough.

Centered measure numbers

Centering a stencil on another stencil

If you want to re-position a stencil so that it is centered relative to another stencil, on the X axis, the Y axis, or both, you can use the "center-stencil-on-stencil" function from this snippet.

Centering a stencil on another stencil

Centering markup on note heads automatically

For technical reasons, text scripts attached to note heads cannot easily be centered on a note head's width, unlike articulations.

Instead of using trial-and-error offset tweaks, this snippet uses a Scheme engraver to reset the horizontal parent of each markup to a NoteColumn. This also allows text to follow note heads which have been shifted via force-hshift.

Centering markup on note heads automatically

Changing \flageolet mark size

To make the \flageolet circle smaller use the following tweak.

As of 2.23.12 the \flageolet is smaller by default, thus this snippet will be deleted with next LSR upgrade.

Changing \flageolet mark size

Changing \partCombine texts

When using the automatic part combining feature, the printed text for the solo and unison sections may be changed.

Changing \partCombine texts

Changing a single note's size in a chord

Individual note heads in a chord can be modified with the \tweak command inside a chord, by altering the font-size property.

Inside the chord (within the brackets < >), before the note to be altered, place the \tweak command, followed by font-size and define the proper size like #-2 (a tiny note head).

Changing a single note's size in a chord

Changing beam knee gap

Kneed beams are inserted automatically when a large gap is detected between the note heads. This behavior can be tuned through the auto-knee-gap property. A kneed beam is drawn if the gap is larger than the value of auto-knee-gap plus the width of the beam object (which depends on the duration of the notes and the slope of the beam). By default auto-knee-gap is set to 5.5 staff spaces.

Changing beam knee gap

Changing beam thickness and spacing

To make beams thicker or thinner alter the Beam.beam-thickness property. To adjust the spacing between beams alter the Beam.length-fraction property.

Changing beam thickness and spacing

Changing breathe marks to markup text

Other snippets show how to replace a breathe symbol by some other symbol. This snippet extends that idea by:

In this example the breathe symbol is replaced by the comma character from the Helvetica font. This character is enlarged and slightly raised using the \raise markup function.

Changing breathe marks to markup text

Changing chord separator

The separator between different parts of a chord name can be set to any markup.

Changing chord separator

Changing form of multi-measure rests

If there are ten or fewer measures of rests, a series of longa and breve rests (called in German Kirchenpausen - church rests) is printed within the staff; otherwise a simple line is shown. This default number of ten may be changed by overriding the expand-limit property.

Changing form of multi-measure rests

Changing fret orientations

Fret diagrams can be oriented in three ways. By default the top string or fret in the different orientations will be aligned.

Changing fret orientations

Changing MIDI output to one channel per voice

When outputting MIDI, the default behavior is for each staff to represent one MIDI channel, with all the voices on a staff amalgamated. This minimizes the risk of running out of MIDI channels, since there are only 16 available per track.

However, by moving the Staff_performer to the Voice context, each voice on a staff can have its own MIDI channel, as is demonstrated by the following example: despite being on the same staff, two MIDI channels are created, each with a different midiInstrument.

Changing MIDI output to one channel per voice

Changing ottava text

Internally, \ottava sets the properties ottavation (for example, to 8va or 8vb) and middleCPosition. To override the text of the bracket, set ottavation after invoking \ottava.

Short text is especially useful when a brief ottava is used.

Changing ottava text

Changing properties for individual grobs

The \applyOutput command allows the tuning of any layout object, in any context. It requires a Scheme function with three arguments.

Changing properties for individual grobs

Changing stanza fonts

Fonts can be changed independently for each stanza, including the font used for printing the stanza number.

Changing stanza fonts

Changing stems direction without affecting rests

Here is how to change the stems direction without affecting rests.

Changing stems direction without affecting rests

Changing text and spanner styles for text dynamics

The text used for crescendos and decrescendos can be changed by modifying the context properties crescendoText and decrescendoText.

The style of the spanner line can be changed by modifying the 'style property of DynamicTextSpanner. The default value is 'dashed-line, and other possible values include 'line, 'dotted-line and 'none.

Changing text and spanner styles for text dynamics

Changing the ambitus gap

It is possible to change the default gap between the ambitus noteheads and the line joining them.

Changing the ambitus gap

Changing the appearance of a slur from solid to dotted or dashed

The appearance of slurs may be changed from solid to dotted or dashed.

Changing the appearance of a slur from solid to dotted or dashed

Changing the appearance of forced, cautionary and suggested accidentals

Normally accidentals are printed automatically where needed, but it is also possible to force them to be printed. A reminder accidental can be forced by adding an exclamation mark after the pitch. A cautionary accidental (i.e. an accidental within parentheses) can be obtained by adding a question mark after the pitch.

The size of cautionary accidentals can be changed and the parentheses removed if required.

Suggested accidentals are a part of ancient music (known as annotational accidentals) and are printed above the note. Their size can also be changed and paretheses added if desired.

Changing the appearance of forced, cautionary and suggested accidentals

Changing the appearance of the number of Clef Modifier

How to change the size or shape of the small eight (or whatever number) appears in the ClefModifier.

Changing the appearance of the number of Clef Modifier

Changing the breath mark symbol

The glyph of the breath mark can be tuned by overriding the text property of the BreathingSign layout object with any markup text.

Changing the breath mark symbol

Changing the chord names to German or semi-German notation

The english naming of chords (default) can be changed to german (\germanChords replaces B and Bes with H and B) or semi-german (\semiGermanChords replaces B and Bes with H and Bb).

Changing the chord names to German or semi-German notation

Changing the default bar lines

Default bar lines can be changed when re-defined in a score context.

Changing the default bar lines

Changing the default text font family

The default font families for text can be overridden with make-pango-font-tree.

Changing the default text font family

Changing the font to small caps

The font can be changed to small caps.

Changing the font to small caps

Changing the interval of lines on the stave

staffLineLayoutFunction is used to change the position of notes. This snippet shows setting its value to ly:pitch-semitones in order to produce a chromatic scale with the distance between each space and line of the stave equal to one semitone.

Changing the interval of lines on the stave

Changing the number of augmentation dots per note

The number of augmentation dots on a single note can be changed independently of the dots placed after the note.

Changing the number of augmentation dots per note

Changing the number of lines in a staff

The number of lines in a staff may changed by overriding the StaffSymbol property line-count.

Changing the number of lines in a staff

Changing the positions of figured bass alterations

Accidentals and plus signs can appear before or after the numbers, depending on the figuredBassAlterationDirection and figuredBassPlusDirection properties.

If plus signs appear after the number, specially designed glyphs are provided for some figures.

Changing the positions of figured bass alterations

Changing the size of a staff with a music function

To change the size of an individual staff, you would \set the fontSize property of the Staff context, and \override the 'staff-space, and 'thickness properties of the StaffSymbol.

This snippet shows how to simplify this process by defining a music function called staffSize. It works as a macro and sets each of these three properties for you. (It can actually be used in any context that has a font size engraver, not just Staff contexts.)

If you want to resize all the staves in the file (and all the text as well), a simpler way is to use #(set-global-staff-size xx).

Changing the size of a staff with a music function

Changing the size of layout objects

The font-size property can be set directly, so that only certain layout objects are affected.

Changing the size of layout objects

Changing the size of note heads

It is possible to change the fontsize of note heads.

Changing the size of note heads

Changing the size of woodwind diagrams

The size and thickness of woodwind diagrams can be changed.

Changing the size of woodwind diagrams

Changing the staff size

Though the simplest way to resize staves is to use #(set-global-staff-size xx), an individual staff's size can be changed by scaling the properties 'staff-space and fontSize.

Changing the staff size

Changing the tempo without a metronome mark

To change the tempo in MIDI output without printing anything, make the metronome mark invisible.

Changing the tempo without a metronome mark

Changing the text for sustain markings

Staff.pedalSustainStrings can be used to set the text used for pedal down and up. Note that the only valid strings are those found in the list of pedal glyphs - the values used this snippet constitute an exhaustive list.

Changing the text for sustain markings

Changing the tuplet number

By default, only the numerator of the tuplet number is printed over the tuplet bracket, i.e., the numerator of the argument to the \tuplet command.

Alternatively, num:den of the tuplet number may be printed, or the tuplet number may be suppressed altogether.

Changing the tuplet number

Changing the width of ledger lines

If you want to modify the width of ledger lines (for example to make them wider) you can do this by overriding the values of LedgerLineSpanner.length-fraction and (optionally) LedgerLineSpanner.minimum-length-fraction.

Changing the width of ledger lines

Changing the width of ledger lines for a group of notes

If you want to temporary modify the width of ledger lines you have to specify \stopStaff \startStaff before overriding the ledger line values.

Changing the width of ledger lines for a group of notes

Changing time signatures inside a polymetric section using \scaleDurations

The measureLength property, together with measurePosition, determines when a bar line is needed. However, when using \scaleDurations, the scaling of durations makes it difficult to change time signatures. In this case, measureLength should be set manually, using the ly:make-moment callback. The second argument must be the same as the second argument of \scaleDurations.

Changing time signatures inside a polymetric section using \scaleDurations

Chant or psalms notation

This form of notation is used for Psalm chant, where verses aren't always the same length.

Chant or psalms notation

Chord glissando in tablature

Slides for chords are indicated by default in both Staff and TabStaff.

String numbers are necessary for TabStaff because automatic string calculations are different for chords and for single notes.

Chord glissando in tablature

Chord name exceptions

The property chordNameExceptions can be used to store a list of special notations for specific chords.

Chord name exceptions

chord name major7

The layout of the major 7 can be tuned with majorSevenSymbol.

chord name major7

Chord names alternative

Chord names are generated from a list of pitches. The functions which construct these names can be customised.

Here are shown chords following Ignatzek (pp. 17-18, 1995), used by default since LilyPond 1.7.20, compared with an alternative Jazz chord notation and Harald Banter's (1987) notation. A smaller font is used in the latter case, as these tend to be overly verbose.

This mirrors the mechanism originally used in early LilyPond versions (pre-1.7); not having been properly maintained, however, some features have been lost (mainly chord exception lists) and bugs have been introduced.

Chord names alternative

Chord Names and Lyrics without a Staff

To create a song sheet with only chord symbols and lyrics, it is not recommended to use Lilypond but to use a tool specifically designed for the task such as GuitarTeX. There are ways to make Lilypond produce such output, however. One approach is to use the \Devnull context.

Chord Names and Lyrics without a Staff

Chord names, lyrics and blank staff

In order to print a part with chord names, lyrics and a blank musical staff, use the \hideNotes command with other overrides as necessary. This example shows the original melody and the blank-staff version.

Chord names, lyrics and blank staff

Chord with ties and interval bigger than a fifth (tie fix)

Ties in three or more note chords, on legerlines and interval of a fifth or more.

The tie/s encroach upon the note column space, when they shouldn't.

Gould, p. 64, ex. (a) shows tie not going to centre of notehead, where notehead is and there's an interval bigger than a fifth.

This is bug issue 1126 Tie positioning not as expected.

Chord with ties and interval bigger than a fifth (tie fix)

ChordChanges for FretBoards

FretBoards can be set to display only when the chord changes or at the beginning of a new line.

ChordChanges for FretBoards

ChordNames in a ChordMarkup-context

Sometimes the possibility to enter chords not using the default ChordNames-context, but as text only is requested.

This snippets provides some code to do so.

Obvious disadvantages are missing midi and it's not transposable.

ChordNames in a ChordMarkup-context

Chords entry - simultaneous notes

A chord is formed by a enclosing a set of pitches in < and >. A chord may be followed by a duration, and a set of articulations, just like simple notes

Chords entry - simultaneous notes

Chords headword

.

Chords headword

Chords with one normal note head and multiple small note heads

I have encountered music in the wild where the primary voice is joined by a bunch of sub-voices. In this particular instance, this is notated as a set of chords, where the note head of the primary voice is in a normal font, but the note heads for the other voices are in a smaller font.

My solution is to make a scheme music function which modifies all chords that it is given such that the first pitch specified in the chord uses the normal font, and all other pitches are tweaked to use a font size two smaller.

Problems: This does not properly resize accidentals attached to the smaller note heads.

Chords with one normal note head and multiple small note heads

Chords with stretched fingering for FretBoards and TabVoice

Sometimes chords with a stretched fingering are required. If not otherwise specified the context-property maximumFretStretch is set to 4, though. Resulting in a warning about "No string for pitch ..." and the note is omitted. You may set maximumFretStretch to an approppriate value or explecitely assign string-numbers to all notes of a chord.

Chords with stretched fingering for FretBoards and TabVoice

Circle of Fifths

There is no problem, just a solution ;-)

This is just a gimmick: a circle of fifths drawn with Lilypond.

Usage:

\QuiZi

or if you want to change size and position:

\markup \move-and-scale \QuiZi #0.8 #40

Circle of Fifths

Circled numbers for live electronics

When dealing with live electronics notation, it's common to use circled numbers (with or without a description of the electronic effect) at the cue places. This type of notation is particularly common in pieces in which the instrumentalist uses a MIDI footpedal to activate events, though might be used in a wider context.

Circled numbers for live electronics

Circled pattern markup

Syntax is \markup\circled-pattern #'radius #'angle #'repeat 'sign (or letter, or glyph)

Circled pattern markup

Clarinet fingering chart and tablatures

[Note that recent LilyPond versions come with built-in woodwind diagram support.]

This snippet defines a new \clarTab markup command to draw tablatures for the clarinet.

The syntax is

\clarTab twelfthKey? holes keysByFinger

with

Here is a list of all strings for '(fingerName . noteName) pairs accepted (note that all altered notes are defined with a sharp):

To see all keys unpressed, specify a dummy value for the noteName, like in 13:

\clarTab ##t #'() #'(("Rlittle" . "") ("Llittle" . "")
                     ("Rfore" . "")("Lfore" . "")
                     ("Rring" . "")("Lring" . ""))

Eventually, you can specify the size of the clarinet tablature by writing at the begining of the .ly file:

clarTabScale = #x

By default x=1. Specifying other values multiplies the size by x.

Example: clarTabScale = #1.5

Clarinet fingering chart and tablatures

Clef change at the beginning of a piece

When changing the clef at the beginning of the first measure, Lilypond just changes the clef for the staff. This is how to keep the staff clef and add an extra clef after the time signature and before the first note.

Clef change at the beginning of a piece

Clef change at the beginning of a piece (alternative)

When changing the clef at the beginning of the first measure, Lilypond just changes the clef for the staff. This is how to keep the staff clef and add an extra clef after the time signature and before the first note.

Clef change at the beginning of a piece (alternative)

Clef, key and time signature in square brackets

For critical editions, objects like clefs, key or time signatures sometimes need to be written in parentheses to indicate they are missing from the autograph. This can be achieved by simply wrapping the bracketify-stencil function around the object's stencil function. By using \once \override, the effect can be applied to just one clef/key/time signature; by using \override it applies to the whole piece.

Clef, key and time signature in square brackets

Clefs

The clef indicates which lines of the staff correspond to which pitches. The clef is set with the \clef command:

         { c''2 \clef alto g'2 }

Supported clefs include:

treble, violin, G, G2
G clef on 2nd line

alto, C
C clef on 3rd line

tenor
C clef on 4th line.

bass, F
F clef on 4th line

french
G clef on 1st line, so-called French violin clef

soprano
C clef on 1st line

mezzosoprano
C clef on 2nd line

baritone
C clef on 5th line

varbaritone
F clef on 3rd line

subbass
F clef on 5th line

percussion
percussion clef

tab
tablature clef

By adding _8 or ^8 to the clef name, the clef is transposed one octave down or up, respectively, and _15 and ^15 transposes by two octaves. The argument clefname must be enclosed in quotes when it contains underscores or digits. See the last two bars for an example.

Clefs

Clefs can be transposed by arbitrary amounts

Clefs can be transposed by arbitrary amounts, not just by octaves.

Clefs can be transposed by arbitrary amounts

Clip systems

This code shows how to clip (extract) snippets from a full score.

This file needs to be run separately with -dclip-systems; the snippets page may not adequately show the results. The result will be files named base-from-start-to-end[-count].eps.

If system starts and ends are included, they include extents of the System grob, e.g., instrument names.

Grace notes at the end point of the region are not included.

Regions can span multiple systems. In this case, multiple EPS files are generated.

Clip systems

Clusters

Clusters are a device to denote that a complete range of notes is to be played.

Clusters

Coda ahead of a line of its own

Here the coda is simply engraved as a new score.

Coda ahead of a line of its own

Color Gradient using Postscript

Lilypond has no way of creating color gradients. This markup function duplicates the path markup, converts it to postscript and uses postscript's rectclip to crop the duplicates, then colors each one a step to create a smooth gradient. The variable 'res' defines the resolution of the gradient. A larger number here makes the gradient smoother, but takes longer to compile. Bigger gradients and larger paths will need a larger resolution to look smooth.

It has NOT been tested with relative path commands.

Color Gradient using Postscript

Colored arrow

This snippet demonstrates drawing colored arrows in a score, e.g. for analysis purposes. These arrows have a fixed length and angle. If you prefer arrows that adapt to layout changes, please also have a look at snippet 962.

Colored arrow

Colored arrows (alternative method)

This snippet demonstrates drawing colored arrows in a score, e.g. for analysis purposes. These arrows will adapt to layout changes, because they are made of spanners between (invisible) note heads. If you need arrows with a fixed length and angle, you might prefer Snippet 961.

Colored arrows (alternative method)

Colored background

For analysis purposes, it could be helpful to put a colored background behind some notes.

Colored background

Colored background for markup text

The \whiteout command puts a white background behind a given markup text.

This snippet shows an easy way to do this with any color.

White text on black background can simply be created by \with-color #white \on-color #black

Colored background for markup text

Colored boxes around / behind notes

For analysis purposes, it can be useful to mark themes, motifs etc.

This snippet demonstrates some tricks for drawing colored boxes around/behind notes.

It is based on the code of snippet 960: http://lsr.di.unimi.it/LSR/Item?id=960

Colored boxes around / behind notes

Colored notes with black outlines, colors based on note name and alteration

This scheme function can be used to produce colored note heads that have a black outline.

The colors are automatically applied based on a given note's name and also (optionally) its alteration (natural, sharp, flat, double sharp, double flat).

Colored notes with black outlines, colors based on note name and alteration

Coloring elements of notation

Individual objects may be assigned colors. Several pre-defined colors are available; they are exhaustively listed in the Notation Reference.

Coloring elements of notation

Coloring grobs and notational elements using a sophisticated music function

Some scholarly or ‘urtext’ editions use grey color to indicate editorial additions. I find this very elegant, so I wrote a function to easily use this in a score. Instead of writing \override [Context.]Grob.color = #grey …some music… \revert [Context.]Grob.color, it allows to simply write \ed [Context.]Grob [#color] { …some music } (or omit the {}, if it’s only for one note or rest). Note that in v2.18 there is a shortcoming here: a single rest or multi measure rest will need to be enclosed in braces. This doesn’t hold anymore with v2.19, at the least since 2.19.8.

The color may be optionally specified to use another than the default color (defined as editorsColor).

In order to conveniently address more complex notational elements (and to save typing with long grob names), the function also permits using shortcuts such as \ed Note { …some music } . Some are predefined, but others may be easily added.

Coloring grobs and notational elements using a sophisticated music function

Coloring individual staff lines

Staff lines can be colored independently by overriding the default stencil for StaffSymbol.

The StaffSymbol callback color-staff-lines takes a set of colors (using LilyPond's predefined colors or the functions x11-color and rgb-color) which are applied to each staff line in turn starting with the fifth line (for a standard staff), or each item in the list for custom staves defined with line-positions. To signal that a particular line between colored lines should remain black, use #f.

Coloring individual staff lines

Coloring notes depending on their pitch

It is possible to color note heads depending on their pitch and/or their names: the function used in this example even makes it possible to distinguish enharmonics.

Coloring notes depending on their pitch

Coloring notes depending on their pitch (alternate version)

It is possible to color note heads depending on their pitch and/or their names: the function used in this example even makes it possible to distinguish enharmonics.

This is an alternate version of the original snippet found here: http://lsr.di.unimi.it/LSR/Item?id=572 This version achieves the same result by using different code that some may find easier to understand. (It uses case rather than an association list to assign the colors.)

Coloring notes depending on their pitch (alternate version)

Coloring objects

LilyPond gives you the ability to assign different colors to any grob in your score, such as NoteHeads, Alterations, Beams and so on, by simply overriding the #'color property and choosing your color (as explained in the Notation Reference, it is possible to obtain about any color).

Coloring objects

Coloring staves

The following example demonstrates how to print individual staves with a colored background.

Coloring staves

Coloring successive intervals

This scheme engraver searches for specified successive intervals in a voice, e.g. a minor third. If the interval occurs somewhere, the note heads of both notes defining the interval are colored. The engraver can be added to every Voice context.

Usage: \color_interval_engraver #intervaldefs #debug? #intervals-given

intervaldefs: alist containing information about semitonical distances for certain intervals, diatonical distance is calculated in the engraver using `string-diatonic-semi-tonic-list`, relying on the key.

debug?: (optional) boolean, if true, output information about the processed pitches

intervals-given: list of the form


#`((interval1 ,dir1 enh1 ,color1)
   (interval2 ,dir2 enh2 ,color2)
    ...
   (intervalN ,dirN enhN ,colorN))
with

intervalN: string - specifying the interval to search after

dirN: integer - UP (=1) DOWN (=-1) or 0 (up and down)

enhN: boolean - search for enharmonically equivalent intervals, too?

colorN: lilypond color value, see NR A.7. Example:

\layout {
   \context {
     \Voice
     \consists \color_interval_engraver #intervaldefs
       #`(("2--" ,UP #f ,green)
          ("3+" ,DOWN #t ,blue))
   }
}
Debug mode:

With debug? set to #t, the engraver does output

Warnings:

The engraver tries to provide helpful warning messages when fed with invalid input or if other issues prevent the engraver from working correctly.

Some examples:

Coloring successive intervals

Combining a time signature glyph and a default time signature

In mensural notation, you can find double time signatures, such as mensural 6/4 followed by the classical time signature 3/2 (in ternary white notation for instance). This scheme function, adapted from the http://lsr.di.unimi.it/LSR/Item?id=192 snippet, allows you to do so.

The glyph argument is the name of the glyph in the Feta font. This means that in fact this function can include any glyph. The baseline-skip value can be adjusted to your needs, as well as the font-size specifications.

Combining a time signature glyph and a default time signature

Combining beam and slur in one keystroke

If a vocal part contains many short note values and melismata, and melismata are shown by both beams and slurs, there are many instances of d([ b)] for example. To save tedious keystrokes, it’s very convenient to redefine [ and ] so they provoke both the beam and the slur. Alternatively, the slurs may be omitted as in the second example, to avoid misinterpretations (performers might take the slur as an indication for dynamics and articulation, even if it’s only intended to provide information on melismata) or to get a clearer, less crowded look.

Combining beam and slur in one keystroke

Combining dynamics with markup texts

Some dynamics may involve text indications (such as più forte or piano subito). These can be produced using a \markup block.

Combining dynamics with markup texts

Combining pedal notes with clef changes

In piano music, you may occasionally come across a staff in which a held (pedal) note is followed by a clef change and further polyphonic notation.

With a little bit of work involving clef settings, you can overcome this problematic situation.

In the first figure, we can see that a clef change in one voice messes with the pedal note in a lower voice; the tie appears to have changed voices.

You can create a fake treble clef which has the properties of a bass clef by overriding the following properties:

\set Staff.clefGlyph = #"clefs.G" - show a G clef

\set Staff.clefPosition = #-2 - set the staff position two half spaces below centre line (i.e., on G)

\set Staff.middleCPosition = #6 - set middle C to the same position as a bass clef

The second figure shows the solution as applied to the final bar of a Wolf lied. The pedal note E flat is followed by a treble clef and a high octave E flat. Since we are effectively still in the bass clef, we have to input the octave E flat as an octave G to produce the required output. Using \tag splits the musical layout and MIDI so you can use \keepWithTag #'midi in a MIDI \score block.

The third figure shows a more extended example from Debussy's L'Isle joyeuse in which the bass clef is faked.

Finally, the fourth figure shows the same Debussy excerpt with an additional feature you may encounter: the pedal note is preceded by a small cautionary clef printed after the barline.

Combining pedal notes with clef changes

Combining two parts on the same staff

The part combiner tool (i.e., the \partCombine command) allows the combination of several different parts on the same staff. Text directions such as solo or a2 are added by default; to remove them, simply set the property printPartCombineTexts to #f.

For vocal scores (hymns), there is no need to add solo/a2 texts, so they should be switched off. However, it might be better not to use them if there are any solos, as they won't be indicated. In such cases, standard polyphonic notation may be preferable.

This snippet presents the three ways two parts can be printed on a same staff: standard polyphony, \partCombine without texts, and \partCombine with texts.

Combining two parts on the same staff

Compare and adjust parts with different volta settings to create a score

If you have a set of parts to build a score, but they differ in the \repeat volta and \alternative layout, it is a good idea to display them parallel in one score, but still isolated.

This is achieved by moving a couple engravers from the Score context to the Staff context.

Compare and adjust parts with different volta settings to create a score

Compilation error on music overflow

When you have multiple overflowing measures, the music flows off the page. This snippet forces an error when this happens by checking the width of each system and checking it against the paper width.

Compilation error on music overflow

Complex compound time signatures

This snippets implements complex compound time signatures (e.g. (1+3)/8 or (1+3)/8 + 2/4). The function \compoundMeter (defined in the snippet) can be used instead of \time to create those time signatures. The argument is a Scheme list of lists. Each list describes one fraction, with the last entry being the denominator, while the first entries describe the summands in the enumerator. If the time signature consists of just one fraction, the list can be given directly, i.e. not as a list containing a single list. For example, a time signature of (3+1)/8 + 2/4 would be created as \compoundMeter #'((3 1 8) (2 4)), and a time signature of (3+2)/8 as \compoundMeter #'((3 2 8)) or shorter \compoundMeter #'(3 2 8). The beat structure (and thus the automatic beaming) will be derived from the given meter automatically.

Complex compound time signatures

Compound time signatures

Odd 20th century time signatures (such as 5/8) can often be played as compound time signatures (e.g. 3/8 + 2/8), which combine two or more inequal metrics.

LilyPond can make such music quite easy to read and play, by explicitly printing the compound time signatures and adapting the automatic beaming behavior.

Compound time signatures

Conducting signs, measure grouping signs

Beat grouping within a measure is controlled by the beatStructure context property. Values of beatStructure are established for many time signatures in file scm/time-signature-settings.scm. Values of beatStructure can be changed or set with \set. Alternatively, \time can be used to both set the time signature and establish the beat structure. For this, you specify the internal grouping of beats in a measure as a list of numbers (in Scheme syntax) before the time signature.

\time applies to the Timing context, so it will not reset values of beatStructure or baseMoment that are set in other lower-level contexts, such as Voice.

If the Measure_grouping_engraver is included in one of the display contexts, measure grouping signs will be created. Such signs ease reading rhythmically complex modern music. In the example, the 9/8 measure is grouped in two different patterns using the two different methods, while the 5/8 measure is grouped according to the default setting in scm/time-signature-settings.scm:

Conducting signs, measure grouping signs

Connecting groups of beamed notes with a single beam

Groups of beamed notes can be connected with a settable number of beams using the stemRightBeamCount and stemLeftBeamCount properties.

Connecting groups of beamed notes with a single beam

Consecutive tremolos

Typing music for many consecutive tremolos with the same base duration becomes tedious. This is a function to make this easier.

By default LilyPond does not unfold tremolo repeats for midi. A function for unfolding only tremolo repeats is also included.

Consecutive tremolos

Consistently left-aligned bar numbers

When left-aligning bar numbers, overlapping problems may occur with staff brackets.

The snippet solves this by keeping the first bar number right-aligned that follows a line break.

Consistently left-aligned bar numbers

Contemporary glissando

A contemporary glissando without a final note can be typeset using a hidden note and cadenza timing.

Contemporary glissando

Contemporary glissando 2

A contemporary glissando without a final note can be typeset using a hidden note and duration scaling.

Contemporary glissando 2

Controlling beam damping

The angle (damping) of the beams can be modified. In the following example, various settings are demonstrated.

Controlling beam damping

Controlling formatting of prefatory items

This example demonstrates how to place prefatory items (such as the clef and key signature) at the end of a line.

Controlling formatting of prefatory items

Controlling of the pitch range in a score

Here is a set of 4 functions to check or modify the pitch range in a piece of music.

  \correctOctave
  \correctOctaveOutOfRange
  \colorizeOutOfRange
  \parenthesizeOutOfRange

Here is the code of each Staff.

  \music                                 % staff 1
  \correctOctave #'above g'' \music      % staff 2
  \correctOctave #'below g' \music       % staff 3
  \correctOctaveOutOfRange g' g'' \music % staff 4
  \colorizeOutOfRange g' g'' \music      % staff 5
  \parenthesizeOutOfRange g' g'' \music  % staff 6

Controlling of the pitch range in a score

Controlling spanner visibility after a line break

The visibility of spanners which end on the first note following a line break is controlled by the after-line-breaking callback ly:spanner::kill-zero-spanned-time.

For objects such as glissandos and hairpins, the default behaviour is to hide the spanner after a break; disabling the callback will allow the left-broken span to be shown.

Conversely, spanners which are usually visible, such as text spans, can be hidden by enabling the callback.

Controlling spanner visibility after a line break

Controlling the appearance of tremolo slashes

Using various properties of the StemTremolo grob it is possible to control the appearance of tremolo slashes.

Controlling the appearance of tremolo slashes

Controlling the placement of chord fingerings

The placement of fingering numbers can be controlled precisely. For fingering orientation to apply, it must be used within a chord construct <code>&lt;...&gt;</code>, even for single notes. Orientation for string numbers and right-hand fingerings may be set in a similar way.

Controlling the placement of chord fingerings

Controlling the vertical ordering of scripts

The vertical ordering of scripts is controlled with the 'script-priority property. The lower this number, the closer it will be put to the note. In this example, the TextScript (the sharp symbol) first has the lowest priority, so it is put lowest in the first example. In the second, the prall trill (the Script) has the lowest, so it is on the inside. When two objects have the same priority, the order in which they are entered determines which one comes first.

Controlling the vertical ordering of scripts

Controlling the vertical ordering of scripts (2)

The vertical ordering of scripts can be either tweaked with the 'script-priority or the 'outside-staff-priority property. The lower this number the closer it will be put to the note.

Controlling the vertical ordering of scripts (2)

Controlling tuplet bracket visibility

The default behavior of tuplet-bracket visibility is to print a bracket unless there is a beam of the same length as the tuplet.

To control the visibility of tuplet brackets, set the property bracket-visibility to either #t (always print a bracket), if-no-beam (only print a bracket if there is no beam) or #f (never print a bracket). The latter is in fact equivalent to omitting the TupletBracket object altogether from the printed output.

Controlling tuplet bracket visibility

Cow and ride bell example

Two different bells, entered with 'cb' (cowbell) and 'rb' (ridebell).

Cow and ride bell example

Creating "real" parenthesized dynamics

Although the easiest way to add parentheses to a dynamic mark is to use a \markup block, this method has a downside: the created objects will behave like text markups, and not like dynamics.

However, it is possible to create a similar object using the equivalent Scheme code (as described in the Notation Reference), combined with the make-dynamic-script function. This way, the markup will be regarded as a dynamic, and therefore will remain compatible with commands such as \dynamicUp or \dynamicDown.

Creating "real" parenthesized dynamics

Creating a custom clef glyph

This snippet shows how to print a new clef glyph - here an old style bass clef - with a path encoding (support svg output).

Creating a custom clef glyph

Creating a delayed turn

Creating a delayed turn, where the lower note of the turn uses the accidental, requires several overrides. The outside-staff-priority property must be set to #f, as otherwise this would take precedence over the avoid-slur property. Changing the fractions 2/3 and 1/3 adjusts the horizontal position.

Creating a delayed turn

Creating a Schenker Graph

The music theorist Heinrich Schenker created a method of analysing tonal music using, what are now known as Schenker graphs or diagrams. These use normal musical notation in non-standard ways.

Major problems creating a Schenker graph with lilypond are:

  1. Precise alignment of notes between staves needed,
  2. Note heads, stems, beams etc are used to notate musical structure not rhythm,
  3. A note head may have more than one stem or none,
  4. Slurs may be nested arbitrarily and can connect to both left and right of the same note head,
  5. Harmonic connection lines may be drawn between staves.

Solutions:

  1. By default all notes are eight notes and the (invisible) time signature is 1/8. A missing note head is implemented as a transparent note rather than a skip.
  2. Most grobs are, by default, invisible. Each staff is structured as a series of layers, implemented as voices, containing all the notes, NoteCollision #'merge-differently-headed is set to true. Note heads are only visible in the notes voice, note heads are determined by setting NoteHead #'duration-log.
  3. Harmonic connections are implemented by a note followers in separate layers.

Creating a Schenker Graph

Creating a sequence of notes on various pitches

In music that contains many occurrences of the same sequence of notes at different pitches, the following music function may prove useful. It takes a note, of which only the pitch is used.

This example creates the rhythm used throughout Mars, from Gustav Holst's The Planets.

Creating a sequence of notes on various pitches

Creating a short ossia section with lyrics

In vocal scores for a chorus the music for the soloists is sometimes omitted. In such cases a vocal cue can be inserted as a short ossia section.

Creating a short ossia section with lyrics

Creating arbitrary lines following notes across staves

In the snippet, you'll see that "s2" was used instead of "r2" as a placeholder to space it out a little bit. VoiceFollower ignores this -- when r2 was used it would try to draw a line from the rest to the note head, while philosophically interesting would be wrong.

Creating arbitrary lines following notes across staves

Creating arpeggios across notes in different voices

An arpeggio can be drawn across notes in different voices on the same staff if the Span_arpeggio_engraver is added to the Staff context:

Creating arpeggios across notes in different voices

Creating blank staves

To create blank staves, generate empty measures then remove the Bar_number_engraver from the Score context, and the Time_signature_engraver, Clef_engraver and Bar_engraver from the Staff context.

Creating blank staves

Creating chord rhythm guides

In some jazz, pop, and rock lead sheets, complex chord rhythms are clarified with some small notes below the chords demonstrating the rhythm. This behavior can be easily implemented by creating a RhythmicStaff and copying the rhythms directly.

Creating chord rhythm guides

Creating clarinet fingering symbol

This draws a symbol for clarinet fingering indications (e.g., microtonal scales, multiphonic sounds).

Usage : \clFinger arg1 arg2 arg3 arg4 arg5 arg6 arg7 arg8 arg9 arg10 arg11 arg12 arg13 arg14 arg15 arg16 arg17 arg18

All args are numbers with values of 0 or 1 except the last one which can be 0, 1, 2, 3, 4, 12, 13, 14, 23, 24, 34, 123, 124, 134 or 234

Creating clarinet fingering symbol

Creating cross-staff arpeggios in a piano staff

In a PianoStaff, it is possible to let an arpeggio cross between the staves by setting the property PianoStaff.connectArpeggios.

Creating cross-staff arpeggios in a piano staff

Creating cross-staff arpeggios in other contexts

Cross-staff arpeggios can be created in contexts other than GrandStaff, PianoStaff and StaffGroup if the Span_arpeggio_engraver is included in the Score context.

Creating cross-staff arpeggios in other contexts

Creating custom dynamics in MIDI output

The following example shows how to create a dynamic marking, not included in the default list, and assign a specific value to it so that it affects MIDI output.

The dynamic mark \rfz gets value 0.9.

Creating custom dynamics in MIDI output

Creating custom key signatures

LilyPond supports custom key signatures. In this example, print for D minor with an extended range of printed flats.

Creating custom key signatures

Creating double-digit fingerings

Creating fingerings larger than 5 is possible.

Creating double-digit fingerings

Creating fret diagrams with chord names but no staff/staves using fret diagram markup

This snippet shows how to create fret diagrams with chord names but no staff/staves, for a fret diagram which is not one of the predefined fretboard diagrams i.e. with the fret diagrams specified using fret diagram markup.

The first example in the "Fret diagram markups" section of the "Notation Reference" (http://lilypond.org/doc/v2.18/Documentation/6f/lily-b213fdb4.ly) is defined using fret diagram markup, so I have used that example as the basis for this snippet. Hence, this is also an example of how to remove the staff (and all things in the staff) from the first example in the "Fret diagram markups" section of the "Notation reference".

For more info, please see:

Creating fret diagrams with chord names but no staff/staves using fret diagram markup

Creating guitar scales on fretboards

This snippet creates fretboards with guitar scales.

The syntax is

\scale-diagramm #'( (string1 fret1) (string2 fret2) ... ) #notesinscale #size

For example for a c pentatonic scale (first six notes)

\scale-diagramm #'((5 3) (5 5 ) (4 3) (4 5) (3 2) (3 5)) #5 #1.5

you can wrap this up in a markup command for building up a list of scales

cpenta = \markup \scale-diagramm #'((5 3) (5 5 ) (4 3) (4 5) (3 2) (3 5)) #5 #1.5

and use it like this

c^\cpenta d f g a c

The snippet doesn't show it, but the (1) position of the scale is inverted

Creating guitar scales on fretboards

Creating harp glissandi

You can notate an ad lib. harp glissando in LilyPond using transparent NoteHeads with no ledger lines.

Creating harp glissandi

Creating jazz-style repeats

In response to a request for jazz-style repeats, where there is a number in the middle of the bar which indicates how many bars to repeat, with a heavy horizontal bar on either side of the number, Robin Bannister provided this snippet.

Creating jazz-style repeats

Creating keyboard diagrams with chords or scales

For use in education a scheme function to display chords on a keyboard have been created.

The function is called 'keys' and it takes a list of note names as its argument. For example

\keys #'(c e g bes)

wil create a C7 chord

So far the following note names are accepted:

c, cis, des, d, ....., ais, bes, b, c', cis', des', ...., bes', b', c''

The function can be wrapped up in a markup command like this

cnine=\markup\keys #'(c e g bes d')

and be used like this

\relative c' { < c e g bes d' >^\cnine }

Creating keyboard diagrams with chords or scales

Creating metronome marks in markup mode

New metronome marks can be created in markup mode, but they will not change the tempo in MIDI output.

Creating metronome marks in markup mode

Creating music sheet with blank piano staves

To create a piano music sheet with blank staves, use a Piano template, generate empty measures then remove the Bar_number_engraver from the Score context, and the Time_signature_engraver, (optionally the Clef_engraver) and Bar_engraver from the Staff context.

Creating music sheet with blank piano staves

Creating music with Scheme (music box)

This example shows how to repeat the same rhythm with different pitches. As an example the whole prelude in C major of Bach's Well-Tempered Klavier 1 is included. See comments in the snippet to see how it is used.

Creating music with Scheme (music box)

Creating slurs across voices

In some situations, it may be necessary to create slurs between notes from different voices. The solution is to add invisible notes to one of the voices, using \hideNotes.

This example is measure 235 of the Ciaconna from Bach's 2nd Partita for solo violin, BWV 1004.

Creating slurs across voices

Creating text spanners

The \startTextSpan and \stopTextSpan commands allow the creation of text spanners as easily as pedal indications or octavations. Override some properties of the TextSpanner object to modify its output.

Creating text spanners

Cross-staff arpeggio brackets

By default, the arpeggioBracket shortcut only works at a Voice level. As a consequence, if you need to print cross-staff arpeggios, it will not work (as demonstrated in the first measure of this example); here is a way to make it work (demonstrated in the second measure).

Cross-staff arpeggio brackets

Cross-staff chords - beaming problems workaround

Sometimes it is better to use stems from the upper staff for creating cross-staff chords, because no problems with automatic beam collision avoidance then arise. If the stems from the lower staff were used in the following example, it would be necessary to change the automatic beam collision avoidance settings so that it doesn't detect collisions between staves using \override Staff.Beam.collision-voice-only = ##t

Cross-staff chords - beaming problems workaround

Cross-staff stems

This snippet shows how to use Span_stem_engraver and \crossStaff to connect stems across staves automatically.

The stem length need not be specified, as the variable distance between noteheads and staves is calculated automatically. However, it is important that \crossStaff is applied to the correct voice or staff (i.e., on the opposite side of where a beam is or would be positioned) to get the desired effect.

Cross-staff stems

Cross-staff tremolos

Since \repeat tremolo expects exactly two musical arguments for chord tremolos, the note or chord which changes staff within a cross-staff tremolo should be placed inside curly braces together with its \change Staff command.

Cross-staff tremolos

Crossing staves

This snippet demonstrates how to create various types of staves where their lines actually cross other staves.

Crossing staves

Cue with lyrics

Making a cue containing lyrics. This is just a combination of solutions from the Notation Reference.

Cue with lyrics

Curly bracket with variable length (path)

Curly bracket (or flat brace).

Curly bracket with variable length (path)

Curly end barline

Curly end barline supports svg output.

Curly end barline

Curved arrow

Markup function to draw a curved arrow with variable dimension.

Syntax is \curvedArrow #'length #'height #'X-strait_length.

Curved arrow

Custodes

Custodes may be engraved in various styles.

Custodes

Custom tuning and MIDI rendering

For custom tuning in MIDI output, you define both the pitches of the basic scale (c d e f) and the pitch change for each alteration. Both the basic scale and the alteration contribute to the pitch adjustment in the MIDI output.

MIDI implements tuning as a "pitch-bend" adjustment from equal-temperament, changing with every note. Each MIDI channel has its own pitch-bend. You can put each voice on a separate MIDI channel, so each voice can have an independent pitch-bend.

You can use Scheme expressions to generate the pitches and alterations, or you can type the pitches as a list of numbers, in terms of cents or semitones.

Here is an example where you can hear the difference between quarter-comma meantone, 24-tone equal-temperament, etc.

Custom tuning and MIDI rendering

Customising note heads

There are two things you need to do to create arbitrary noteheads: <p>1. change the NoteHead stencil to the text-interface. <p>2. define the text attribute of the NoteHead. It accepts any markup. The easiest thing to do is to simply call a musicglyph, as in this example.

Customising note heads

Customized accidentals

The following example shows how to obtain customized alterations. It is achieved in three steps:

Such accidentals can be used to print semitones instead of the default LilyPond glyphs.

Customized accidentals

Customized drum notation in printed and MIDI output

Customized drum pitch names (suitable for a custom drum style, for example) may be used both in printed and MIDI output by defining such variables as drumPitchNames, drumStyleTable and midiDrumPitches, as demonstrated here.

In short, this snippet

Customized drum notation in printed and MIDI output

Customizing Chord Symbols - Global

To make global changes to chord symbols, you can re-define the chord-symbol markup as described in the Notation Reference, then define <code>chordNameExceptions = #chExceptions</code> in a <code>\layout</code> block.

Customizing Chord Symbols - Global

Customizing fretboard fret diagrams

Fret diagram properties can be set through 'fret-diagram-details. For FretBoard fret diagrams, overrides are applied to the FretBoards.FretBoard object. Like Voice, FretBoards is a bottom-level context, and therefore can be omitted in property overrides.

Customizing fretboard fret diagrams

Customizing individual staff lines

This snippet is a near-exact copy of snippet #700 (Coloring individual staff lines).

It allows you to provide separate functions for drawing each staff line. #f will draw the staff line normally.

Customizing individual staff lines

Customizing markup fret diagrams

Fret diagram properties can be set through 'fret-diagram-details. For markup fret diagrams, overrides can be applied to the Voice.TextScript object or directly to the markup.

Customizing markup fret diagrams

Customizing the chord grid style

Custom divisions of chord squares can be defined through the measure-division-lines-alist and measure-division-chord-placement-alist properties of ChordSquare. These are both alists. Their keys are measure divisions, namely lists which give the fraction of the measure that each chord (or rest, or skip) represents. More precisely, a measure division alist is made of positive, exact numbers adding up to 1, for example: '(1/2 1/4 1/4). The exactness requirement means that, e.g., 1/2 is valid but not 0.5.

The values in measure-division-lines-alist are lists of lines, which are represented as (x1 y1 x2 y2). The line starts at the point (x1 . y1) and ends at (x2 . y2). Coordinates are expressed in the [-1, 1] scale relative to the extent of the square.

The values in measure-division-chord-placement-alist are lists of (x . y) pairs giving the placement of the respective chords.

This example defines a peculiar chord grid style that has a rule for measures divided in three equal parts.

Customizing the chord grid style

Customizing the no-chord symbol

By default, rests in a <code>ChordNames</code> context cause the <q>N.C.</q> symbol to be printed. This markup can be customized.

Customizing the no-chord symbol

Customizing the position and number of dots in repeat sign bar lines

If you want to customize the position and/or number of dots in repeat sign bar lines, you can define new custom bar lines or redefine the way default repeat signs are drawn. This snippet shows how. This may be particularly helpful when using a staff with custom line-positions, as shown in this snippet.

Customizing the position and number of dots in repeat sign bar lines

Damping sign using a balloon help

Without a breakable line.

Damping sign using a balloon help

Damping sign using a glissando

With breakable glissando.

Damping sign using a glissando

Dashed individual staff lines

You can customize a staff so that some (or all) of its lines are dashed instead of solid. This snippet defines a music function called "dashedStaffSymbolLines" that replaces specified lines of a StaffSymbol with dashed lines. For example, the following will replace the center line of the staff with a dashed line:

\dashedStaffSymbolLines #'( #f #f #t #f #f )

A list containing booleans (#t and #f) indicates which lines are to be dashed. (#t means dashed, #f means normal and unchanged)

The width of the dashes and the spacing between them can optionally be customized by adding a pair of values as the first argument when calling the function. The first number of the pair is the width, the second is the spacing. (The default is 0.5 for both.) The following will create wider dashes (1.5) with more space between them (1.2):

\dashedStaffSymbolLines #'(1.5 . 1.2) #'(#f #f #t #f #f)

The function also works with staves that have different numbers of lines and/or different line positions.

Dashed individual staff lines

Dashed slurs indicating optional slurs between lyric lines

This is a technique that may aid in typesetting verses with very similar melodies stacked on top of each other. Dashed slurs can be used to indicate that two notes are sung separately in one verse and slurred together in another.

Notice that the slurred notes are declared twice: once in the main voice and again in the second voice, where they are hidden. It is these two hidden notes that are connected with a dashed slur, leaving the notes in the main voice free to align with any lyrics. The thickness of the slur is also increased, to aid visibility.

To align the lyrics to the correct notes, place \skip instructions where lyrics should not be placed. The snippet demonstrates that in the \lyricsto mode durations are ignored, so the argument to the \skip command is arbitrary; it will always skip the next note opportunity.

Ideally, this solution can be developed into a music function of its own that takes the notes to be slurred as an argument.

Dashed slurs indicating optional slurs between lyric lines

Default direction of stems on the center line of the staff

The default direction of stems on the center line of the staff is set by the Stem property neutral-direction.

Default direction of stems on the center line of the staff

Define shorthand for text spanner, like rit. or rall.

To obtain a textual indication like "rit." or "rall." followed by a dashed line, you have to first set bound-details.left.text. However, it is easy to define a shorthand to both set the text and start the text spanner.

Define shorthand for text spanner, like rit. or rall.

Defining a Custom Staff Context

Instead of having to type the same customization commands every time you need to use a particular type of staff, you can define a custom staff context and use it instead. For example, instead of typing:

\new Staff \with { ... }

You would type:

\new MyCustomStaff

A custom staff context can have any customizations that you would use in a Staff's \with block. (Tip: the custom staff's definition can be saved in a file that you \include, so you do not have to re-create it every time it is needed.) (At time of writing, Notation Reference 5.1.6 shows how to create a custom voice context, but there is no example of how to create a custom staff context, hence this snippet.)

Defining a Custom Staff Context

Defining a Custom Staff Context

Instead of having to type the same customization commands every time you need to use a particular type of staff, you can define a custom staff context and use it instead. For example, instead of:

\new Staff \with { ... }

You would use:

\new MyCustomStaff

A custom staff context can have any customizations that you would use in a Staff's \with block. Note that the custom staff's definition can be saved in a file that you \include, so you do not have to re-create it every time it is needed.

Defining a Custom Staff Context

Defining an engraver in Scheme: ambitus engraver

This example demonstrates how the ambitus engraver may be defined on the user side, with a Scheme engraver. This is basically a rewrite in Scheme of the code from lily/ambitus-engraver.cc.

Defining an engraver in Scheme: ambitus engraver

Defining predefined fretboards for other instruments

Predefined fret diagrams can be added for new instruments in addition to the standards used for guitar. This file shows how this is done by defining a new string tuning and a few predefined fretboards for the Venezuelan cuatro.

This file also shows how fingerings can be included in the chords used as reference points for the chord lookup, and displayed in the fret diagram and the TabStaff, but not the music.

These fretboards are not transposable because they contain string information. This is planned to be corrected in the future.

Defining predefined fretboards for other instruments

Demo MidiInstruments

Problem: How to know which midiInstrument would be best for your composition?

Solution: A LilyPond demo file.

Demo MidiInstruments

Demonstrating all headers

A demonstration of all headers.

Demonstrating all headers

Demonstrating LilyPond support for figured bass

This snippet demonstrates how figured bass is supported in LilyPond. In addition to the numerous BassFigure objects available, you can always use text markups instead to get precisely what you need.

All of these examples are to be found in the relevant sections of the Notation Reference, where you will learn how to add a figured bass with simple but powerful notation.

Demonstrating LilyPond support for figured bass

Demonstrating the power and flexibility of the \markup function

Here are some examples of how various markup texts can be obtained with LilyPond syntax. You won't probably be needing all of them in a standard score, but hey, you never know...

Demonstrating the power and flexibility of the \markup function

Different font size settings for instrumentName and shortInstrumentName

Choose different font sizes for instrumentName and shortInstrumentName as a context override.

Different font size settings for instrumentName and shortInstrumentName

Differently colored note heads in one staff

Note head coloring for better readability of different (transposed) instruments in one staff, to keep track of chord changes.

Differently colored note heads in one staff

Direction of merged 'fa' shape note heads

Using property NoteCollision.fa-merge-direction, the direction of fa shape note heads (fa, faThin, etc.) can be controlled independently of the stem direction if two voices with the same pitch and different stem directions are merged. If this property is not set, the down glyph variant is used.

Direction of merged 'fa' shape note heads

Disabling the TAB symbol at the beginning of a TabStaff

To remove the TAB symbol at the beginning of a TabStaff simply override the 'stencil property of the Clef object.

Disabling the TAB symbol at the beginning of a TabStaff

Display bracket with only one staff in a system

If there is only one staff in one of the staff types ChoirStaff or StaffGroup, by default the bracket and the starting bar line will not be displayed. This can be changed by overriding collapse-height to set its value to be less than the number of staff lines in the staff.

Note that in contexts such as PianoStaff and GrandStaff where the systems begin with a brace instead of a bracket, another property has to be set, as shown on the second system in the example.

Display bracket with only one staff in a system

Displaying a whole GrandStaff system if only one of its staves is alive

In orchestral scores sometimes single or groups of instruments are silent for a while and their staves can be removed for that time (with \removeEmptyStaves).

When they play again it is often preferred to show the staves of all instruments of such a group. This can be done adding the Keep_alive_together_engraver in the grouper (e.g., a GrandStaff or a StaffGroup).

In the example the violins are silent in the 2nd system and in the 3rd system. Only the first violin plays the last measure but the staff of the second violin is also displayed.

Displaying a whole GrandStaff system if only one of its staves is alive

Displaying all grob-properties and there actual value

Sometimes you may want to know all properties and their value for a certain grob. The here provided function is a possibility. Afaict, following comment is not true (any more?), will delete soon --Harm: Known limitation: it doesn't work for NoteHead. The output is like:

for this coding: \new ChordNames \chordmode { \grobPropertiesInfo #'ChordName c1:m7 }

Displaying all grob-properties and there actual value

Displaying bar lines on lyrics

You can move Bar_engraver and Span_bar_engraver to a different engraving context, if you want, for example, bar lines on lyrics.

Displaying bar lines on lyrics

Displaying bar numbers on a separate staff

Defines the BarNumberStaff context, to be used as a more prominent measure counter in between of staff groups in large scores.

Displaying bar numbers on a separate staff

Displaying bar numbers on all measures

By default, bar numbers are printed only in the first measure.

This setting can be overridden so that bar numbers appear on every measure.

Displaying bar numbers on all measures

Displaying bar numbers only when point-and-click is enabled

Bar numbers are useful for editing, but for some types of music (such as hymns) should normally be removed completely. To make editing easier without requiring extra file modifications at production-time, this small Scheme function changes bar number visibility based on the point-and-click LilyPond option. When point-and-click is enabled, bar numbers are printed for every bar, but they have zero extent so that they are "invisible" to the layout engine; while this is ugly (remember, this is for score-debugging only), it should result in the development and production scores having identical spacing.

Displaying bar numbers only when point-and-click is enabled

Displaying complex chords

Here is a way to display a chord where the same note is played twice with different accidentals.

Displaying complex chords

Displaying grob ancestry

When working with grob callbacks, it can be helpful to understand a grob's ancestry. Most grobs have parents which influence the positioning of the grob. X- and Y-parents influence the horizontal and vertical positions for the grob, respectively. Additionally, each parent may have parents of its own.

Unfortunately, there are several aspects of a grob's ancestry that can lead to confusion:

For example, the System grob can be both parent (on the Y-side) and grandparent (twice on the X-side) to a VerticalAlignment grob.

This macro prints (to the console) a textual representation of a grob's ancestry.

When called this way:

{ \once \override NoteHead.before-line-breaking = #display-ancestry c }

The following output is generated:

NoteHead
X,Y: NoteColumn
     X: PaperColumn
        X,Y: System
     Y: VerticalAxisGroup
        X: NonMusicalPaperColumn
           X,Y: System
        Y: VerticalAlignment
           X: NonMusicalPaperColumn
              X,Y: System
           Y: System

Displaying grob ancestry

Displaying the exact extent of a system

If you want to see exactly what amount of space takes your system, you can display it by overriding the <code>stencil</code> property in the <code>System</code> context: as you can see here, the system size is determined by including every postscript element such as slurs or key symbol.

Displaying the exact extent of a system

Displaying the version number with conditionals (if then) using Scheme

Thanks to its implementation of GUILE, LilyPond makes high level functionalities relatively easy to accomplish. <p>In this example, the title will mention the current version (i.e. the version the snippet was compiled with, regardless which version was originally used).

Displaying the version number with conditionals (if then) using Scheme

Distancing an accidental from the note using the right padding property

It is possible to distance an accidental from the note head by setting suitably the right-padding property of AccidentalPlacement.

Distancing an accidental from the note using the right padding property

Distancing the metronome sign

If you're not happy with the distance of the metronome sign from the score, you can alter its position using the padding property of MetronomeMark.

Distancing the metronome sign

Divisiones

Divisiones are gregorian variants of breathing signs. Choices are divisioMinima, divisioMaior, divisioMaxima and finalis, virgula and caesura.

Divisiones

Dodecaphonic staff

This twelve-note staff demonstrates a contemporary notation described by Erv Wilson. It works similarly to a piano keyboard: black notes are on the lines and white notes are in the spaces. Though such notation does not have to be microtonal, some quarter-tones have been added to show that they still work. Ledger lines do not follow the same pattern as the staff lines. Here they have been made as thin as possible for now; a better hack would be to draw them a bit higher, so that they're above the note head for C. (And draw them a bit lower below the staff so that the first one's under B.) Improvements are welcome.

Dodecaphonic staff

Dodecaphonic staff with accurate ledger lines

This twelve-note staff demonstrates a contemporary notation described by Erv Wilson. It works similarly to a piano keyboard: black notes are on the lines and white notes are in the spaces. Ledger lines follow the same pattern as the staff lines. Though such notation does not have to be microtonal, some quarter-tones have been added to show that they still work. Improvements are welcome.

Dodecaphonic staff with accurate ledger lines

Dotted harmonics

Artificial harmonics using \harmonic do not show dots. To override this behavior, set the context property harmonicDots.

Dotted harmonics

Double bar line as system start

A double bar line as system start may be printed as demonstrated here.

Double bar line as system start

Draw a box spanning multiple staves

This snippet shows how to draw markers/boxes around objects on different staves.

Syntax is

  ^\markup\myMarker #width #height

or

  ^\markup\myBox #width #height

Draw a box spanning multiple staves

Draw a bracket spanning multiple staves

This snippet shows how to draw a bracket around objects on different staves.

Syntax is

  ^\markup\openBracket #width #height

and

  ^\markup\closeBracket #width #height

Draw a bracket spanning multiple staves

Drawing a keyboard with scalable size and correct positions of the black keys

Often people think that the black keys are centered to the white keys.

Even in piano teaching books keyboards are drawn this way.

Black keys are positioned surprisingly excentric, though.

Creating keyboard diagrams with chords or scales inspired me to draw a keyboard with following features:

- scalable

- correct positioning of the black keys

- entering of notes which are represented by dots

Drawing a keyboard with scalable size and correct positions of the black keys

Drawing an accordion standard stradella bass system

Lilypond has amazing drawing capabilities. This example demonstrates how to draw a Stradella bass system as described here Stradella bass system.

The Buttons Ab , C and E are marked.

To mark a specific button by outlining it, enter its row and column number:

first number: column (0=Beses , 19=A#)

Second number: row (1=diminished chord, 2=7th chord, 3=minor chord, 4=major chord, 5=root note, 6=counter bass note)

If the parameters are outside this range no button is outlined.

Change the scale factor to a number you like.

Usage: \markup \scale #'(0.75 . 0.75) \accordion-bass #4 #2

Drawing an accordion standard stradella bass system

Drawing boxes around grobs

The print-function can be overridden to draw a box around an arbitrary grob.

Drawing boxes around grobs

Drawing circles around note heads

Here is how to circle a note.

Drawing circles around note heads

Drawing circles around various objects

The \circle markup command draws circles around various objects, for example fingering indications. For other objects, specific tweaks may be required: this example demonstrates two strategies for rehearsal marks and measure numbers.

Drawing circles around various objects

Drawing skyline outline

<p>By setting the 'debug-skylines Scheme property, you can turn your score into a nice funky artwork :-)</p> <p>More seriously, drawing this skyline can be helpful to debug spacing and collision issues. (Still, it does make your score pretty; so just try it, no matter how much you really need to...)</p>

Drawing skyline outline

Dynamically Creating Notes with Precise MIDI Velocity Value Control

This is an example how to control MIDI output with precise velocity control. The visible output is wild and has nothing to see; but the MIDI output is usable.

Dynamically Creating Notes with Precise MIDI Velocity Value Control

Dynamics custom text spanner postfix

Postfix functions for custom crescendo text spanners. The spanners should start on the first note of the measure. One has to use -\mycresc, otherwise the spanner start will rather be assigned to the next note.

Dynamics custom text spanner postfix

Dynamics text spanner postfix

Custom text spanners can be defined and used with hairpin and text crescendos. \< and \> produce hairpins by default, \cresc etc. produce text spanners by default.

Dynamics text spanner postfix

Dynamics with attributes aligned on dynamic sign (e.g. "poco f" aligned on "f")

Dynamics like "poco forte" should be aligned on the "forte". In this snippet we define a markup command to align a line-markup on the center of the second. Then we define a new dynamic-script with attributes. Now "poco/meno/silly" "forte" is aligned on "forte". X-offset is tweaked to 0, because otherwise markup halign will not work and so overriding will have no effect. But you can use extra-offset to move the DynamicText.

Dynamics with attributes aligned on dynamic sign (e.g. "poco f" aligned on "f")

Easily enter music expressions in markup

Sometimes it is necessary to add a simple snippet of music into a markup function. Constructing the different notation elements manually can be painful, because of lots of trial-and-error positioning. The \ezscore markup command takes the pain out of manually constructing these music expressions in \markup mode.

When this command is useful:

Basically, \ezscore is a wrapper for the \score markup command that puts everything on a RhythmicStaff, but automatically removes the staff lines, clefs, and time signatures. Why use it? Because it utilizes LilyPond's built-in layout/spacing algorithms, so you can add any other overrides you want, which makes it possible to do things like compressing/expanding the horizontal spacing of notes with \newSpacingSection.


Easily enter music expressions in markup

Easy Gregorian notation

This snippet shows a special notation for easy Gregorian music.

Definitions can be saved as "modernGregorian.ily" in order to be used as \include "modernGregorian.ily"

Syntax is:

\include "modernGregorian.ily"

...

\cadenzaOn \omit Stem 'note'... \melisma { \lst 'note' \mli 'note' \sli 'note' \tli 'note' }

where:

It also includes a simple ornament: 'note' -\tweak extra-offset #'(X . Y) \orn

Known issues:

Easy Gregorian notation

Easy Rhythm Template Creation

Many times a piece will repeat the same rhythm on different notes. This is tedious to write manually. This snippet allows for easy creation of rhythm templates.

Easy Rhythm Template Creation

Editorial headword

<p>NR 1.7 Editorial annotations <p>Beethoven, Op. 31, No. 3<br> Piano sonata 18, Movt. II, Scherzo<br> Measures 9&ndash;14

Editorial headword

Embedding native PostScript in a \markup block

PostScript code can be directly inserted inside a \markup block.

Embedding native PostScript in a \markup block

Encapsulated text

\capsule arg (markup).

Draw a capsule around arg.

Use thickness, x-padding, y-padding and font-size properties to determine line thickness and padding around the markup.

Encapsulated text

Engravers one-by-one

The notation problem, creating a certain symbol, is handled by plugins. Each plugin is called an engraver. In this example, (some) engravers are switched on one by one, in the following order:

- note heads,

- staff symbol,

- clef,

- stem,

- beams, slurs, accents,

- accidentals, bar lines, time signature and key signature.

Engravers are grouped. For example, note heads, slurs, beams, etc., form a Voice context. Engravers for key signature, accidentals, bar line, etc., form a Staff context.

Engravers one-by-one

Engraving music using Scheme expressions

You can engrave music using just Scheme expressions. Although those expressions reflect the inner mechanism of LilyPond, they are rather clumsy to use, so avoid them, if possible.

Engraving music using Scheme expressions

Engraving symmetric or palindromical music

Symmetric, or palindromical music can be produced, first, by printing some music, and second, by printing the same music applying a Scheme function to reverse the syntax.

Engraving symmetric or palindromical music

Engraving ties manually

A single tie may be engraved manually by changing the staff-position property (an offset) of the Tie grob; if there are multiple ties at the same musical moment, they can be adjusted manually by changing the tie-configuration property (a list of offset/direction pairs) of the TieColumn object.

The offset indicates the distance from the center of the staff in half staff spaces, the direction can be either 1 (up) or -1 (down).

Note that LilyPond makes a distinction between exact and inexact values for the offset. If using an exact value (i.e., either an integer or a fraction like (/ 4 5)), the value serves as a rough vertical position that gets further tuned by LilyPond to make the tie avoid staff lines. If using an inexact value like a floating point number, it is taken as the precise vertical position without further adjustments.

Engraving ties manually

Engraving tremolos with floating beams

If a tremolo's total duration is less than a quarter-note, or exactly a half-note, or between a half-note and a whole-note, it is normally typeset with all beams touching the stems. Certain engraving styles typeset some of these beams as centered floating beams that do not touch the stems. The number of floating beams in this type of tremolo is controlled with the 'gap-count property of the Beam object, and the size of the gaps between beams and stems is set with the 'gap property.

Engraving tremolos with floating beams

Entering durations - 1

In Note, Chord, and Lyrics mode, durations are designated by numbers and dots: durations are entered as their reciprocal values. For example, a quarter note is entered using a 4 (since it is a 1/4 note), while a half note is entered using a 2 (since it is a 1/2 note). For notes longer than a whole you must use the variables \longa and \breve

c'\breve
c'1 c'2 c'4 c'8 c'16 c'32 c'64 c'64
r\longa r\breve
r1 r2 r4 r8 r16 r32 r64 r64

Entering durations - 1

Entering durations - 2

If the duration is omitted then it is set to the previously entered duration. The default for the first note is a quarter note.

Entering durations - 2

Entering pitches as a list of semitones

The function presented here maps a list of positive or negative numbers to a musical expression, resulting in a melody where each note differs from the previous one's pitch by the given number of semitones. This may be particularly useful in compositional processes where music input (and particularly pitches) is generated arithmetically or from any number sequence.

Entering pitches as a list of semitones

Entering several tuplets using only one \tuplet command

The property tupletSpannerDuration sets how long each of the tuplets contained within the brackets after \tuplet should last. Many consecutive tuplets can then be placed within a single \tuplet expression, thus saving typing.

There are several ways to set tupletSpannerDuration. The command \tupletSpan sets it to a given duration, and clears it when instead of a duration \default is specified. Another way is to use an optional argument with \tuplet.

Entering several tuplets using only one \tuplet command

Evenly spaced text in a measure

Sometimes, for speaking parts, it is useful to have the text in the measure itself instead of below in a lyrics context.

This is a workaround to achieve that.

Evenly spaced text in a measure

Expressive headword

Expressive headword

Expressive headword

Extended position fingering for string instruments

String instruments (for example the cello) may require special notation for extended fingerings, situations where one finger has to reach beyond its usual pitch in the current position. Some editions indicate that with a tie or a glissando line between the two fingerings, whilst others use a cross mark between the two fingerings. Here is a way to print the latter.

Extended position fingering for string instruments

Extending a TrillSpanner

For TrillSpanner, the minimum-length property becomes effective only if the set-spacing-rods procedure is called explicitly.

To do this, the springs-and-rods property should be set to ly:spanner::set-spacing-rods.

Extending a TrillSpanner

Extending a TrillSpanner (alternate)

This snippet shows how to get a trill span over the last note of a measure.

Extending a TrillSpanner (alternate)

Extending glissandi across repeats

A glissando which extends into several \alternative blocks can be simulated by adding a hidden grace note with a glissando at the start of each \alternative block. The grace note should be at the same pitch as the note which starts the initial glissando. This is implemented here with a music function which takes the pitch of the grace note as its argument.

Note that in polyphonic music the grace note must be matched with corresponding grace notes in all other voices.

Extending glissandi across repeats

Extending Tempo

The Tempo marking may include a markup to create a more complex marking indicating tempo for more complex rythms.

Extending Tempo

Extracting notes inside chords into separate staves

This snippet create a new function to allow the transformation of a polyphonic instrument into several monaural instruments.

The syntax of this function is:

\extractNote #position music

In, for example, , c is in position 1, e in position 2, and g in 3.

In the example below, the first staff is the original music, and the three others have been made with:

\extractNote #3 \music

\extractNote #2 \music

\extractNote #1 \music

Extracting notes inside chords into separate staves

Extracting text from markup

This scheme function extracts a string from markup, removing any formatting information.

Extracting text from markup

Extracting unmodified fragments of a music expression

This snippet provides an \extractMusic function that can be used as follows:
\extractMusic music from during
For example, in the second Staff of the score below, the following has been used :
\extractMusic \music s1 s1*2
This has kept the music beginning after the first measure (i.e., at the second measure) for two measures.

All data (notes, scripts, dynamics and various \overrides) outside this range have been deleted.

Note that this function should also work with multiple voices, \repeat structures etc.

A full and updated version of \extractMusic can be found here. There are some additional useful features and other enhancement functions on that page, with a description of each of them in a small document (in pdf format) with multiple voices, \repeat structures etc.

Extracting unmodified fragments of a music expression

Eyeglasses as markup (path)

To insert alternative eyeglasses into a score (strongly indicating that one should look at the conductor), one has to insert self-defined path code as a markup.

myEyeglasses support svg ouput.

Eyeglasses as markup (path)

Eyeglasses as markup (postscript)

To insert eyeglasses into a score (strongly indicating that one should look at the conductor), one has to insert self-defined postscript code as a markup.

Eyeglasses as markup (postscript)

Faking a hammer in tablatures

A hammer in tablature can be faked with slurs.

Faking a hammer in tablatures

Fancy Glissando

To print a glissando with turning points and/or curves you may want to use the here defined functionality.

For convenience a function to modify the length of the overall glissando is provided as well.

Fancy Glissando

Feathered beams

As explained in the Notation Reference, feathered beams can be obtained by setting the #'grow-direction property; you may also want to use \featherDurations to adjust note durations.

Feathered beams

Feta font chart

This chart shows all articulations or scripts that LilyPond's feta font contains.

Feta font chart

Figured bass headword

Figured bass headword

Figured bass headword

Figured bass with alternate baroque notation

Most renaissance and baroque scores use specific symbols for bass figures, particularly for augmented sixths with a backslash striking only the upper part of the number six (or sometimes the number nine), and "plus" symbols integrated with the number four (and sometimes the numbers two or five as well; this notation may also be used for integrating flat and natural accidentals).

Here is a way to obtain such symbols in the printed output whilst keeping the usual syntax for figured bass entry. This is done not with native MetaFont glyphs, but by combining PostScript code (using Scheme syntax so that SVG output is supported) and additional stencils in markup definitions.

Figured bass with alternate baroque notation

File Information

Display ly file information in markup, including file name, file size, LilyPond version, date processed, time processed, time last modified, and the LilyPond command line.

File Information

Filtering parts from the command line

If you need to create scores for different audiences from the same sources you need to filter the input. The \tag command partially addresses this, but source files have to be changed in order to create different scores. This snippet shows how to use scheme code to filter music expressions, markup expressions, set up header fields and layout context overrides based on a switch passed on the command line.

The basic idea is to use a command line such as lilypond -dtarget=chords -o chords snippet.ly, for example, to build a score emphasizing chords. In the input file several facilities are provided:

Filtering parts from the command line

Fine-tuning manual beaming

By setting the #'beaming property, it is possible to override beaming rules. You may preferably want to use \once when doing so, as this property cannot be shared between objects.

Fine-tuning manual beaming

Fine-tuning pedal brackets

The appearance of pedal brackets may be altered in different ways.

Fine-tuning pedal brackets

Fingering spanner

Draw a line or a dashed line between two fingerings.

Syntax is -\guide (dashed)#t #'(X-start-guide-line-coordinate . Y-start-guide-line-coordinate)-finger-number.

Fingering spanner

Fingering symbols for wind instruments

Special symbols can be achieved by combining existing glyphs, which is useful for wind instruments.

Fingering symbols for wind instruments

Fingering under bow on a trill

Usage as pseudocode: { note [script] \fingertrill [direction] "fingers" }

Fingering under bow on a trill

Fingerings, string indications, and right-hand fingerings

This example combines left-hand fingering, string indications, and right-hand fingering.

Fingerings, string indications, and right-hand fingerings

Flamenco notation

For flamenco guitar, special notation is used:

Most figures use arrows in combination with fingering; with abanicos and rasgueados, noteheads are printed only for the first chord.

This snippet contains some header-like code that can be copied as flamenco.ly and included in source files.

Flamenco notation

Flamenco spanner

This snippet shows how to create a flamenco style spanner (e.g., as in Frederick Noad's book).

Flamenco spanner

Flams, drags and ruffs

Writing a flam, drag, or ruff is pretty easy, but it's just too much typing for such a common ornament. Because the notation of the ornament depends on the note it is attached to, you can't just write it as a simple variable, you need a function. This snippet provides four functions and an example of using them: \flam, \drag,\ruff and the more generic \graceRepeat, also, a improved version of add-grace-property, thanks to David Kastrup.

Just write \flam, \drag, or \ruff, followed by the note you want to attach it to. If you pass it a chord, then the first note in the chord will get the flam. They are typeset as grace notes internally, so if you want to change their appearance, use the usual grace note tweaks.

The more generic \graceRepeat offers the possibility to get grace chords and to specify which number of grace notes you want.

Flams, drags and ruffs

Flat and sharp symbols in text-markups

If you want to use flat or sharp symbols in text, you may want to adjust the horizontal and vertical position of the \flat or \sharp.

Flat and sharp symbols in text-markups

Flat fixed beams

Flat beams at a fixed position.

Flat fixed beams

Flat flags and beam nibs

Flat flags on lone notes and beam nibs at the ends of beamed figures are both possible with a combination of stemLeftBeamCount, stemRightBeamCount, and paired [] beam indicators.

For right-pointing flat flags on lone notes, use paired [] beam indicators and set stemLeftBeamCount to zero (see Example 1).

For left-pointing flat flags, set stemRightBeamCount instead (Example 2).

For right-pointing nibs at the end of a run of beamed notes, set stemRightBeamCount to a positive value. And for left-pointing nibs at the start of a run of beamed notes, set stemLeftBeamCount instead (Example 3).

Sometimes it may make sense for a lone note surrounded by rests to carry both a left- and right-pointing flat flag. Do this with paired [] beam indicators alone (Example 4).

(Note that \set stemLeftBeamCount is always equivalent to \once \set. In other words, the beam count settings are not sticky, so the pair of flat flags attached to the lone c'16[] in the last example have nothing to do with the \set two notes prior.)

Flat flags and beam nibs

Flat Ties

The function takes the default Tie.stencil as an argument, calculating the result relying on the extents of this default.

Further tweaking is possible by overriding Tie.details.height-limit or with \shape. It's also possible to change the custom-definition on the fly.

Flat Ties

Flexible Transposing a whole score

This code shows how to transpose a whole score by changing one single piece of code.

In the code the Scheme function MyTranspose is defined. If you use it in every Voice, you can transpose the whole score just by setting the arguments to the \transpose call within the function definition. As you see in the example this works with transposed voices as well (in the example I've written the Bb-Trumpet pitches as they sound, so they have to be additionaly transposed by \transpose bes c' {...}).

To see the original pitches, you may disable the MyTranspose function by redefining MyTranspose = {}, as shown in the lower part of the snippet.

Flexible Transposing a whole score

Flip

\scale #'(-1 . 1) workaround.

Flip

Flute slap notation

It is possible to indicate special articulation techniques such as a flute tongue slap by replacing the note head with the appropriate glyph. For that we can draw the accent-like note head with \markup.

Flute slap notation

Footnoted header

Footnotes can be created within music expressions and in stand-alone text outside music expressions.

This snippet is a workaround that allows a title, or any other element such as the instrument name, to be footnoted.

Footnoted header

Footnotes / Remarks in the footer

Place a numbered annotation in the footer. First we define a scheme-function to add an annotation (add-foot!) wich adds a markup to a foot-item-list and returns a label-event and a TextScriptEvent. Now we define a music-function, wich utilizes the scheme-function. Then we define a markup-command, wich returns the footnotes/annotations of the current page. Now we can use this markup-command in [odd|even]FooterMarkup in the paper block.

Footnotes / Remarks in the footer

Force a cancellation natural before accidentals

The following example shows how to force a natural sign before an accidental.

Force a cancellation natural before accidentals

Force clef change in alternatives

This snippet shows how to force the appearance of a callback clef during a repeat.

Force clef change in alternatives

Force unparenthesized accidentals

If you want to force an accidental in all accidental styles, you will find situations where LilyPond places a (parenthesized) cautionary accidental instead. Here are three methods how to remove the parenthesis from selected cautionary accidentals, based on an example like this: \partial 4 cis''4( | c'')

Force unparenthesized accidentals

Forcing a clef symbol to be displayed

When a clef sign has already been displayed and it has not been changed to a different clef, then repeating the \clef command will be ignored by LilyPond, since it is not a change of clef. It is possible to force the clef to be redisplayed using the command \set Staff.forceClef = ##t.

Forcing a clef symbol to be displayed

Forcing a note to a particular staff line

Occasionally, it is necessary to move a note's pitch to a certain staff line or space, with no regard to the clef (e.g. to indicate percussion on a non-percussive instrument.) The built-in Pitch_squash_engraver does just that. This snippet provides two Scheme shortcut functions, \squashTo and \middleLine. Don't forget to include the correct engraver in the Voice context.

Forcing a note to a particular staff line

Forcing horizontal shift of notes

When the typesetting engine cannot cope, the following syntax can be used to override typesetting decisions. The units of measure used here are staff spaces.

Forcing horizontal shift of notes

Forcing hyphens to be shown

If LilyPond does not think there is space for a hyphen, it will be omitted. The behaviour can be overridden with the minimum-distance property of LyricHyphen.

Forcing hyphens to be shown

Forcing measure width to adapt to MetronomeMark's width

By default, metronome marks do not influence horizontal spacing.

This can be solved through a simple override, as shown in the second half of the example.

Forcing measure width to adapt to MetronomeMark's width

Forcing rehearsal marks to start from a given letter or number

This snippet demonstrates how to obtain automatic ordered rehearsal marks, but from the letter or number desired.

Forcing rehearsal marks to start from a given letter or number

Forcing systems to fill the whole page

When writing an orchestral score, here is how to force each system to be extended to fill the whole page.

Forcing systems to fill the whole page

Forcing visibility of systems with multi-bar rests when using \RemoveEmptyStaffContext

In an orchestral score, you may find it useful to hide multi-bar rests using \RemoveEmptyStaffContext to produce a Frenched score, but this can prove problematic when you want to make such bars visible.

For example, imagine you are using a PianoStaff for a harp part. When there is music in one stave, you will want both staves to be visible. Of course, adding hidden notes to the invisible staff will make the stave visible, but this is a rather ugly kludge.

A more elegant solution is to use the property keepAliveInterfaces. This determines which items of musical output are interesting enough to keep a bar visible when remove-empty is set. By default, it looks like this:

keepAliveInterfaces = #'( rhythmic-grob-interface lyric-interface stanza-number-interface percent-repeat-interface)

If you insert multi-measure-rest-interface into this list, multi-bar rests count as interesting items. You can then create macros to switch this behaviour on and off as required:

showMultiRests = { \set Staff.keepAliveInterfaces = #'( rhythmic-grob-interface multi-measure-rest-interface lyric-interface stanza-number-interface percent-repeat-interface) }

hideMultiRests = \unset Staff.keepAliveInterfaces

For this to work successfully, you must place these macros carefully, otherwise they tend to interfere with the visibility of other hidden staves.

Forcing visibility of systems with multi-bar rests when using \RemoveEmptyStaffContext

Forcing visibility of the first bar number

The visibility of the first bar number can be forced using an invisible bar line and a little Scheme code.

Forcing visibility of the first bar number

Formatting lyrics syllables

Markup mode may be used to format individual syllables in lyrics.

Formatting lyrics syllables

Free BarNumber - printing the bar numbers whenever you want

It is possible to change the behavior of bar numbers in many ways. However, it requires a certain amount of typing, using the \override command every time a property has to be changed.

In this example, all needed commands have been put in a Scheme music function. Therefore, you can use it as a shortcut, at any time, to print the bar number. If you want to print the bar number in several bars, you can enclose the relevant section in braces {...} so that the function applies to every bars in it.

Free BarNumber - printing the bar numbers whenever you want

Free Meter - increasing the barnumber wherever you want

If you do not want to use lilypond's automatic barlines but rather just insert barlines with \bar, the bar counter will not be increased, and therefore two problems may occur:

This snippet defines a function, \increaseBarNumber that - yeah - increases the barnumber, thereby making accidentals and typeset barnumbers behave correctly. Just call it whenever you insert a manual bar.

Also defines short hand functions \ibar and \nibar - as illustrated by the example.

Free Meter - increasing the barnumber wherever you want

French-style C clef

A custom French-style C clef created with postscript.

French-style C clef

Fret diagrams

Frets are supported as markup commands.

Fret diagrams

Fret diagrams explained and developed

This snippet shows many possibilities for obtaining and tweaking fret diagrams.

Fret diagrams explained and developed

Fretboards alternate tables

Alternate fretboard tables can be created. These would be used in order to have alternate fretboards for a given chord.

In order to use an alternate fretboard table, the table must first be created. Fretboards are then added to the table.

The created fretboard table can be blank, or it can be copied from an existing table.

The table to be used in displaying predefined fretboards is selected by the property \predefinedDiagramTable.

Fretboards alternate tables

Fretted headword

Fretted headword

Fretted headword

Fretted-string harmonics in tablature

The following demonstrates fretted-string harmonics in a tablature.

Fretted-string harmonics in tablature

Full bar rest number only if all voices have rests

If you want to display numbers (including the number 1) on full bar rests, but only if all voices have rests simultaneously, here is a "negative" engraver (or "un-engraver").

The un-engraver removes the rest number grob if there is any note head between the bar lines. To avoid problems with cue notes inside a full measure or multi-measure rest, only noteheads with a minimum size trigger the removal of the full-bar rest numbers.

This display method is often preferred if you display only a sub-score of a piece, for example, a choir score.

Full bar rest number only if all voices have rests

Function to create WYGIWYM-Chord Names

This function is an update to an earlier version which can be found here: http://lists.gnu.org/archive/html/lilypond-user/2009-02/msg00293.html

The function is customised to work with a special font which can also be found in the above link. It shouldn't be too difficult to get the function to work with other fonts.

I created this function because the internal ChordNames context generates chord symbols only by chord entry ( ) which often leads to misinterpretation and strange chord symbols are the result.

What this function basically does is taking note-input and converting it to a lyric-context. For example c-"7" will print C7 chord symbol.

The advantage of this function is that the input can still be transposed before it gets converted, i.e. \transpose c d c-"7" will print D7 chord symbol.

The following entries are possible:

c

→ C

c-"7"

→ C7

→ C/E

-"7"

→ C7/E

r

→ N.C.

s

s-"text"

→ text [not affected by transposition]

and these three additional functions work with any of the above (except for skip)

\parenLeft c

→ (C

\parenRight c

→ C)

\parenBoth c

→ (C)

Function to create WYGIWYM-Chord Names

Functional analysis

Lyric text can be used to display symbols for functional analysis. This snippet shows a few functions that help with the alignment of numbers for options etc.

Functional analysis

Generating custom flags

The stencil property of the Flag grob can be set to a custom scheme function to generate the glyph for the flag.

Generating custom flags

Generating multiple PDFs from one lilypond file (and naming them appropriately)

When you write a large piece including multiple instruments, you probabily also want to generate scores for each instrument. You can make lilypond create multiple PDFs from one .ly file by simply adding mupltiple \book {...} secions in the file. Each such block will be converted into its own PDF, named filename-1.pdf, filename-2.pdf, etc. The \book {..} block typically looks like (note that the \header section needs to come after the score and after a staff, otherwise lilypond will fail with an error message...)
\book {
  \score {
    \new Staff << \va >>
  }
  \header {instrument = "Viola"}
}

To have some control about the naming of the output files, you can use

    #(define output-suffix "VcB")
to define a suffix for the filename. The number will still be added, so the filename for the \book(s) after this definition will be filename-VcB-3.pdf, etc.

Generating multiple PDFs from one lilypond file (and naming them appropriately)

Generating random notes

<p>This Scheme-based snippet generates random notes. Use as</p> <p><code>\randomNotes <i>n</i> <i>from</i> <i>to</i> <i>dur</i></code></p> <p>to generate <i>n</i> random notes between pitches <i>from</i> and <i>to</i>, with duration <i>dur</i>.</p>

Generating random notes

Generating scores within a function

A music-function uses variables at the point where it's invoked; as a result, if variables are then redefined, the same function will then use the same variables with their new value.

This makes it possible to generate scores in a semi-automated way, as demonstrated here.

Generating scores within a function

Generating whole scores (also book parts) in scheme without using the parser

A LilyPond score internally is just a Scheme expression, generated by the LilyPond parser. Using Scheme, one can also automatically generate a score without an input file. If you have the music expression in Scheme, a score can be generated by simply calling

(scorify-music music)

on your music. This generates a score object, for which you can then set a custom layout block with

(let* ((layout (ly:output-def-clone $defaultlayout)))
   ; modify the layout here, then assign it:
   (ly:score-add-output-def! score layout)
  )

Finally, all you have to do it to pass this score to LilyPond for typesetting. This snippet defines functions (add-score score), (add-text text), and (add-music music) to pass a complete score, some markup, or some music to LilyPond for typesetting.

This snippet also works for typesetting scores inside a \book {...} block as well as top-level scores. To achieve this, each score scheduled for typesetting is appended to the list of top-level scores, and the top-level book handler (which is a Scheme function called to process a book once a \book{...} block is closed) is modified to insert all collected scores so far to the book.

Generating whole scores (also book parts) in scheme without using the parser

Ghost voice

This function transforms a simple voice (pitches and durations) into a <q>ghost voice</q> consisting of spacers and durations only (e.g. c2 d e ==> s2 s s). This is very useful for writing simultaneous voice parts where one contains pitches, another dynamics, a third fingering instructions ... This can easily be used to print a score with or without fingerings or other attributes! The ghost music can be written to the log with <code>\displayLilyMusic \ghostMusic</code> followed by the music to be transformed.

Ghost voice

Glissandi can skip grobs

NoteColumn grobs can be skipped over by glissandi.

Glissandi can skip grobs

Glissando

Between notes, there may be simple glissando lines. Here, the first two glissandi are not consecutive.

The engraver does no time-keeping, so it involves some trickery to get << { s8 s8 s4 } { c4 \gliss d4 } >> working correctly.

Glissando

Glissando written out in small notes

Sometimes a glissando is written out in smaller notes. This example shows how to do this.

Glissando written out in small notes

Graphic measure grouping indications for conductors

In 20th century music, time signatures tend to change frequently and to be more complex. Therefore, printing graphic indications (such as brackets and triangles) above the top staff has become quite useful, if not essential, to conductors or even players. LilyPond is able to do that easily with its integrated Measure_grouping_engraver.

Beware: you can no longer use the \time command; use instead the #(set-time-signature x x '(x x) function, which is quite more powerful, especially for compound time signatures such as 5/8.

Graphic measure grouping indications for conductors

Graphical and text woodwind diagrams

In many cases, the keys other than the central column can be displayed by key name as well as by graphical means.

Graphical and text woodwind diagrams

Gregorian scripts

Here is demonstrated a preliminary support of Gregorian Scripts: ictus, circulus, semicirculus, accentus, episem.

Gregorian scripts

Grid lines: adding vertical lines between staves

Vertical lines can be drawn between staves synchronized with the notes.

Grid lines: adding vertical lines between staves

Grid lines: changing their appearance

The appearance of grid lines can be changed by overriding some of their properties.

Grid lines: changing their appearance

Grid lines: emphasizing rhythms and notes synchronization

Regular vertical lines can be drawn between staves to show note synchronization; however, in case of monophonic music, you may want to make the second stave invisible, and make the lines shorter like in this snippet.

Grid lines: emphasizing rhythms and notes synchronization

Grouping contexts

In polyphonic notation, many voices can share a staff: In this situation, the accidentals and staff are shared, but the stems, slurs, beams, etc., are private to each voice. Hence, engravers should be grouped. The engravers for note head, stems, slurs, etc., go into a group called Voice context, while the engravers for key, accidental, bar, etc., go into a group called Staff context. In the case of polyphony, a single Staff context contains more than one Voice context. Similarly, more Staff contexts can be put into a single Score context.

Grouping contexts

Guitar barre

This snippet shows three ways to get barré and half barré chords.

Guitar barre

Guitar barre (simple)

Here is how to print bar chords (guitare barré)

The syntax is: note(or chord)\startB "fret_number" note(s)\stopB

Guitar barre (simple)

Guitar half-Barred or full-Barred

Guitar bar chords with condition, full-Barred ##f, half-Barred ##t,

Guitar half-Barred or full-Barred

Guitar slides

Unlike glissandos, slides may go from an imprecise point of the fretboard to a specific fret. A good way to do this is to add a hidden grace note before the note which is actually played, as demonstrated in the following example.

Guitar slides

guitar string number

String numbers can be added to chords. They use the same positioning mechanism as finger instructions.

guitar string number

Guitar strum rhythms

For guitar music, it is possible to show strum rhythms, along with melody notes, chord names and fret diagrams.

Guitar strum rhythms

Guitar strum rhythms 2

For guitar music, it is possible to show strum rhythms, along with melody notes, chord names and fret diagrams. Strumming directions added.

Guitar strum rhythms 2

Hairpin placed between two \markup or parenthesized hairpin

If you need a parenthesized hairpin (i.e. in an Urtext edition) you can use this snippet. You can use it to put a hairpin between any other text or markup element.

Hairpin placed between two \markup or parenthesized hairpin

Hairpins with different line styles

Hairpins can take any style from line-interface - dashed-line, dotted-line, line, trill or zigzag.

Hairpins with different line styles

Hammer on and pull off

Hammer-on and pull-off can be obtained using slurs.

Hammer on and pull off

Hammer on and pull off using chords

When using hammer-on or pull-off with chorded notes, only a single arc is drawn. However double arcs are possible by setting the doubleSlurs property to #t.

Hammer on and pull off using chords

Hammer on and pull off using voices

The arc of hammer-on and pull-off is upwards in voices one and three and downwards in voices two and four:

Hammer on and pull off using voices

Harmonic noteheads in a chord

If you have a lot of chords including harmonic noteheads, typing <code>\tweak style #'harmonic-mixed</code> may be to long and make the code unreadable. To avoid that, you can define a function with a shorter name (in the code below it is only named <code>\har</code>).

Harmonic noteheads in a chord

Harmonics with parenthesized stemless note head

This snippet places a small parenthesized stemless note head above harmonics to indicate the sounding pitch.

Harmonics with parenthesized stemless note head

Harp muffle notation

Here is how to use custom-made symbols for harp muffle notation, letting musicians know when to damp the strings with the palm of the hands. It may be printed more nicely between the lower and upper staff by using the Dynamics context.

Harp muffle notation

Headers for all pages in bookpart

In every page of a bookpart except the first, show a header with the subtitle centered and the page number alternating left for even pages, right for odd pages.

Headers for all pages in bookpart

Heavily customized polymetric time signatures

Though the polymetric time signature shown was not the most essential item here, it has been included to show the beat of this piece (which is the template of a real Balkan song!).

Heavily customized polymetric time signatures

Held note (tenuto) fingering

Held note or tenuto fingering indicates that a finger should be kept pressed on the fret also after the actual duration of the note. This is usually suggested to facilitate the move of the fingers to the next position. It is represented by a digit (the finger) followed by a t (meaning tenuto).

If you use \finger "3t", you will get a poor result, because \finger uses the Emmentaler notation font, which has numbers but not letters. As a result, the number will use a serif font, while the letter t will use a san serif font. The letter t will also be positioned incorrectly.

This snippet contains a function which creates the desired fingering object without above problems.

Held note (tenuto) fingering

Hiding accidentals on tied notes at the start of a new system

This shows how to hide accidentals on tied notes at the start of a new system.

Hiding accidentals on tied notes at the start of a new system

Hiding notes

In the following examples, some notes are hidden: although they are made transparent, they still take vertical and horizontal space.

Hiding notes

Hiding part of a glissando when clashing a clef

When a glissando crosses a G or F clef, the \whiteout function does not hide it properly.

Here are two clef-combining stencils that offer something more accurate.

Hiding part of a glissando when clashing a clef

Hiding parts of slurs to avoid collisions with other objects

Curved objects like slurs sometimes collide with key signatures, time signatures, accidentals, or other objects.

This snippet shows how to hide the part of the slur that is colliding with something.

Hiding parts of slurs to avoid collisions with other objects

Hiding staves with rests only (for some/all voices)

If you have a choir score, or an orchestral score, where some voices are quiet for a long time, you might want to hide staves containing nothing (or only multi-measure rests). By default, LilyPond shows all staves, even if they only contain rests. To change this into what is sometimes called a "French Score" style, simply add the \RemoveEmptyStaffContext variable, in a \context block, to your \layout.

The first system would still show all staves for all voices. To force this setting to also apply to the first system of a score, set remove-first of VerticalAxisGroup to #t.

If only one staff is displayed, the choir or the StaffGroup bracket would also be hidden, so you will probably need to set collapse-height of SystemStartBracket to value 1 (or anything smaller than 5).

If you have some voices where you still want to display all (even empty) staves, you need to set the remove-empty property of the VerticalAxisGroup to #t for that one staff only. You can do this in the \with section of the staff (in this example, the alto staff will never erase empty lines, while the soprano staff will).

Hiding staves with rests only (for some/all voices)

Hiding the dashed line in a text crescendo

Text crescendi (or decrescendi, ritardandi, etc.) show a dashed line by default. To hide this spanner line, simply set the dash-period of DynamicTextSpanner (or TextSpanner if you use one for rit.) to a negative value.

Hiding the dashed line in a text crescendo

Hiding the extender line for text dynamics

Text style dynamic changes (such as cresc. and dim.) are printed with a dashed line showing their extent. This line can be suppressed in the following way:

Hiding the extender line for text dynamics

High and Low woodblock example

Two Woodblocks, entered with 'wbh' (high woodblock) and 'wbl' (low woodblock). The length of the barline has been altered with an \override command otherwise it would be too short. The positions of the two stafflines also have to be explicitly defined.

High and Low woodblock example

Horizontal beams

Horizontal beams can be forced, regardless of the positions of the notes they connect.

Horizontal beams

horizontal centered systems on a page

If you want your systems horizontally centered, as sometimes needed in contemporary music, you have to use a \score inside a \markup construction for every line.

horizontal centered systems on a page

Horizontally aligning custom dynamics (e.g. "sempre pp", "piu f", "subito p")

Some dynamic expressions involve additional text, like sempre pp. Since dynamics are usually centered under the note, the \pp would be displayed way after the note it applies to.

To correctly align the sempre pp horizontally so that it is aligned as if it were only the \pp, there are several approaches:

Horizontally aligning custom dynamics (e.g. "sempre pp", "piu f", "subito p")

How to add text marks at the end of a line

By default, rehearsal marks specified at the end of a line are printed at the beginning of the next line (even if it is the end of the piece, in such case the mark isn't printed at all). To avoid this, override the #'break-visibility property of the RehearsalMark object, like in the following snippet.

How to add text marks at the end of a line

How to add thumb fingerings

Special scripts can be entered for thumb fingerings (for example in cello music).

How to add thumb fingerings

How to bottom-align texts with different vertical extents

Some letters imply smaller vertical extents than the others; if you have, below your staff, two markups with different vertical extents (e.g. one text with letters t,h,l and/or UPPER CASE and one text with a, c, e, n or m), LilyPond will align them to the top by default, thus making it look a bit messy. Therefore, you need to add invisible ascender letters using the \transparent command to make it right.

How to bottom-align texts with different vertical extents

How to change fret diagram position

If you want to move the position of a fret diagram, for example, to avoid collision, or to place it between two notes, you have various possibilities:

1) modify #'padding or #'extra-offset values (as shown in the first snippet)

2) you can add an invisible voice and attach the fret diagrams to the invisible notes in that voice (as shown in the second example).

If you need to move the fret according with a rythmic position inside the bar (in the example, the third beat of the measure) the second example is better, because the fret is aligned with the third beat itself.

How to change fret diagram position

How to create custom dynamic markings

While it is trivial to create individual dynamic markings, if a more complex dynamic is required that LilyPond does not offer 'as standard' then it is quite easy to create your own. This also has the advantage of centering correctly without the need for more complex h-align positioning.

How to create custom dynamic markings

How to define autoBeamSettings in the \layout block

If you need to modify the automatic beaming behaviour (as explained in the Notation Reference) in the \layout block, here is a simple way to achieve it.

How to define autoBeamSettings in the \layout block

How to improve automatic beam groups when frequently using \time

Groups of beamed notes can be made by setting the subdivideBeams property. However, if you have \time-statements inside your score, you'll need to set the beatLength again after each \time-statement (that has a denominator that is not 8). This happens because the \time-statements reset the beatLength-value to the denominator of the time signature. So, if you have many meter-changes, you can use the following function named \timenb #X #Y instead of \time X/Y.

How to improve automatic beam groups when frequently using \time

How to print a classical trill combining acciaccatura, TrillSpan and afterGrace

Here is an excerpt of Mozart's KV545 piano Sonata (as brought to Mutopia by A. Sierra), in which you can see the typical classical trill, i.e. beginning with an acciaccatura, then trilling the whole bar, and ending with two afterGrace notes. This combination, which is rather frequent (if not systematic) in classical piano music, requires a rather precise typesetting: first the \acciaccatura, then the \afterGrace (which you have to define using Scheme-like syntax), then the main note, the TrillSpan and the two final notes (don't forget the curly braces here). You can also notice here the \slurDown, which avoids slurs collision.

How to print a classical trill combining acciaccatura, TrillSpan and afterGrace

How to print two rehearsal marks above and below the same barline (method 2) [obsolete in 2.23]

This method prints two 'rehearsal marks' - one above the stave and one below, by creating two voices, adding the Rehearsal Mark engraver to each voice - without this no rehearsal mark is printed - and then placing each rehearsal mark UP and DOWN in each voice respectively.

This method (as opposed to method 1) is more complex, but allows for more flexibility, should it be needed to tweak each rehearsal mark independently of the other.

This snippet is obsolete starting from LilyPond version 2.23.14, which introduces the \textMark and \textEndMark commands. There is no restriction similar to rehearsal marks: there can be several text marks at the same moment.

How to print two rehearsal marks above and below the same barline (method 2) [obsolete in 2.23]

How to put ties between syllables in lyrics

This can be achieved by separating those syllables by tildes.

How to put ties between syllables in lyrics

How to show a staff and ledger lines without notes

How to show a staff and ledger lines without notes

How to show a staff and ledger lines without notes

Hymn template

This code shows one way of setting out a hymn tune when each line starts and ends with a partial measure. It also shows how to add the verses as stand-alone text under the music.

Hymn template

Hymn template (Wilhelmus van Nassouwe)

This hymn example was taken from the original documentation; it features the Dutch anthem Wilhelmus van Nassouwe, with several variations for different verses.

Hymn template (Wilhelmus van Nassouwe)

Hymn Template for per-voice music and \partcombine

When writing hymns it is desirable to keep each part (soprano, alto, tenor, bass) separate. But when using partcombine to combine the parts, there are some difficulties. This template works through the difficulties and provides a useful method of writing hymns in four parts, then combining the upper voices and the lower voices.

Hymn Template for per-voice music and \partcombine

Implementing a counter in markup text

This snippet shows how to implement a counter in LilyPond for use in markup texts. Whenever you call the \counter #"name" markup function, the counter named name will be increased by one and the new value will be printed as a text markup. The first call will print 1 by default. Example:

\markup { Initial value of the counter: \counter #"mycounter". Second call: \counter #"mycounter" }

The snippet also implements a \setcounter #"name" newvalue markup command to set the the counter to a specific value and print it out.

One can have an arbitrary number of simultaneous counters, each indicated by its own name (as a string).

The storage of the counter values is implemented as a global alist counter-alist (Scheme/Guile's concept of a hash), where the counter command simply extracts the current value, increases it by one and stores it back in the alist.

Implementing a counter in markup text

Incipit

When transcribing mensural music, an incipit at the beginning of the piece is useful to indicate the original key and tempo. While today musicians are used to bar lines in order to faster recognize rhythmic patterns, bar lines were not yet invented during the period of mensural music; in fact, the meter often changed after every few notes. As a compromise, bar lines are often printed between the staves rather than on the staves.

Incipit

Include a file only once, new version

This snippet lets you include a file only once, which is great for breaking circular dependency issues. Inspired by code from snippet 657 this thread.

Compliments? Complaints? Contact Marnen Laibow-Koser, marnen AT marnen DOT org. Enjoy!

Include a file only once, new version

Including a file only once

Some files of definitions should be included only once in a project, but they need to be mentioned by all of the files that require them. I defined \includeIfAbsent to include a file if and only if it has not already been included by \includeIfAbsent. It works in a different scope from \include, so definitions in the included file need to be made global with define-public-toplevel in order to be effective.

Including a file only once

Including accidental and dots in a parenthesized note [obsolete in 2.23]

[This snippet is obsolete since LilyPond version 2.19.20.]

Sometimes a parenthesized note should include its accidental sign and/or dot.

Using \parenthesize won't do that.

The defined function \parentheAll will.

Including accidental and dots in a parenthesized note [obsolete in 2.23]

Increasing distance between symbols that are printed above or below notes

The padding property for objects with side-position-interface can be set to increase distance between symbols that are printed above or below notes.

Increasing distance between symbols that are printed above or below notes

Increasing spacing between staves

Vertical spacing is automatically set so that the layout of a score is neither too cramped or loose. Changing the distance between systems, however, is easy to do. You may want to move systems closer together so that more can fit on the page, for example.

Four keys are available for fine-tuned control, but you may find that you can get the spacing you want with changes to just one or two. The output of this snippet is the result of a change to a single key, padding. You may want to experiment with the commented-out line below it, which contains the default values for system-system-spacing and shows the syntax to use for changes in groups. Numbers represent distances in staff-spaces.

For more details you should consult Section 4.1 of the Notation Reference.

Increasing spacing between staves

Incrementing bar numbers in volta repeats

There are different ideas of bar numbering: counting bars as written or as played/heard. In other words: volta repeats might be counted only once or as often as they are played. Only the former is officially supported, but the latter is used by respectable publications such as the Neue Bach-Ausgabe. This has also been reported in ensemble music where some parts are printed with volta repeats whereas others (as well as the conductor) are printed as unfolded.

Here is a hack that increments the currentBarNumber property whenever volta repeats occur. It also offers basic (though limited) support for alternatives.

Incrementing bar numbers in volta repeats

Indenting individual systems

LilyPond scores are indented rather like text paragraphs: all lines except the first are indented by the same amount (short-indent). This layout constraint is applied in advance and cannot be modified later e.g. on a line-by-line basis.

LilyPond users who need a differently indented line can arrange for that line to start a new score, as in LSR966. That may be a reasonable workaround at a more or less natural break such as a coda, but in general the structure clash introduces severe fragmentation requiring compensatory splicing and fudging. See discussion re LSR966.

This snippet demonstrates the pseudoIndent workaround which superimposes an additional line-wise indentation on the score's unmodified layout indentation. This approach avoids all those score change problems.

There are independent parameters for left and right indentations. It also comes with a freebie parameter for succinct instrument-name modding.


Caveats:

Indenting individual systems

Indicating cross-staff chords with arpeggio bracket

An arpeggio bracket can indicate that notes on two different staves are to be played with the same hand. In order to do this, the PianoStaff must be set to accept cross-staff arpeggios and the arpeggios must be set to the bracket shape in the PianoStaff context.

(Debussy, Les collines d'Anacapri, m. 65)

Indicating cross-staff chords with arpeggio bracket

Indicating the duration of a feathered beam

This is an easy way to indicate the duration of a set of beamed notes (especially those joined by a feathered beam) using a tuplet.

Indicating the duration of a feathered beam

Inserting a \markup when using chordmode

A way to insert a \markup { . . . } string in \chords { . . . }.

Inserting a \markup when using chordmode

Inserting a caesura

Caesura marks can be created by overriding the 'text property of the BreathingSign object.

A curved caesura mark is also available.

Inserting a caesura

Inserting a temporary ossia

A temporary ossia in an instrumental part may be printed using a separate, short staff. A simpler solution is also given: instantiate a full staff, and let RemoveEmptyStaffContext take out the unused parts.

Inserting a temporary ossia

Inserting large plain text sections, as independent \markup blocks

LilyPond can handle text almost as well as music notation: in a \book block, you can enter different \score blocks, but also independent \markup sections. This snippet also demonstrates some interesting text formatting features such as \justify-string or \wordwrap-string (do not forget the # character when using them). The \fill-line command produces centered text, and you can define margins using \override #'(line-width . X), where X is the width in staff spaces.

Inserting large plain text sections, as independent \markup blocks

Inserting score fragments above a staff, as markups

The \markup command is quite versatile. In this snippet, it contains a \score block instead of texts or marks.

Inserting score fragments above a staff, as markups

Instrument name as staff lines

Instrument name as staff lines

Instrument name as staff lines

Instrument name as staff lines (alternative)

Instrument name as staff lines (alternative)

Instrument name as staff lines (alternative)

Integrating LilyPond expressions inside Scheme functions

It is possible to use fragments of LilyPond syntax inside Scheme, by putting them between #{ and #}. In this example, three functions are defined to apply different paddings on the TextScript markups, using native LilyPond commands such as <code>\override TextScript #'padding</code>.

Integrating LilyPond expressions inside Scheme functions

Invert notes in a chord

A set of functions to:

- drop notes in a chord (like jazz drop2),

- rise notes in a chord

- invert chords

Invert notes in a chord

Irrational time signatures for metric modulation

Time signatures with denominators that are not powers of two can be used easily in LilyPond, by setting the time signatures you want and scaling the rhythmic value by the appropriate amount. The scaling fraction involves a denominator that is the same as that of the time signature and a numerator that is of the appropriate fractional relationship for the time signature. For instance, since seven divisions of the whole note would be written as with seven notes resembling quarters, the scaling fraction for seventh measures would be 4/7. LilyPond correctly produces MIDI files for these time signatures; uncomment the \midi line to check this.

Irrational time signatures for metric modulation

Isolated percent repeats

Isolated percents can also be printed.

Isolated percent repeats

Jazz combo template

This is quite an advanced template, for a jazz ensemble. Note that all instruments are notated in \key c \major. This refers to the key in concert pitch; the key will be automatically transposed if the music is within a \transpose section.

Jazz combo template

Keep change clefs full sized

When a clef is changed, the clef sign displayed is smaller than the initial clef. This can be overridden with full-size-change.

Keep change clefs full sized

Keeping a Lyrics context alive

If you temporarily have additional lyrics to a voice you can keep the lyrics context alive with the following construct. Unless you do this, a further temporary lyrics context would create a separate line (if it happens on the same system of music).

The solution is to create one or more named lyrics context(s) with

\new Lyrics = "lyr1"

\new Lyrics = "lyr2"

before they are filled with the lyrics text.

It is noteable that the definition of the contexts must use \new … while later references must use \context …

Keeping a Lyrics context alive

Key signature and small staff

Traditionally, smaller staves key signature spacing is slightly different than full size staves ones.

Here's a function that automatically calculates the right key signature spacing according to the staff size.

Key signature and small staff

Key signatures

The key signature indicates the tonality in which a piece is played. It is denoted by a set of alterations (flats or sharps) at the start of the staff.

Setting or changing the key signature is done with the \key command

\key pitch type

Here, type should be \major or \minor to get pitch-major or pitch-minor, respectively. You may also use the standard mode names (also called “church modes”): \ionian, \locrian, \aeolian, \mixolydian, \lydian, \phrygian, and \dorian.

This command sets the context property Staff.keySignature. Non-standard key signatures can be specified by setting this property directly.

Accidentals and key signatures often confuse new users, because unaltered notes get natural signs depending on the key signature.

Key signatures

keyboard diagrams

Functions to draw piano keys and piano keyboards

keyboard diagrams

Keyboard headword

Keyboard headword

Keyboard headword

Ladder-style C clef

From Wikipedia:

In printed music from the 16th and 17th centuries, the C clef often assumed a ladder-like form, in which the two horizontal rungs surround the stave line indicated as C: ; this form survived in some printed editions into the 20th century.


From lilypond-user discussion, 2016-09:

Ladder-style C clef for TTBB men's chorus

Ladder-style C clef

Laissez vibrer ties

Laissez vibrer ties have a fixed size. Their formatting can be tuned using 'tie-configuration.

Laissez vibrer ties

Let TabStaff print the topmost string at bottom

In tablatures usually the first string is printed topmost. If you want to have it at the bottom change the stringOneTopmost-context-property. For a context-wide setting this could be done in layout as well.

Let TabStaff print the topmost string at bottom

Letter tablature formatting

Tablature can be formatted using letters instead of numbers.

Letter tablature formatting

Line arrows

Arrows can be applied to text-spanners and line-spanners (such as the Glissando).

Line arrows

Line styles

Displays all available line styles.

Line styles

logo at the top

Put a logo at the top left on all pages and titling.

logo at the top

Longer laissez vibrer ties

The following functions allows to make a laissez vibrer tie look longer. It may, however, collide with other notation objects.

Longer laissez vibrer ties

lyric combine

With the \lyricsto mechanism, individual lyric lines can be associated with one melody line. For each lyric line, they can be tuned whether to follow melismata or not.

lyric combine

Lyrics above the staff they are assigned to

Lyrics can also be placed above the staff to which they are assigned to. However, in this case you cannot simply place the line with \lyricsto above the staff definition, because at that point the voice to which the lyrics are assigned has not been created. Thus, you have to insert an empty dummy definition
  \new Lyrics = "lyricsname" { s4 }
  \new Staff = "staffname" << .... >>
and do the actual lyrics assignment later:
  \context Lyrics = "lyricsname" \lyricsto "voicename" \lyricsdefinition

This snippet is a simple example how to add lyrics above and/or below the staff.

Lyrics above the staff they are assigned to

Lyrics alignment

Horizontal alignment for lyrics can be set by overriding the self-alignment-X property of the LyricText object. -1 is left, 0 is center, and 1 is right; however, you can use #LEFT, #CENTER and #RIGHT as well.

Lyrics alignment

Magnetic lyrics: snap syllables together if the hyphen inbetween is too short

The current code that LilyPond uses to handle lyric hyphens (i.e., LyricHyphen grobs) often leads to very short hyphens or even small gaps between syllables with no hyphen visible. This snippet merges adjacent syllables into one string in such cases, also taking care of ligatures as if the string was not hyphenated.

It supersedes previous implementations of “magnetic snap” engravers that were in circulation via the lilypond-user mailing list.

Magnetic lyrics: snap syllables together if the hyphen inbetween is too short

Makam example

Makam is a type of melody from Turkey using 1/9th-tone microtonal alterations.

Consult the initialization file ly/makam.ly for details of pitch names and alterations.

Makam example

Making \thumb behave like other fingerings

\thumb does not behave like other fingerings, in particular with regards to slur avoidance, since it is defined as a Script object. This can be changed by redefining \thumb as a Fingering object, which also allows finer control over positioning with fingeringOrientations.

Making \thumb behave like other fingerings

Making \unfoldRepeats work with \repeat volta structure

\globalizeMusic is a possible solution for the problem you get when you put all your \repeat volta structures in a separate music variable (named generally \global ) and then you want to unfold all your music (for MIDI output for example).

Suppose you have defined the following :


   global = { s1 \repeat volta 2 { s1} \alternative {{s1} {s1} }} 
   musicA = \relative { c1 d e f g}
   musicB = \relative { \clef bass c,1 d e f g}
Then, the function \globalizeMusic can be used like this :

   \globalizeMusic
      \new StaffGroup
           {<<
                \new Staff  \musicA
                \new Staff  \musicB
           >>}
It will have the same effects than

    \new StaffGroup
          {<<
                \new Staff  >
                \new Staff  >
          >>}
BUT all the \repeat volta structures will be copied inside each Staff, so that you will get the correct unfolded music when you call \unfoldRepeats. (not true using the traditionnal > structure ).

The pdf here shows the behaviour of the function.

To use \globalizeMusic, you have to download 2 files : globalizeMusic.ly and also extractMusic.ly (because globalizeMusic.ly uses extractMusic.ly internally). You can find extractMusic.ly here and globalizeMusic.ly here These 2 files should be put in the same directory.

Making \unfoldRepeats work with \repeat volta structure

Making an object invisible with the 'transparent property

Setting the transparent property will cause an object to be printed in invisible ink: the object is not printed, but all its other behavior is retained. The object still takes up space, it takes part in collisions, and slurs, ties and beams can be attached to it.

This snippet demonstrates how to connect different voices using ties. Normally, ties only connect two notes in the same voice. By introducing a tie in a different voice, and blanking the first up-stem in that voice, the tie appears to cross voices.

Making an object invisible with the 'transparent property

Making bar numbers appear at regular intervals

If you would like the bar numbers to appear at regular intervals, but not starting from measure zero, you can use a context function, set-bar-number-visibility, to set automatically barNumberVisibility, so that the bar numbers appear at regular intervals, starting from the measure in which set-bar-number-visibility is set using \applycontext.

Making bar numbers appear at regular intervals

Making cross-staff beams look better

Cross-staff beams may not look always good; this snippet demonstrates how to get better results.

Making cross-staff beams look better

Making glissandi breakable

Setting the breakable property to #t in combination with after-line-breaking allows a glissando to break if it occurs at a line break:

Making glissandi breakable

Making noteheads look handwritten

Just for fun, here's a way of making hand-written noteheads in LilyPond. Points on a markup path are randomly jittered to form the notehead shapes.

Making noteheads look handwritten

Making slurs with complex dash structure

Slurs can be made with complex dash patterns by defining the dash-definition property. dash-definition is a list of dash-elements. A dash-element is a list of parameters defining the dash behavior for a segment of the slur.

The slur is defined in terms of the bezier parameter t which ranges from 0 at the left end of the slur to 1 at the right end of the slur. dash-element is a list (start-t stop-t dash-fraction dash-period). The region of the slur from start-t to stop-t will have a fraction dash-fraction of each dash-period black. dash-period is defined in terms of staff spaces. dash-fraction is set to 1 for a solid slur.

Making slurs with complex dash structure

Making some staff lines thicker than the others

For educational purposes, a staff line can be thickened (e.g., the middle line, or to emphasize the line of the G clef). This can be achieved by adding extra lines very close to the line that should be emphasized, using the line-positions property of the StaffSymbol object.

Making some staff lines thicker than the others

Making staff lines invisible

You can make staff lines invisible by removing the Staff_symbol_engraver from the Staff context.

Making staff lines invisible

Manipulating slurs via 'positions and 'extra-offset

There is a command to change slurs, \override Slur.positions. Actually the influence of this command is limited, e.g. if you like the shape of the slur and you want to shift it a little bit,

\override Slur.positions does not exactly what you want.

slurShift shifts the slur exactly the amount you want without changing the shape, slurShiftx combines slurShift and Slur.positions.

Manipulating slurs via 'positions and 'extra-offset

Manually break figured bass extenders for only some numbers

Figured bass often uses extenders to indicate continuation of the corresponding step. However, in this case lilypond is in greedy-mode and uses extenders whenever possible. To break individual extenders, one can simply use a modifier \! to a number, which breaks any extender attributed to that number right before the number.

Manually break figured bass extenders for only some numbers

Manually connecting groups of beamed notes with a single beam

Groups of non-periodic beat structure beamed notes can be connected manually with a settable number of beams using the stemRightBeamCount and stemLeftBeamCount properties.

Manually connecting groups of beamed notes with a single beam

Manually controlling beam positions

Beam positions may be controlled manually, by overriding the positions setting of the Beam grob.

Manually controlling beam positions

Many types of bar lines

There are many types of bar lines available.

Many types of bar lines

Marking notes of spoken parts with a cross on the stem (Sprechstimme)

This example shows how to put crosses on stems. Mark the beginning of a spoken section with the \speakOn keyword, and end it with the \speakOff keyword.

Marking notes of spoken parts with a cross on the stem (Sprechstimme)

Markup list

Text that can spread over pages is entered with the \markuplist command.

Markup list

Markup on clef

Here's how to put a markup – such as a sul tasto reminder – over the clefs.

Markup on clef

Measure counter

This snippet provides a workaround for emitting measure counters using transparent percent repeats.

Measure counter

Measure spanner

Measure spanners are an alternate way to print annotated brackets. As opposed to horizontal brackets, they extend between two bar lines rather than two notes. The text is displayed in the center of the bracket.

Measure spanner

Measure-centered bar numbers

For film scores, a common convention is to center bar numbers within their measure. This is achieved through setting the centerBarNumbers context property to true. When this is used, the type of the bar number grobs is CenteredBarNumber rather than BarNumber.

This example demonstrates a number of settings: the centered bar numbers are boxed and placed below the staves.

Measure-centered bar numbers

Melody with chords. Chord diagrams described on top of the score.

Problem: How to display chord diagrams on top of the score? The chord diagrams description is a \score block in a markup with fill-line command, so that it can be centered. There is also a scheme function in order to center the name of the chords above the diagrams.

Melody with chords. Chord diagrams described on top of the score.

Mensural ligatures

In mensural ligatures, notes with ancient durations are printed in a tight manner.

Mensural ligatures

Mensural note heads

Mensural notes may also have note heads.

Mensural note heads

Mensurstriche layout (bar lines between the staves)

Mensurstriche, bar lines between but not through staves, can be printed by setting measureBarType to "-span|" and using a grouping context that allows span bars, such as StaffGroup.

Mensurstriche layout (bar lines between the staves)

Merging multi-measure rests in a polyphonic part

When using multi-measure rests in a polyphonic staff, the rests will be placed differently depending on the voice they belong to. However they can be printed on the same staff line, using the following setting.

Merging multi-measure rests in a polyphonic part

Merging nested system start brackets

Whilst staves can be grouped and nested using a variety of notations, such as SystemStartSquare or SystemStartBrace (which can be achieved automatically through the systemStartDelimiterHierarchy property), some editions of symphonic music use SystemStartBracket at different levels, which may result in unwanted collision between bracket tips.

Here is a possible workaround, which masks the extraneous part of some bracket tips in order to give the impression that they merge with the lower-level bracket.

Merging nested system start brackets

Merging rests automatically

When two (or more) voices on a staff share common rests, common engraving practice merges these rests into one. The following snippet takes care of that, automatically. Please note that multi-measure rests are not automatically combined.

Merging rests automatically

Metric Modulation with Tuplet

Where you have one tempo going to another tempo, and the second tempo has the pulse of a tuplet. This can be done with markup, using postscript inside. So you can use the sample markup template and adjust

Metric Modulation with Tuplet

Metronome marks with more options

If you need, in metronome marks:

This snippet also changes the size of metronome marks: IMPORTANT:

This snippet is based on a snippet by Arnold Theresius. The original snippet create a formatter called format-metronome-markup-approx, and the default value to tempoEquationText in that snippet is "≈". I changed back this default to Lilypond default, and added the tempoBetweenText property. Also, I changed the sizing of some elements, as described above.

Original snippet by Arnold Theresius

Metronome marks with more options

Microtonal notation and theory of harmony

If you use microtonal notation, you can define your own note-names for the additional pitches. You list the set of pitch-changes you want to represent, and what symbol to use for each pitch-change.

You can also modify the pitches of unaltered notes, so that MIDI output and \transposition honor your tuning system.

The example below comes from Helmholtz and Ellis' book "on the Sensations of Tone". The notation indicates the precise pitches of just intonation based on perfect fifths and thirds. The sharp, flat and natural notes represent 'Pythagorean' tuning following the cycle of perfect fifths, which results in a very wide major third. The arrows represent the alteration that changes a Pythagorean major third to a perfect major third.

Notice the different shadings of pitch in the C-sharps, G-sharps and A-naturals, depending on their role in the harmony.

Microtonal notation and theory of harmony

Microtones - quarter tones

Half-flats and half-sharps are formed by adding -eh and -ih; the following is a series of Cs with increasing pitches. Micro tones are also exported to the MIDI file. There are no generally accepted standards for denoting three quarter flats, so LilyPond's symbol does not conform to any standard.

Microtones - quarter tones

Mixing harmonics and regular notes

In passages where there are harmonics in one voice and regular notes in the other, the note head 'style override only applies to the voice in which it is declared.

Mixing harmonics and regular notes

Modify only the current system

Starting bars usually are all clones of the first one. The only way to affect one system and not the others is to collect all the grobs using the all-elements property of any grob on the system in question (for example a NoteHead) and filter the target grob, which you can then modify.

Modify only the current system

Modifying default font properties for piece titles

If you have multiple pieces (e.g., Kyrie, Gloria, Credo, etc. in masses) in a large work, you can use multiple <code>\score</code> parts and use the piece header field to supply a title for each of the pieces. However, the font is very small. You can either directly put the markup into the <code>piece=...</code> header field, or better re-define the <code>scoreTitleMarkup</code> function in the <code>\paper</code> section.

Modifying default font properties for piece titles

Modifying default values for articulation shorthand notation

The shorthands are defined in ly/script-init.ly, where the variables dashHat, dashPlus, dashDash, dashBang, dashLarger, dashDot, and dashUnderscore are assigned default values. The default values for the shorthands can be modified. For example, to associate the -+ (dashPlus) shorthand with the trill symbol instead of the default + symbol, assign the value \trill to the variable dashPlus:

Modifying default values for articulation shorthand notation

Modifying the Ottava spanner slope

It is possible to change the slope of the Ottava spanner.

Modifying the Ottava spanner slope

Modifying tuplet bracket length

Tuplet brackets can be made to run to prefatory matter or the next note. Default tuplet brackets end at the right edge of the final note of the tuplet; full-length tuplet brackets extend farther to the right, either to cover all the non-rhythmic notation up to the following note, or to cover only the whitespace before the next item of notation, be that a clef, time signature, key signature, or another note. The example shows how to switch tuplets to full length mode and how to modify what material they cover.

Modifying tuplet bracket length

Moving around objects in the printout using the extra-offset property

The extra-offset property, which has a pair of numbers as value, moves around objects in the printout. The first number controls left-right movement; a positive number will move the object to the right. The second number controls up-down movement; a positive number will move it higher. The units of these offsets are staff-spaces. The extra-offset property is a low-level feature: the formatting engine is completely oblivious to these offsets.

Moving around objects in the printout using the extra-offset property

Moving dotted notes in polyphony

When a dotted note in the upper voice is moved to avoid a collision with a note in another voice, the default is to move the upper note to the right. This behaviour can be over-ridden by using the prefer-dotted-right property of NoteCollision.

Moving dotted notes in polyphony

Moving dynamics horizontally

Here are two functions to move dynamics easily. The first one moves the dynamics horizontally and drops / raises it closer to the staff if there's room. With the second one you can move the dynamics also vertically.

Moving dynamics horizontally

Moving notes or chords in collisions horizontally using the force-hshift property

You can manually determine the horizontal shift of a note or a chord when it collides with notes in other voices, using the NoteColumn #'force-hshift property. Overriding this property will appropriately move all objects associated with the note or chord—that is, the stem with all its noteheads, ledger lines, augmentation dots and beams.

Note that this technique will only work when the notehead collides with noteheads in other voices, and has no effect in monophonic situations.

Moving notes or chords in collisions horizontally using the force-hshift property

Moving slur positions vertically

The vertical position of a slur can be adjusted using the positions property of Slur. The property has 2 parameters, the first referring to the left end of the slur and the second to the right. The values of the parameters are not used by LilyPond to make an exact movement of the slur - instead it selects what placement of the slur looks best, taking into account the parameter values. Positive values move the slur up, and are appropriate for notes with stems down. Negative values move downward slurs further down.

Moving slur positions vertically

Moving the ends of hairpins

The ends of hairpins may be offset by setting the shorten-pair property of the Hairpin object. Positive values move endpoints to the right, negative to the left. Unlike the minimum-length property, this property only affects the appearance of the hairpin; it does not adjust horizontal spacing (including the position of bounding dynamics). This method is thus suitable for fine-tuning a hairpin within its allotted space.

Moving the ends of hairpins

Multi-column scores

To obtain columns, one can simply put scores into \markup \fill-line contexts, but line breaking must be done manually. By obtaining separate line-widths for each score, line breaking can happen automatically. However, page breaking must still be done manually.

Multi-column scores

Multi-measure rest length control

Multi-measure rests have length according to their total duration which is under the control of MultiMeasureRest.space-increment. Note that the default value is 2.0.

Multi-measure rest length control

Multi-measure rest markup

Markups attached to a multi-measure rest will be centered above or below it. Long markups attached to multi-measure rests do not cause the measure to expand. To expand a multi-measure rest to fit the markup, use an empty chord with an attached markup before the multi-measure rest. Text attached to a spacer rest in this way is left-aligned to the position where the note would be placed in the measure, but if the measure length is determined by the length of the text, the text will appear to be centered.

Multi-measure rest markup

Multimeasure Rests over a Cadenza

How to get Multimeasure rests in another staff, over a cadenza.

Multimeasure Rests over a Cadenza

Multiple repeats with alternate endings

By default it is the last alternative that stays single.

This snippet shows how to create a single first alternative using \tag for the midi output.

Multiple repeats with alternate endings

Multiple simultaneous RehearsalMarks, tunable output per score, grace synchronized [obsolete in 2.23]

An alternate engaver for RehearsalMarks with many features, e.g.

This snippet is obsolete starting from LilyPond version 2.23.14, which introduces the \textMark and \textEndMark commands. There is no restriction similar to rehearsal marks: there can be several text marks at the same moment.

Multiple simultaneous RehearsalMarks, tunable output per score, grace synchronized [obsolete in 2.23]

music within an octave ambitus

Function to keep the music within an octave ambitus, starting from a reference pitch.

It may be useful for the left-hand of accordion.

music within an octave ambitus

Name tuning of each string in a TabStaff

In a TabStaff, the tuning of each string can be displayed to the left of the system using postscript code.

Name tuning of each string in a TabStaff

Naming a whole GrandStaff

You can have a name for the whole GrandStaff in addition to individual Staffs.

Naming a whole GrandStaff

Nesting staves

The property systemStartDelimiterHierarchy can be used to make more complex nested staff groups. The command \set StaffGroup.systemStartDelimiterHierarchy takes an alphabetical list of the number of staves produced. Before each staff a system start delimiter can be given. It has to be enclosed in brackets and takes as much staves as the brackets enclose. Elements in the list can be omitted, but the first bracket takes always the complete number of staves. The possibilities are SystemStartBar, SystemStartBracket, SystemStartBrace, and SystemStartSquare.

Nesting staves

Non-default tuplet numbers

LilyPond also provides formatting functions to print tuplet numbers different than the actual fraction, as well as to append a note value to the tuplet number or tuplet fraction.

Non-default tuplet numbers

Non-stretchable gracenote groups

For some instruments such as bagpipes it is desirable to use groups of several gracenotes that do not stretch with the normal music. This can be achieved by setting the GraceSpacing spacing-increment to zero or to a small value.

Non-stretchable gracenote groups

Non-traditional key signatures

The commonly used \key command sets the keyAlterations property, in the Staff context.

To create non-standard key signatures, set this property directly. The format of this command is a list:

\set Staff.keyAlterations =
  #`(((octave . step) . alter) ((octave . step) . alter) ...)

where, for each element in the list, octave specifies the octave (0 being the octave from middle C to the B above), step specifies the note within the octave (0 means C and 6 means B), and alter is ,SHARP ,FLAT ,DOUBLE-SHARP etc.

Alternatively, using the more concise format for each item in the list (step . alter) specifies the same alteration holds in all octaves.

For microtonal scales where a sharp is not 100 cents, alter refers to the alteration as a proportion of a 200-cent whole tone.

Non-traditional key signatures

Normalized \transposition

The \transposition command allows to typeset transposing parts. However, when multiple transposing instruments are used, one may want to normalize these transpositions to print the score in one single key. Here is how to achieve it.

Normalized \transposition

Notating whispering and air tones

Alfred Blatter suggested using circular note heads for brass and woodwind instruments to indicate air tones or whispering lyrics into the instrument. Here's a way to do this in LilyPond.

Notating whispering and air tones

Numbering groups of measures

This snippet demonstrates the use of the Measure_counter_engraver to number groups of successive measures. Any stretch of measures may be numbered, whether consisting of repetitions or not.

The engraver must be added to the appropriate context. Here, a Staff context is used; another possibility is a Dynamics context.

The counter is begun with \startMeasureCount and ended with \stopMeasureCount. Numbering will start by default with 1, but this behavior may be modified by overriding the count-from property.

When a measure extends across a line break, the number will appear twice, the second time in parentheses.

Numbering groups of measures

Numbering single measure rests

Multi measure rests show their length by a number except for single measures. This can be changed by setting restNumberThreshold.

Numbering single measure rests

Numbers as easy note heads

Easy notation note heads use the note-names property of the NoteHead object to determine what appears inside the note head. By overriding this property, it is possible to print numbers representing the scale-degree.

A simple engraver can be created to do this for every note head object it sees.

Numbers as easy note heads

Obtaining 2.12 lyrics spacing in newer versions

The vertical spacing engine changed since version 2.14. This can cause lyrics to be spaced differently.

It is possible to set properties for Lyric and Staff contexts to get the spacing engine to behave as it did in version 2.12.

Obtaining 2.12 lyrics spacing in newer versions

Of the ubiquity of markup objects

Text objects are entered either as simple strings between double quotes or as \markup blocks that can accept a variety of advanced text formatting and graphical enhancements.

As such, markup blocks may be used:

\markup may additionally be used for lyrics, in chord names, and as dynamics. In fact, it is possible to use \markup to customize the appearance of virtually any object, as demonstrated in this example using various methods.

Of the ubiquity of markup objects

Open string harmonics in tablature

This snippet demonstrates open-string harmonics.

Open string harmonics in tablature

Orchestra, choir and piano template

This template demonstrates the use of nested StaffGroup and GrandStaff contexts to sub-group instruments of the same type together, and a way to use \transpose so that variables hold music for transposing instruments at concert pitch.

Orchestra, choir and piano template

Orchestral grouping with a custom brace

This snippet supports svg output.

Orchestral grouping with a custom brace

Ordering scripts stack

Scripts can be stacked. The order is determined by a priority field, but when objects have the same priority, the input order determines the order. Objects specified first are closest to the note. You may also want to override the #'script-priority to give your Script or TextScript overall priority (if you do so, remember to use \once if you don't want the whole score to be affected).

Ordering scripts stack

Organ pedal marks in various styles, including pedal glides

Lilypond's standard commands for organ pedal marks are: \lheel, \ltoe, \rheel, \rtoe. However, there are several ways of displaying these visually. Not all organists may want Lilypond's default style, so this snippet provides some alternatives.

This snippet defines several pedal styles ("lilypond", "modern", "traditional"), plus context-management helpers to apply them conveniently. The "modern" style has inward-pointing toe marks (inwards towards the staff, that is) and circular heel marks; this follows C.H. Trevor (1971) "The Oxford Organ Method", Oxford University Press, Oxford, UK. The "lilypond" style is of course Lilypond's default, with outward-pointing toes and outward-pointing heels. The "traditional" style follows a Bach/Novello 1948 standard and has upward-pointing toe marks and downward-pointing heel marks (both as if the foot were pointing "toes up" on the staff).

This snippet also defines some new pedal indicator commands, including for heel/toe transitions; foot slide marks (for sliding a foot forward/backward on a pedal); "foot behind"/"foot in front" marks, for crossing feet; "foot forward/backward" marks, for when feet are adjacent; and "foot substitution" (foot change, foot transition) marks, for swapping feet whilst pressing a single pedal. These augmented marks follow Trevor (1971, as above), and can be used with any of the pedal mark styles.

Finally, the snippet defines an engraver allowing you to show glide (glissando) marks, e.g. sliding the right toe from one note to another, using the standard Lilypond \glide command. (The engraver for fingering glides should be disabled while pedal glides are in use, and the snippet provides demonstrations and a convenience method for this.)

Full usage information is given in the comment block at the start of the snippet code.

For the Lilypond Snippet Repository, the snippet is self-contained and includes a demonstration. For practical use, the snippet should be trimmed below the comment "% organ_pedal_marks.ly ends here" and saved as organ_pedal_marks.ly, ready for inclusion in other files via the command \include "organ_pedal_marks.ly".

Organ pedal marks in various styles, including pedal glides

Organum and discant

Rhythmic ligatures are used in the transcription of organum, discant and copula. The underlying rhythm must be transcribed to cause the ligatures to line up correctly. A short measure length (in this example 3/4, breves are transcribed as quarter notes) compresses the music together and allows for line breaks between divisiones.

Organum and discant

Ossia staves with clefs and time signatures

Under Notation Reference > Staff notation > Modifying single staves (section 1.6.2) > Ossia staves, one technique is given in which a separate staff is created for the ossia, and \context Staff="ossia" places notes on the ossia staff.

The technique recommends removing the time signature engraver and making clefs transparent. If there is a key signature, then the "Key_engraver" may also need to be removed.

  \remove "Time_signature_engraver"
  \override Clef #'transparent = ##t

Problem: If there is a meter, clef, or key change in the middle of an ossia passage, those will be invisible.

Solution: Instead of removing the engravers, override the relevant stencils to be #f, hiding them where they are not needed. Then it's easy to \once \revert the stencil(s) where needed.

In this example, the change to 3/4 time appears in the ossia staff at the end of the first system, and both the clef and meter appear at the beginning of the second system (whereas they are hidden at the start of the first system).

Ossia staves with clefs and time signatures

Ottava text on the right

In some cases, ottava text should be on the right for a clearer reading.

Ottava text on the right

Outliner

Outliner helps outlining markups with a defined color.

Outliner

Outputting the version number

It is possible to print the version number of LilyPond in markup.

Outputting the version number

Overriding articulations by type

Sometimes you may want to affect a single articulation-type. Although it is always possible to use \tweak, it might become tedious to do so for every single sign of a whole score. The following shows how to tweak articulations with a list of custom settings. One use-case might be to create a style sheet.

With 2.16.2 and above it is possible to put the proposed function, \customScripts, into a \layout-block.

Overriding articulations by type

Overriding articulations of distinct type

Sometimes you may want to affect a single articulation type. Although it is always possible to use \tweak, it might become tedious to do so for every single sign of a whole score. The following shows how to tweak articulations with a list of custom settings. One use case might be to create a style sheet.

With 2.16.2 it is possible to put the proposed function, \customScripts, into a \layout block.

Overriding articulations of distinct type

Page label

Page labels may be placed inside music or at top-level, and referred to in markups.

Page label

Page Range Numbering

It may sometimes be necessary to have a single score with numbered pages that are consecutive but you want to skip specified page ranges.

This snippet shows how to specify a list of page number ranges to print, with numbers not in the list omitted. Page numbers greater than the last number in the range list will be printed consecutively as per normal.

For example, specifying a list of page ranges '((1) (3 5) (7 10)) would skip pages 2 and 6, and continue with consecutive numbering from 11 onwards.

(Please note: only first page is displayed in preview)

Page Range Numbering

Parenthesize a group of notes using a Scheme function

This scheme code puts parentheses around a group of notes.

See also Parenthesize note heads using a Scheme function (snippet #564).

Parenthesize a group of notes using a Scheme function

Parenthesize crescendo and decrescendo spanners

Parenthesize crescendo and decrescendo spanners.

Parenthesize crescendo and decrescendo spanners

Parenthesize note heads using a Scheme function

This scheme code puts parentheses around note heads and recalculates the grob size and adjusts the stem position.

Parenthesize note heads using a Scheme function

Partcombine and \autoBeamOff

The function of \autoBeamOff when used with \partCombine can be difficult to understand. It may be preferable to use

\set Staff.autoBeaming = ##f

instead to ensure that auto-beaming is turned off for the entire staff. Use this at a spot in your score where no beam generated by the auto-beamer is still active.

Internally, \partCombine works with four voices – stem up single, stem down single, combined, and solo. In order to use \autoBeamOff to stop all auto-beaming when used with \partCombine, it is necessary to use four calls to \autoBeamOff.

Partcombine and \autoBeamOff

Partial measures (pickup measures)

Partial measures, such as an anacrusis or upbeat, are entered using the \partial command. The syntax for this command is \partial duration.

This is internally translated into \set Timing.measurePosition = -length of duration

The property measurePosition contains a rational number indicating how much of the measure has passed at this point.

Partial measures (pickup measures)

Pedal brackets with slanted lines

Here is a way to display pedal brackets with a slanted line (indicating, for example, that the sustain pedal must be gradually released). The first bracket shows the default behaviour.

Pedal brackets with slanted lines

Percent repeat count visibility

Percent repeat counters can be shown at regular intervals by setting the context property repeatCountVisibility.

Percent repeat count visibility

Percent repeat counter

Measure repeats of more than two repeats can get a counter when the convenient property is switched, as shown in this example:

Percent repeat counter

Percent repeat counters for piano music

In piano music parts it is customary to put the repeat counters between the staves. While it is rather straightforward to add the two percent repeat engravers to the Dynamics context (which we use for centering the counter numbers), it is non-trivial to get some vertical whitespace above and below the digits for the double percent repeat counter.

Percent repeat counters for piano music

Percussion beaters

Graphic symbols for percussion instruments are not natively supported; however it is possible to include such symbols, either as an external EPS file or as embedded PostScript code inside a markup, as demonstrated in this example.

Percussion beaters

Percussion example

A short example taken from Stravinsky's L'histoire du Soldat.

Percussion example

Percussive guitar note heads

These note heads are used in contemporary guitar scores.

The first one shows that the player should strike the strings sharply at the head of the guitar with the left hand index.

For the second one, he has to tab lightly on the table with any finger of the right hand (similar to a light golpe).

Both note heads support svg output.

Percussive guitar note heads

Permitting line breaks within beamed tuplets

This artificial example shows how both manual and automatic line breaks may be permitted to within a beamed tuplet. Note that such off-beat tuplets have to be beamed manually.

Permitting line breaks within beamed tuplets

Persistent accidentals

Tired of having to remember where flats and sharps are supposed to go in your scores? Here's a solution: all accidentals are remembered and applied to subsequent natural pitches, until a natural gets forced.

This snippet shows two methods of achieving that: by using a music function, or with a Scheme engraver.

Persistent accidentals

Piano "Half Sustain Pedal" Indications

When playing the piano, there a quite a few songs that require you to only press the sustain pedal half way (or even a quarter of the way in some cases).

There is currently not a way to show these indications on the generated music in an intuitive way. This snippet provides functions that allow you to easily do this.

The implementation is quite complicated, but basically there are two music functions that get defined, sustainHalfOn and sustainHalfOff. You can use these just like you would normally use sustainOn and sustainOff. You can use any of the sustain pedal styles, and everything will work as expected. You do need to add an explicit call to sustainHalfOff when you want the half pedal to end. Calling sustainOn does not automatically turn off sustainHalfOn.

Under the covers, this works by representing sustain half on/half off as Una Corda pedal events. The logic temporarily changes the rendering of Una Corda pedals when you call sustainHalfOn, and changes it back when you call sustainHalfOff. We also temporarily change the value of Staff.unaCordaPedalStyle to match the value of Staff.sustainPedalStyle for the duration of the half sustain event so that the intended sustain pedal style will be used.

Piano "Half Sustain Pedal" Indications

Piano template (simple)

Here is a simple piano staff with some notes.

Piano template (simple)

Piano template with centered dynamics

Many piano scores have the dynamics centered between the two staves. This snippet demonstrates how this was achieved with older versions of LilyPond; the Dynamics context is now included by default (starting with LilyPond 2.13.29), and does not require to be defined manually.

Piano template with centered dynamics

Piano template with centered lyrics

Instead of having a full staff for the melody and lyrics, lyrics can be centered between the staves of a piano staff.

Piano template with centered lyrics

Piano template with melody and lyrics

Here is a typical song format: one staff with the melody and lyrics, with piano accompaniment underneath.

Piano template with melody and lyrics

PianoStaff without Braces

Sometimes you want to encode staffs without braces which has the effect that the bar lines are aligned.

See also snippet 873: Vertical aligned StaffGroups without connecting SystemStartBar

PianoStaff without Braces

Pipe-band snare drums

Writing parts for pipe-band snare drums (e.g. in Scottish traditional music) can be very specific.

To make it simpler, here are a few tailor-made definitions that you can save as a separate file (named "scottish-drums.ily" for example) and then include in each of your drum scores.

Pipe-band snare drums

Pitches entry 1

The notes are specified by the letters a through g. The octave is formed with notes ranging from c to b. The pitch c is an octave below middle C and the letters span the octave above that C.

Pitches entry 1

Pitches entry 2 - accidental signs

A sharp is formed by adding -is to the end of a pitch name and a flat is formed by adding -es. Double sharps and double flats are obtained by adding -isis or -eses. These names are the Dutch note names. In Dutch, aes is contracted to as, but both forms are accepted. Similarly, both es and ees are accepted.

Pitches entry 2 - accidental signs

Pitches entry 3 - octaves

The optional octave specification takes the form of a series of single quote (`'') characters or a series of comma (`,') characters. Each ' raises the pitch by one octave; each , lowers the pitch by an octave

Pitches entry 3 - octaves

Pitches headword

Pitches headword

Pitches headword

Placement of right-hand fingerings

It is possible to exercise greater control over the placement of right-hand fingerings by setting a specific property, as demonstrated in the following example.

Placement of right-hand fingerings

Placing a text at the end of a hairpin (decrescendo)

The book Music Notation on the Twentieth Century, by Kurt Stone, suggests to use "niente" or its abbreviation "n." instead of a hairpin ending on a "o" (page 18). Lilypond actually supports the latter but the former is not implemented. I defined "n." as a dynamic text and also created one of my own: "pd." as an abbreviation of "perdendosi", a term I feel more appropriated for winds than niente. However, there was a situation where I couldn't place the new dynamics: at the end of a measure, right before the bar line. A popular solution is to use a second voice with spacers to place the dynamics correctly but I found this is hardly a good solution. I first attempted to tweak the Scheme code to center text under a hairpin and managed to get a decent result but, as I know nothing of Scheme, the solution was far from perfect. I then created a post in the Nabble forum and the user named Thomas Morley kindly provided a solution in the form of the Scheme function copied below. All credit belongs to him. I'm adding this snippet to the repository at his request.

Placing a text at the end of a hairpin (decrescendo)

Placing changes of clef, time signature and key signature at the beginning of a repeated section

According to Elaine Gould, Behind Bars, chapter Repeated Sections, page 234, "When there is a new clef, key signature or time signature at the beginning of a repeated section" the repeat marks should be printed afterwards.

This is currently not the default in LilyPond.

This snippet provides a manual workaround.

Placing changes of clef, time signature and key signature at the beginning of a repeated section

Placing grace notes between arpeggios and chords

Arpeggios are positioned by default directly to the left of a chord.

If a chord is preceded by a grace note, you can position the arpeggio in front of the grace note by using an invisible note in a separate voice.

In order to span the two grace notes with the arpeggio, we add the Span_arpeggio_engraver to the Staff context, and set connectArpeggios = ##t.

Here's an example from Chopin's Nocturne No. 11 (Op. 37, No. 2):

Placing grace notes between arpeggios and chords

Placing rehearsal marks other than above the top staff

Currently, placing rehearsal marks somewhere else than above the top staff is not possible by default. This is due to a malfunction in the Staff_collecting_engraver, see Issue 2199. This solution (courtesy of Shevek, see the lilypond-user archive) defines a custom MarkLine context which will display all metronome and rehearsal marks and may be inserted anywhere between staff and other lines.

Remark from LSR-editor: Issue 2199 is solved in 2.21. In this regard this snippet is deprecated, for now we let it in as an example how to define a custom context like MarkLine.

Placing rehearsal marks other than above the top staff

Polymetric section: printing full-measure rests

This situation seems to come up when the following conditions are met:


The problem is that although notes and ordinary rests compress in the offending staves, full measure rests adhere to the time of the global voice.

The solution is to scale the \time value for offending staves by a fraction of the global voice full-measure rest length.

In the example below, there are nine 3/8 measures in the time of four 3/8 measures. The nine are therefore compressed by 4/9ths. To get appropriate length full-measure rests in the nine, we must set the \time value for the nine bars to 4/9ths of 3/8, or 1/6.

We can then display a dummy 3/8 time signature.

You can see the error by replacing the 1/6 with 3/8 in the compressMusic block.

Polymetric section: printing full-measure rests

Polymetric section: synchronizing different groups of staves

This snippet demonstrates how to handle staff grouping and synchronizing when typesetting polymetric ensemble music.

Polymetric section: synchronizing different groups of staves

Polyphony in tablature

Polyphony is created the same way in a TabStaff as in a regular staff.

Polyphony in tablature

polyrhythmic staves

Polyrhythmic pieces (with different rhythms in different staves) are not processed propperly with default settings. The BarLines crash as well as Timing. The solution is to assign the respective engravers to the Staff context.

polyrhythmic staves

Positioning a \fermata over the last bar line

To position a \fermata sign over the last bar line, you must use a specially modified rehearsal mark

\override Score.RehearsalMark
  #'break-visibility = #begin-of-line-invisible

Positioning a \fermata over the last bar line

Positioning arpeggios

If you need to extend or shorten an arpeggio, you can modify the upper and lower start positions independently.

Positioning arpeggios

Positioning fingering indications precisely

Generally the options available for positioning the fingering of chords work well by default, but if one of the indications needs to positioned more precisely the following tweak may be used. This is particularly useful for correcting the positioning when intervals of a second are involved.

Positioning fingering indications precisely

Positioning grace note beams at the height of normal note beams

When notes are placed on ledger lines, their beams are usually centred on the stave. Grace notes beams are shorter and grace notes on ledger lines may well have beams outside the stave. You can override this beaming for grace notes.

Positioning grace note beams at the height of normal note beams

Positioning grace notes with floating space

Setting the property 'strict-grace-spacing makes the musical columns for grace notes 'floating', i.e., decoupled from the non-grace notes: first the normal notes are spaced, then the (musical columns of the) graces are put left of the musical columns for the main notes.

Positioning grace notes with floating space

Positioning lead sheet symbols

To position lead sheet symbols above repeat brackets, override their Y-offsets. Without additional elements the values in the snippet can be used; they may have to be tweaked in a real music context.

Positioning lead sheet symbols

Positioning multi-measure rests

Unlike ordinary rests, there is no predefined command to change the staff position of a multi-measure rest symbol of either form by attaching it to a note. However, in polyphonic music multi-measure rests in odd-numbered and even-numbered voices are vertically separated.

The positioning of multi-measure rests can be controlled as follows:

Positioning multi-measure rests

Positioning opposing fermatas on a bar line

This snippet demonstrates a command that prints fermatas both above and below a bar line. If there would not otherwise be a bar line, it adds a double bar line. Semantically, the command codes a longer-than-normal caesura, which might be considered misuse depending on the situation.

Positioning opposing fermatas on a bar line

Positioning segno and coda (with line break)

If you want to place an exiting segno sign and add text like D.S. al Coda next to it where usually the staff lines are you can use this snippet. The coda will resume in a new line. There is a variation documented in this snippet, where the coda will remain on the same line.

Positioning segno and coda (with line break)

Positioning segno and coda (without line break)

If you want to place an exiting segno sign and add text like <q>D.S. al Coda</q> next to it where usually the staff lines are you can use this snippet. The coda will resume in the same line.

Positioning segno and coda (without line break)

Positioning text markups inside slurs

Text markups need to have the outside-staff-priority property set to false in order to be printed inside slurs.

Positioning text markups inside slurs

Positioning tuplet numbers close to kneed beams

If you want to move tuplet numbers close to kneed beams on a single staff or between staves, this workaround automates the process. It ignores tuplets on ordinary beams or with visible brackets.

Important: to work properly, this method must be used with manual beaming.

Two functions are provided. The first moves the number along the Y-axis, and is called like so: \override TupletNumber #'Y-offset = #kneed-beam. The second function centers the number horizontally: \override TupletNumber #'X-offset = #center-on-beam.

Positioning tuplet numbers close to kneed beams

Positioning two opposite \fermata signs over the last bar line

To position two fermata signs on the last bar line (a typical setup in XVIII century music) add the Mark_engraver to the lower staff using \with.

Positioning two opposite \fermata signs over the last bar line

PostScript lines

You can add solid, dashed, and dotted lines using embedded Postscript.

PostScript lines

Predefined ukulele fretboards

Predefined fretboard diagrams for the ukulele, so that authors can simply write a chord name to get a fretboard with fingering hints, just as with guitar music. Also includes a definition for ukulele-tunings for the standard soprano tuning A-E-C-G, with which Lilypond is able to autogenerate further fretboard diagrams for chords not defined here (although these are not necessarily playable).

The fretboard diagrams are followed by a simple chord chart. Delete that and include the rest of the file to use the diagrams in your own scores.

These chord diagrams may give non-fatal compilation warnings with Lilypond 2.12.2, but 2.13 has been patched to fix this (on 24 Nov 2009 by Carl Sorensen).

Proposed blurb for documentation:

"Predefined fret diagrams" subsection (from section 2.4.1)

The default predefined fret diagrams are contained in the file predefined-guitar-fretboards.ly. Fret diagrams are stored based on the pitches of a chord and the value of stringTunings currently in use. predefined-guitar-fretboards.ly contains predefined fret diagrams only for guitar-tuning. To produce fret diagrams for the ukulele, use the file predefined-ukulele-fretboards.ly:

  \include "predefined-ukulele-fretboards.ly"

  myChords = { a1 a:m a:aug }

  \new ChordNames {
    \myChords
  }

  \new FretBoards {
    \set stringTunings = #ukulele-tuning
    \myChords
  }

Predefined fret diagrams can be added for other instruments or other tunings by following these examples.

From lower down in the same subsection:

The predefined fret diagram table for guitar contains seven chords (major, minor, augmented, diminished, dominant seventh, major seventh, minor seventh) for each of 17 keys. The table for ukulele contains these plus an additional four chords (major sixth, suspended second, suspended fourth, and major ninth) for the same keys. In addition, the file predefined-guitar-ninth-fretboards.ly contains major ninth chords for guitar. A complete list of the predefined fret diagrams is shown in Predefined fretboard diagrams. If there is no entry in the table for a chord, the FretBoards engraver will calculate a fret-diagram using the automatic fret diagram functionality described in Automatic fret diagrams.

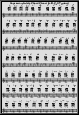
"Predefined fretboard diagrams" (section B.3)

I propose to copy the examples given here, except using \include "predefined-ukulele-fretboards.ly" plus \set stringTunings = #ukulele-tuning, and using these chords: mychords = \chordmode {c1 c:m c:aug c:dim c:7 c:maj7 c:m7 c:6 c:sus2 c:sus4 c:9 \break }. I also suggest adding "predefined-guitar-ninth-fretboards.ly" and including c:9 in the list of chords for the guitar.

Predefined ukulele fretboards

Preventing double augmentation dots with identical notes in chords

Sometimes, a dotted chord may contain the same note twice, in which case two augmentation dots will be printed (accordingly to recommended engraving practice). Here is how to prevent this behavior from appearing, in cases where it would be unwanted.

Preventing double augmentation dots with identical notes in chords

Preventing extra naturals from being automatically added

In accordance with traditional typesetting rules, a natural sign is printed before a sharp or flat if a previous double sharp or flat on the same note is canceled. To change this behavior to contemporary practice, set the extraNatural property to f in the Staff context.

Preventing extra naturals from being automatically added

Preventing final mark from removing final tuplet

The addition of a final mark can result in the loss of a final tuplet marking. This can be overcome by setting TupletBracket.full-length-to-extent to false.

Preventing final mark from removing final tuplet

Preventing long \mark objects to stretch a measure

When you put a long \markup text in a \mark object, LilyPond stretches the measure to encompass the complete markup. This can be avoided by overriding the 'X-extent property of the RehearsalMark object, as demonstrated in this snippet.

Preventing long \mark objects to stretch a measure

Preventing natural signs from being printed when the key signature changes

When the key signature changes, natural signs are automatically printed to cancel any accidentals from previous key signatures. This may be prevented by setting to f the printKeyCancellation property in the Staff context.

Preventing natural signs from being printed when the key signature changes

Preventing NoteNames adding a note name for a tied note

By default, the NoteNames also adds a note name for a tied note. To avoid that, you can use a scheme music function which will transform all second notes of tied notes to a \skip event.

Preventing NoteNames adding a note name for a tied note

Preventing notes from being beamed when using \breathe

Notes that are separated with a \breathe sign are usually not beamed in engraved music. However, LilyPond currently ignores it by default. Here is a way to define a new command that includes a \noBeam instruction. You can even name it breathe, if you want to replace the existing function; however, as the example shows, there are some limitations too, that require explicit manual beaming in some situations.

Preventing notes from being beamed when using \breathe

Preventing stem extension

Extending stems to the center line may be prevented using no-stem-extend.

Preventing stem extension

Print ChordNames with same root and different bass as slash and bass-note

To print subsequent ChordNames only differing in its bass note as slash and bass note use the here defined engraver. The behaviour may be controlled in detail by the chordChanges context property.

Print ChordNames with same root and different bass as slash and bass-note

Printing bar numbers at regular intervals

By setting the barNumberVisibility property, bar numbers can be printed at regular intervals. Here the bar numbers are printed every two measures except at the end of the line.

Printing bar numbers at regular intervals

Printing bar numbers for broken measures

By default a BarNumber of a broken measure is not repeated at the beginning of the new line. Use first-bar-number-invisible-save-broken-bars for barNumberVisibility to get a parenthesized BarNumber there.

Printing bar numbers for broken measures

Printing bar numbers inside boxes or circles

Bar numbers can also be printed inside boxes or circles.

Printing bar numbers inside boxes or circles

Printing bar numbers using modulo-bar-number-visible

If the remainder of the division of the current BarNumber by the first argument of modulo-bar-number-visible equals its second argument print the BarNumber.

Useful to print the BarNumber at certain distances, p.e.:

Printing bar numbers using modulo-bar-number-visible

Printing bar numbers with changing regular intervals

Using the set-bar-number-visibility context function, bar number intervals can be changed.

Printing bar numbers with changing regular intervals

Printing both the ancient and the modern clef in vocal music

Until the late 17th century, vocal parts were printed using specific clefs for each voice. In modern editions, the modern clef is printed but sometimes it is preceded by the traditional clef. Here is how to achieve it in LilyPond: you have to replace the clef symbol by a \markup block, and that can only be done by overriding the 'stencil property to make it print a text element. Then you have to define this text element as a markup, and insert in it the \musicglyph you need. Notice the \raise command: it is used to place the C clef properly on the staff.

Printing both the ancient and the modern clef in vocal music

Printing figured bass extender lines without a starting figure

In figured bass, the normal triads (<8 5 3> or simply <5> in LilyPond notation) are not printed at all. However, sometimes, the bass moves, while the upper voices in the chord should stay from the normal triad. The usual way for this is to print an extender line without an explicit starting figure. The way to produce such a single extender line in figured bass is to declare a bass figure as implicit, using the implicitBassFigures property of the Staff context. The most common setting would be \set Staff.implicitBassFigures = #'(5), which declares <5> an implicit figure and does not print the 5, but will print any extenders derived from it. This can be done Staff-wide (using \with as in the first staff of this example), but it can also be set/changed at any point inside the score using \set as shown in the second staff.

The problem is that one can then not have any explicit 5 figures in the score. As a workaround, one can of course declare any other number (e.g. 100) as an implicit figure and simply use this number for single extender lines.

Printing figured bass extender lines without a starting figure

Printing figured bass extender lines without a starting figure

In figured bass, the normal triads (<8 5 3> or simply <5> in LilyPond notation) are not printed at all. However, sometimes, the bass moves, while the upper voices in the chord should stay from the normal triad. The usual way for this is to print an extender line without an explicit starting figure. The simplest way to obtain this in LilyPond is to specify an underscore instead of the figure, which is interpreted as a space, so that only the extender line is shown. An alternative is to declare a bass figure as implicit, using the implicitBassFigures property of the Staff context. The most common setting would be \set Staff.implicitBassFigures = #'(5), which declares <5> an implicit figure and does not print the 5, but will print any extenders derived from it.

Printing figured bass extender lines without a starting figure

Printing figured bass figures above rests in a Staff context

If figured bass is written using \figuremode inside a Staff context, then by default figures attached to rests are printed, as seen in the first staff. To skip figures assigned to rests, one has to set the ignoreFiguredBassRest property of the Staff to ##t. Figures are always printed over skips.

Printing figured bass figures above rests in a Staff context

Printing hairpins in various styles

Hairpin dynamics may be created in a variety of styles.

Printing hairpins in various styles

Printing hairpins using al niente notation

Hairpin dynamics may be printed with a circled tip (al niente notation) by setting the circled-tip property of the Hairpin object to #t.

Printing hairpins using al niente notation

Printing marks at the end of a line or a score

Marks can be printed at the end of the current line, instead of the beginning of the following line. This is particularly useful when a mark has to be added at the end of a score – when there is no next line.

In such cases, the right end of the mark has to be aligned with the final bar line, as demonstrated on the second line of this example.

Printing marks at the end of a line or a score

Printing marks on every staff

Although rehearsal and text marks are normally only printed above the topmost staff, they may also be printed on every staff.

Printing marks on every staff

Printing metronome and rehearsal marks below the staff

By default, metronome and rehearsal marks are printed above the staff. To place them below the staff simply set the direction property of MetronomeMark or RehearsalMark appropriately.

Printing metronome and rehearsal marks below the staff

Printing music with different time signatures

In the following snippet, two parts have a completely different time signature, yet remain synchronized.

The bar lines can no longer be printed at the Score level; to allow independent bar lines in each part, the Default_barline_engraver and Timing_translator are moved from the Score context to the Staff context.

If bar numbers are required, the Bar_number_engraver should also be moved, since it relies on properties set by the Timing_translator; a \with block can be used to add bar numbers to the relevant staff.

Printing music with different time signatures

Printing note names with and without an octave marker

The NoteNames context can be used to print the text value of notes. The printOctaveNames property turns on or off the representation of the octave of the note.

Printing note names with and without an octave marker

Printing only odd bar numbers

To print only the odd bar numbers you must set the barNumberVisibility

Moreover, the Score.BarNumber #'break-visibility should be overridden e.g. to #all-visible

This is best placed in a \layout block to keep the music part "clean".

The first bar number can also be printed by inserting \bar "" before the music.

This modulo function can also be used in a more general way!

Printing only odd bar numbers

Printing text from right to left

It is possible to print text from right to left in a markup object, as demonstrated here.

Printing text from right to left

Printing the bar number for the first measure

By default, the first bar number in a score is suppressed if it is less than or equal to 1. By setting barNumberVisibility to all-bar-numbers-visible, any bar number can be printed for the first measure and all subsequent measures.

Printing the bar number for the first measure

Printing the full title on several scores in the same file

By default, only the piece and opus fields from the \header{...} block are typeset above each separate score, if you have multiple \score{...} blocks in your input file. As explained in the Notation Reference, you can change this by setting the paper variable printallheaders, so that the full title is printed over each score. The corresponding \header{...} block should then be included within the corresponding \score{...} block, otherwise you will get an additional title (the title for the full book) above the first individual score title. This example shows how to get rid of the extra book level title. Note that a top level \header{...} block is useful if some titling information is the same for all scores and you do not want to repeat the information several times in the input file.

Printing the full title on several scores in the same file

Printing the title on every page of your score

With this trick, the title of your work will be printed in small on top of every page, using evenHeaderMarkup and oddHeaderMarkup.

Printing the title on every page of your score

Printing tuplet brackets on the note head side

Whichever option you choose for controlling the tuplet bracket visibility, it will show or hide the tuplet bracket irrespectively of tuplet bracket placement (stem side or note head side). However, when placing the tuplet bracket on the note head side some authors recommend always printing the tuplet bracket. The option visible-over-note-heads can be used to achieve this.

Printing tuplet brackets on the note head side

Producing white (void) notation

In some French Baroque music, mainly in slow 3/2 time, a form of notation using open note heads was used, which is now known as white or void notation.

This snippet demonstrates such notation, by setting the property duration-log. Correct beaming is obtained by setting the music in 3/4 time and changing the displayed time signature using timeSignatureFraction.

Producing white (void) notation

Proportional spacing

Proportional notation can be created by setting proportionalNotationDuration. Notes will be spaced proportional to the distance for the given duration.

Proportional spacing

Proportional strict grace notes

With strict-note-spacing spacing for grace notes (even multiple ones) is floating as well.

Proportional strict grace notes

Proportional strict notespacing

If strict-note-spacing is set spacing of notes is not influenced by bars or clefs within a system. Rather, they are placed just before the note that occurs at the same time. This may cause collisions.

Proportional strict notespacing

Putting lyrics inside the staff

Lyrics can be moved vertically to place them inside the staff. The lyrics are moved with \override LyricText.extra-offset = #'(0 . dy) and there are similar commands to move the extenders and hyphens. The offset needed is established with trial and error.

Putting lyrics inside the staff

Putting parentheses around a note inside a chord

As children do not always have hands large enough, say, to plays octavas when studying piano, or anything else, it can be useful to add parentheses around a low note for example. In this snippet, the parenthesized note is made a bit smaller using the \tweak command on the #'font-size property.

Putting parentheses around a note inside a chord

Putting parentheses around a single note

Objects may be parenthesized by prefixing \parenthesize to the music event: in other words, the note has to be put after the \parenthesize command.

This only functions inside chords; to parenthesize a single note it must be enclosed with as if it is a chord.

Putting parentheses around a single note

Putting parentheses around non-note objects

Various objects may be parenthesized as well as notes: in this example, the articulation mark is printed between parentheses.

Putting parentheses around non-note objects

Quoting another voice

The quotedEventTypes property determines the music event types which should be quoted. The default value is (note-event rest-event tie-event beam-event tuplet-span-event), which means that only the notes, rests, ties, beams and tuplets of the quoted voice will appear in the \quoteDuring expression.

In the following example, a 16th rest is not quoted since rest-event is not in quotedEventTypes.

For a list of event types, consult the Music classes section of the Internals Reference.

Quoting another voice

Quoting another voice with transposition

Quotations take into account the transposition of both source and target. In this example, all instruments play sounding middle C; the target is an instrument in F. The target part may be transposed using \transpose. In this case, all the pitches (including the quoted ones) are transposed.

Quoting another voice with transposition

Re-positioning note heads on the opposite side of the stem

In some cases you may want to move one or more note heads in a chord to the opposite side of the stem. This snippet allows you to do that by overriding the horizontal placement of individual note heads.

It also includes two helper functions for making other necessary adjustments (like changing the 'stem-attachment property) that may be required when changing the horizontal placement of a note head.

Re-positioning note heads on the opposite side of the stem

Ready-to-use LilyPond macros: advanced layout and titles, using a special stylesheet

Taking LilyPond to a whole new level

This snippet is actually a set of advanced macros that provide some useful predefined commands. You can just copy the whole code, paste it in a separate file, named, for instance, 'book-titling.ily'; then just include it in your score and use the provided macros (see the end of the snippet description if you want an example of an actual score source file).

Using LilyPond to produce a whole book

This snippet allows you to create:

The following commands are provided (in addition to LilyPond standard syntax):: In this snippet, you will find the ready-to-use stylesheet (you may save it as a separate file named "book-titling.ily", and then include it in your scores), and at the bottom of the source code, a short example demonstrating some of these abilities.

Ready-to-use LilyPond macros: advanced layout and titles, using a special stylesheet

Recorder fingering chart

The following example demonstrates how fingering charts for wind instruments can be realized.

Recorder fingering chart

Redefining grace note global defaults

The global defaults for grace notes are stored in the following identifiers.

startGraceMusic
stopGraceMusic
startAcciaccaturaMusic
stopAcciaccaturaMusic
startAppoggiaturaMusic
stopAppoggiaturaMusic

They are defined in file ly/grace-init.ly. By redefining them other effects may be obtained.

Redefining grace note global defaults

Remove named chords from MIDI output

When using a \new Chordnames {} section, chords will be included in MIDI output. When chord names are only included to ease reading but should not sound, possibly because they are already included in the score, this is a problem.

The sound can be changed using \set Chordnames.midiInstrument = "(whatever)", but cannot be removed by using a non-existent instrument: Lilypond will default to acoustic grand in such a case.

The solution is to act at the MIDI level instead of the Chordnames: remove the MIDI performer used for that specific voice.

Note that the working part of the snippet is not visible in the generated score. This is as should be, since this is only about MIDI behaviour.

Remove named chords from MIDI output

Remove time signature, keep barlines

The following lines create a new staff without the time signature mark but they do print the barlines, which are positioned manually in the example.

Remove time signature, keep barlines

Removing accidentals from a single voice

The accidentals engravers engraver usually live at Staff level, but reads the settings for Accidental at Voice level, so you can \override them at Voice. To get rid of all accidentals, you need to remove both the Accidental engraver and the AccidentalCautionary one.

Removing accidentals from a single voice

Removing bar numbers from a score

Bar numbers can be removed entirely by removing the Bar_number_engraver from the Score context.

Removing bar numbers from a score

Removing brace on first line of piano score

This snippet removes the first brace from a PianoStaff or a GrandStaff, together with the clefs.

It may be useful when cutting and pasting the engraved image into existing music.

It uses \alterBroken.

Removing brace on first line of piano score

Removing connecting bar lines on StaffGroup, PianoStaff, or GrandStaff

By default, bar lines in StaffGroup, PianoStaff, or GrandStaff groups are connected between the staves, i.e. a SpanBar is printed. This behaviour can be overridden on a staff-by-staff basis.

Removing connecting bar lines on StaffGroup, PianoStaff, or GrandStaff

Removing items from only voiceTwo using a Scheme filter

Sometimes you have two voices combined on one staff, but you also want to generate a version for each voice separately. Thus, each voice has all dynamics, articulations, ornaments and markup text assigned. However, when combining them as two voices on the same staff, each voice will print its dynamics, articulations, etc. resulting in them printed twice.

To remove these markups from the second voice, you have two choices:

  1. Remove the corresponding engravers, which created the dynamics, markups, etc.
  2. Filter out the events from the music that describe these dynamics, markups, etc.

While the first approach is well-documented in the documentation, it is unable to remove the fermata from R1-\fermataMarkup, because the same engraver creates both the rest itself and all markup attached to it. Using the second approach, one can also filter out that fermata (which is of type MultiMeasureTextEvent).

The second approach can be easily implemented in Scheme by defining a filter function, that returns false for all events to be removed (e.g., for MultiMeasureTextEvent). This filter function is simply applied to the music of the second voice by the scheme function (music-filter filterfunction music).

Removing items from only voiceTwo using a Scheme filter

Removing the first empty line

The first empty staff can also be removed from the score by setting the VerticalAxisGroup property remove-first. This can be done globally inside the \layout block, or locally inside the specific staff that should be removed. In the latter case, you have to specify the context (Staff applies only to the current staff) in front of the property.

The lower staff of the second staff group is not removed, because the setting applies only to the specific staff inside of which it is written.

Removing the first empty line

Removing the key signature at the end of a line

According to normal typesetting conventions, LilyPond typesets key changes at the end of the line, when the change appears at a line break. This example shows how to change this default to only print the new key signature at the beginning of the next line.

Removing the key signature at the end of a line

Removing time signature and bar lines

Engravers can be removed one by one. Here, the time signature and bar lines have been removed.

Removing time signature and bar lines

Repeat commands grace echo purger

One subtype of the grace synchronization issue is the grace echo. It occurs if one voice sends an (system wide collected) event (e.g. start of repeat, start or end of volta) before a grace note, while another voice does it after this grace note (usually because there is no grace note in the other voice). Then simply ignoring the second occurrence after the grace notes is a quick help.

Off course, it cannot help if there is no event before the first grace note at all, e.g. if you use a parallel control voice without grace notes to define the repeat structure.

With the \repeat and \alternative commands this method is a little tricky, because it must be done within an exact sequence of the other engravers. This example illustrates how it's done 'directly' by context modifications and using a scheme engraver, and this source code also describes how it will be implemented by patching your LILYPOND installation.

Repeat commands grace echo purger

Repeat lyric extender

A lyric extender which extends into several \alternative blocks can be simulated by adding a 'null' markup before the extender.

Repeat lyric extender

Repeat percent and chords

This snippet shows how to put the percent sign for a duplicate chord.

Repeat percent and chords

Repeat percent and chords (alternate)

This snippet shows how to put the percent sign for a duplicate chord.

Repeat percent and chords (alternate)

Repeat with brackets

This snippet adds brackets with the number of repetitions above a bar or a group of bar. Very useful when dealing with minimal music, for instance. To summon it, simply use \repeatBracket N music, where N is the number of repetitions. Example: \repeatBracket 7 { c'2 e' }

Repeat with brackets

Repeat with upbeat and different durations in the alternatives

A volta repeat in a score with an upbeat may

This is done using \partial in the second alternative.

Repeat with upbeat and different durations in the alternatives

Repeat-bar-lines with angle-wings for whole StaffGroup (automatic and semi-automatic)

The here-defined CertainBracketTipsBarLines automatically adds angle wings to certain bar lines of an entire StaffGroup, relying on the new-defined property tip. To activate it, say

\override Staff.BarLine.tip = #'auto

Using values up and down instead of auto, the settings can be made explicit, offering the possibility to limit those angle wings to certain StaffGroups among others of the same score. An example for this is commented in the code below.

CertainBracketTipsBarLines is currently limited to the default repeat bars, i.e., ":..:", ":|.", ".|:-|" ".|:"

Repeat-bar-lines with angle-wings for whole StaffGroup (automatic and semi-automatic)

Repeat-bar-lines with angle-wings for whole StaffGroup (manually)

This snippet demonstrates how to add angle-wings to the BarLines of an entire StaffGroup.

It is done manually by applying the here-defined function repeatBarGroupAlter at appropriate locations.

repeatBarGroupAlter needs three arguments: repeat-bar-type, repeat-bar-height, and repeat-bar-translate.

Repeat-bar-lines with angle-wings for whole StaffGroup (manually)

Repeats headword

Repeats headword

Repeats headword

Repeats with parallelMusic

Sometimes for short polyphonic pieces – and to make the source more readable –, it can be helpful to use \parallelMusic.

Troubles come with repeats that should be entered as

\parallelMusic #'(voiceA voiceB) {
  \repeat volta 2 { mes.1 mes.2 ... mes.n } |
  \repeat volta 2 { mes.1 mes.2 ... mes.n } |
}

so the code becomes less readable and the use of \parallelMusic less understandable.

This snippet is a workaround that shows another way to write repeats in \parallelMusic mode by simply adding a bar at the end of the score.

It also handles the wanted repeats in the midi output.

Repeats with parallelMusic

Replacing default MIDI instrument equalization

The default MIDI instrument equalizer can be replaced by setting the instrumentEqualizer property in the Score context to a user-defined Scheme procedure that uses a MIDI instrument name as its argument along with a pair of fractions indicating the minimum and maximum volumes respectively to be applied to that specific instrument.

The following example sets the minimum and maximum volumes for flute and clarinet respectively."

Replacing default MIDI instrument equalization

Replacing some accidentals with a user-defined stencil

Here is a way to replace all accidentals of any sort with an arbitrary stencil (in this case, a markup). Alterations are defined as 1 for a double-flat, -3/4 for a sesquiflat, etc.

Replacing some accidentals with a user-defined stencil

Resize arrow-heads for directed arpeggio

Sometimes the arrow-heads for directed arpeggios seem to be rather small. The function biggerArrow provides a convenient method to resize them.

Limitation: if the scaling-factor exceeds 2, the result is poor. Likely a rather rare case.

Resize arrow-heads for directed arpeggio

Rest styles

Rests may be used in various styles.

Rest styles

Rests vertical position

A rest's vertical position may be explicitly specified by entering a note with the \rest keyword appended, the rest will be placed at the note's place. This makes manual formatting in polyphonic music easier. Automatic rest collision formatting will leave these rests alone.

Rests vertical position

Retuning to a regular temperament

LilyPond holds all the information for meantone temperaments or near-Pythagorean intonations. The default tuning is for 12 note equal temperament. This snippet changes that, and can be placed in an include file to work with pre-existing files. Key signatures are not supported.

The MIDI output works as well as any case of microtuning. Chords need to be split into separate voices. The example is a single line of rising pitches.

The tuning is specified as the number of steps to the octave for an equal temperament. Everything follows the nearest fifth to just in that equal temperament.

Retuning to a regular temperament

Reverting default beam endings

To typeset beams grouped 3-4-3-2 in 12/8 it is necessary first to override the default beam endings in 12/8, and then to set up the new beaming endings:

Reverting default beam endings

Rewriting the Stem stencil using markup paths

This snippet rewrites ly:stem::print using a markup, which can be used as a base to create markup path stems. The example given produces stems shaped like bolts of lightning.

Rewriting the Stem stencil using markup paths

RGB colors

In addition to the built-in x11-color system, it is possible to get exact RGB colors by specifying the amounts of red, green and blue.

RGB colors

Rhythm marks / play style indication [obsolete in 2.23]

<p>If a piece is written in e.g. even eight notes, but you want to indicate that the rhythm of the even eighths should be played e.g. with a swing rhythm, you can use this. This can be used and tweaked for various rhythm styles/changes.</p> <p>This snippet is obsolete with LilyPond 2.23.x: use the new built-in <code>\rhythm</code> markup command, e.g.,</p> <p><pre> \tempo \markup { Swing \rhythm { 8[ 8] } = \rhythm { \tuplet 3/2 { 8( 8) 8 } } } </pre></p>

Rhythm marks / play style indication [obsolete in 2.23]

Rhythmic slashes

In simple lead-sheets, sometimes no actual notes are written, instead only rhythmic patterns and chords above the measures are notated giving the structure of a song. Such a feature is for example useful while creating/transcribing the structure of a song and also when sharing lead sheets with guitarists or jazz musicians.

Rhythmic slashes

Rhythms headword

Rhythms headword

Rhythms headword

Right-aligned and centered Text

If you want to format a long text to be right-aligned or centered, set the text's line-width as appropriate and use the new commands \textRight or \textCenter as defined here. (To format left-aligned use common \wordwrap.)

Right-aligned and centered Text

Ripped, torn staff-lines

Here are some macros which can make a single staff appear as though its right side has been torn off. Two styles are available: the first "erases" the ends of individual staff- lines to different lengths; the second draws a zigzag line and erases everything to its right. Furthermore, the first type is capable of producing tear-patterns at random. Both work by temporarily modifying the BarLine stencil.

STYLE 1 PREFERENCES:

STYLE 2 PREFERENCES:

USAGE:

see the \score { } block at the end of the file.

Ripped, torn staff-lines

Roman numerals for analysis

This function is designed to simplify the creation of Roman numerals for harmonic analysis.

Syntax: \markup \rN { ...list of symbols... }

Enter a Roman numeral as a list of symbols, with each element separated by spaces. List symbols in order of appearance, omitting those not needed: Roman numeral; letter for a quality requiring a special indicator (i.e., diminished, half-diminished, etc.); top (or only) number of inversion symbol; bottom number; "/" (if secondary function); Roman numeral.

Preceding either Roman numeral with "s" or "b" or "n" will attach a sharp, flat, or natural: for example, "svi" or "bVII" (quotation marks not needed). Note names are possible: Cs, Dn, Eb.

Use the following symbols for qualities (if a superscript indication is needed): "o" for diminished, "h" for half-diminished, "+" for augmented, "b" for flat. You may use any combination of "M" and "m" here: M, mm, MM7, Mm, Mmm9, etc. Added notes are also possible: add6, add9, etc.

The analysis can be created in a Lyrics context.

Roman numerals for analysis

Rotating a text object

LilyPond gives you the ability to rotate any object you want, particularly markups as showed here. Alternatively, you can use the \column function to display your text vertically without rotating the letters.

Rotating a text object

Rotating hairpins

Hairpins which are not in standard orientation can be adjusted using <code>'rotation</code>.

Rotating hairpins

SATB Anglican Chant

Anglican Chant

Anglican chant developed from plainchant. It is an art form of great beauty when sung in four-part harmony by carefully rehearsed choirs. Many congregations sing Anglican chant with affection and enthusiasm.

An Anglican chant consists of two phrases, one of four notes in duration, followed by on of six notes. A double, triple, or quadruple chant consists of a doubling, triplilng, or quadrupling of this basic pattern. Because of the fixed design of Anglican chant, a text must be pointed so that certain accented syllables will be sung to particular notes - the second and fourth notes of each section and the sixth note of the final section. The first note of each section, the reciting note, may be associated with only a single unaccented syllable (it may, in fact, on occasion be omitted) or it may be associated with a dozen or more syllables. The musical notation defines the pitch but not the duration of any note.

A Manual for Clergy and Church Musicians, © 1980 by the Church Pension Fund, pp. 55

You can see from the following attachment that singing Anglican Chant directly from The Hymnal 1982 can require more practice and skill than most congregations, let alone choirs, posses. This template allows a simple method of pointing and writing out Anglican Chant so they can be sung more easily. Here is a sample of S39 The Invitatory: Venite/Psalm 95.

The text for Psalms and Canticles may be downloaded from http://justus.anglican.org/resources/bcp/bcp.htm. However, the pointed versions are in The Hymnal 1982. There, two dots over a word imply a slur. A bracket over a word implies a tie. The apostrophes mark bars.

S 39 is a double chant, so you can think of it as an A B pattern that is repeated. For this example, I used an Antiphon for Lent (The Lord if full of com ' passion and ' mercy: * Come let ' us a ' dore ' him.) The sequence for the entire Venite (Psalm 95 verses 1-7) is in the form A A [Ant. B] A B A [Ant. B] A A [Ant. B]. It is best to end a section in a B. So if you are not using an Antiphon, you would probably program A B A A B A B for verses 1-7 respectively.

Using the Template:

When you have done these six steps, you can run LilyPond to check your programming.

SATB Anglican Chant

SATB Choir template - four staves

This is a template for a SATB choir on four staves.

SATB Choir template - four staves

SATB Choir template - two staves - one text for each voice

SATB Choir template

SATB Choir template - two staves - one text for each voice

SATB Choir template (hymn template) two staves - one text for all voices

SATB Choir template (hymn template), with some layout setting (in the distance between text and staves).

SATB Choir template (hymn template) two staves - one text for all voices

Scaling durations

You can alter the length of duration by a fraction N/M appending `*N/M' (or `*N' if M=1). This will not affect the appearance of the notes or rests produced.

Scaling durations

Scaling vertical spacing

To increase or decrease the vertical spacing in general (rather than the spacing of just one particular aspect) you can multiply all of the default flexible vertical spacing properties by a given scaling factor. This approach helps preserve the spacing proportions, as compared with changing just one or two of these properties. In this snippet two variables are used as the scaling factors for (1) within-system spacing and (2) page layout (outside-system) spacing.

Scaling vertical spacing

Schleifer articulation mark

This articulation mark is used in baroque music, for example in Bach BWV 117b measure 3 and BWV 998 measure 21. Here is a function that combines a prall and a slur, using an invisible rest as a spacer (since slurs normally do not affect spacing).

Schleifer articulation mark

Scordatura

Special tunings (scordatura) for string instruments can be printed at the beginning of the staff, by tweaking the instrumentName property.

Scordatura

Score for diatonic accordion

A template to write a score for a diatonic accordion.

In the tabulator staff notation the outermost column is described with notes between lines, the innermost column is described with notes between lines and a cross as accidental, and the middle column is described with notes on a line, whereby the row in the middle is represented on the middle line in the staff.

Some words to transpose piano notes to the diatonic accordion:

  1. Every diatonic accordion is built for some keys only (for example, for the keys of C major and F major), so it is important to transpose a piano melody to match one of these keys. Transpose the source code, not only the output because this code is required later on to translate it once more to the tabulator staff. This can be done with the command displayLilyMusic.
  2. You have to alternate the push- and pull-direction of the accordion regularly. If the player has a too long part to pull the accordion gets broken. On the other hand, some harmonies are only available in one direction. Considering this, decide which parts of the melody are the push-parts and which the pull-parts.
  3. For each pull- or push-part translate the piano notes to the according tabulature representation.

Score for diatonic accordion

Score with variable measure lengths

LilyPond determines the measure length from the time signature, so to implement variable measure lengths, one has to set the time signature for every measure, but suppress the display of the time signature change by setting its stencil to ##f.

Score with variable measure lengths

Screech and Boink

Random complex notation

Screech and Boink

Segno / Coda on top of rehearsal mark

In LilyPond 2.24.0 the \textMark command and the normal \mark command happily coexist.

Furthermore the sophisticated \repeat segno command is available, see here.

Thus this lsr snippet is heavily shortened compared with previous versions.

Segno / Coda on top of rehearsal mark

SemiChoirStaff is a ChoirStaff with SpanBars except "|"-type bars

If you wish to typeset |., etc, style spanbars on a ChoirStaff, you can add the span_bar_engraver, and instruct it to omit the |-style bars. In this example a new context, SemiChoirStaff, is created to achieve this.

SemiChoirStaff is a ChoirStaff with SpanBars except "|"-type bars

senza ripetizioni (without repeats)

If you want to reuse your music snippet without volta repeats (as mostly done at »Da Capo« or »Dal Segno«, sometimes explicitly written like »Da capo senza ripetizioni«), here is a music function \senzaRipet which extracts such a sequential music.

senza ripetizioni (without repeats)

Separating key cancellations from key signature changes

By default, the accidentals used for key cancellations are placed adjacent to those for key signature changes. This behavior can be changed by overriding the break-align-orders property of the BreakAlignment grob.

The value of break-align-orders is a vector of length 3, with quoted lists of breakable items as elements. Each list describes the default order of prefatory matter at the end, in the middle, and at the beginning of a line, respectively. We are only interested in changing the behaviour in the middle of a line.

If you look up the definition of break-align-orders in LilyPond's Internal Reference (see the BreakAlignment grob), you get the following order in the second element:

...
staff-bar
key-cancellation
key-signature
...

We want to change that, moving key-cancellation before staff-bar. To make this happen we use the grob-transformer function, which gives us access to the original vector as the second argument of the lambda function, here called orig (we don't need the first argument, grob). We return a new vector, with unchanged first and last elements. For the middle element, we first remove key-cancellation from the list, then adding it again before staff-bar.

Separating key cancellations from key signature changes

Setting a color for all staff objects automatically [obsolete in 2.25]

To color all objects on a staff is a laborious task. However, this can be automated by using some Scheme code to access the list of objects contained in all-grob-descriptions. All graphical objects which live in the Staff context can then be colored by setting their color property.

This snippet is obsolete in LilyPond 2.25, which introduces a much simpler method:

\layout { property-defaults.color = "blue" }

Setting a color for all staff objects automatically [obsolete in 2.25]

Setting hairpin behavior at bar lines

If the note which ends a hairpin falls on a downbeat, the hairpin stops at the bar line immediately preceding. This behavior can be controlled by overriding the 'to-barline property.

Setting hairpin behavior at bar lines

Setting minimum width (spacing) for one particular measure

By default, LilyPond chooses the horizontal spacing and stretching so that the whole score fits into the assigned area. When there are dynamic signs attached to invisible spacer notes in tightly spaced scores, their distance might be too small, so that the dynamics either collide or the second of the dynamic signs is moved up or down to prevent collisions (see the first measure in the snippet).

One can, however, set a minimum width for that particular measure by using a parallel voice with an invisible multi-measure rest using the desired minimum-length. All other measures will still keep their default spacing, only this one measure will be stretched a little more (see the third measure in the snippet).

Setting minimum width (spacing) for one particular measure

Setting multiple time signatures at the start of a bar

Create a compound time signature for irregular meters.

Function \irregularMeter accepts the same arguments as function \compoundMeter; it also produces the same visual appearance of the time signature elements. However, it doesn't insert a plus sign between the (top-level) elements but rather a small horizontal space. Additionally, it doesn't change the timing, which means that it is still necessary to insert proper \time commands, to say \omit Timing.TimeSignature before the first \time command in the section with irregular meters, and \undo \omit Timing.TimeSignature after this section.

Setting multiple time signatures at the start of a bar

Setting system separators

System separators can be inserted between systems. Any markup can be used, but \slashSeparator has been provided as a sensible default.

Setting system separators

Setting the control points of a slur manually

If necessary you can resort to manually adjusting the control points of a slur. This example demonstrates the use of \vshape, visualizing the control points as an aid to adjust the slur's shape. After the adjustment is done, simply replace \vshape with \shape.

The \shape command also supports shaping of slurs broken by a line break, which is explained in LilyPond's Notation reference.

Adjusting slurs with \shape should be the last editing step; there are high chances that layout changes also alter the shape of slurs.

Setting the control points of a slur manually

Setting the double repeat default for volte

There are three different styles of double repeats for volte, that can be set using doubleRepeatBarType.

Setting the double repeat default for volte

Setting the extent of objects

The object may be extended to larger sized by overriding their properties. The lyrics in this example have an extent of (-10,10), which is why they are spaced so widely.

Setting the extent of objects

Setting the minimum length of a fall/doit

Sometimes the spacing is too tight, so that a fall or doit looks almost vertical. The solution is to specify a minimum length for the fall/doit, but only setting the minimum-length property (which you can do on hairpins and slurs, for example) does not work, since you also need a suitable setting for the springs-and-rods property. This example shows how to do it.

Setting the minimum length of a fall/doit

Setting the minimum length of a slur to separate notes

By setting the minimum length of a slur, notes are more separated.

Setting the minimum length of a slur to separate notes

Setting the minimum length of hairpins

If hairpins are too short, they can be lengthened by modifying the minimum-length property of the Hairpin object.

Setting the minimum length of hairpins

several procedures to print different bar numbering rules

sometimes you would like to emphasize certain bar numbers...

here are some procedures to do so:

several procedures to print different bar numbering rules

Shifting dynamic marks above the staff and to the left of notes

In vocal music, dynamic markings are often placed above, rather than below, the notes, so both the dynamics and the lyrics are close to the staff. In SATB pieces, vertical space can be scarce, and one way to recover some is to move the dynamics so they appear to the left of the notes. In recent development versions of LilyPond, they will then fall down to the staff in many cases. In current stable versions, they need to be manually shifted down.

Shifting dynamic marks above the staff and to the left of notes

Shifting lyrics when using non vocal letters

If you use non vocal letters in lyrics which come in combination with a word but the letters don't come under the tone but just left of the word you can shift the whole phrase to the left.

Shifting lyrics when using non vocal letters

Short tremolos

Short tremolos (involving eighth notes or shorter durations) can be obtained; in such a case only one beam is connected to the stems.

Short tremolos

Shortening volta brackets

By default, the volta brackets will be drawn over all of the alternative music, but it is possible to shorten them by setting voltaSpannerDuration. In the next example, the bracket only lasts one measure, which is a duration of 3/4.

Shortening volta brackets

Shorthand for triplets

If you have lots of triplets and want to save some typing, you can define your own \triplet command. This is a simple illustration of how to define your own Scheme function with embedded LilyPond code. The example shows two possible implementations, one (\triplet) where you have to enclose the triplet notes withing curly braces and one (\trip) that takes the following three music expressions and combines them into a triplet. The latter alternative saves even more typing, since you don't need the curly braces. On the other hand, it makes the input file slightly harder to read and if you have a triplet with more than three notes (see the example) you need to add some curly braces to get exactly three arguments to the function.

Shorthand for triplets

Showing barlines (SpanBars) only between systems

Span bars are drawn only between staff bar lines. By setting bar lines to transparent, they are shown only between systems.

Showing barlines (SpanBars) only between systems

Showing chords at changes

By default, every chord entered is printed; this behavior can be modified so that chord names are printed only at the start of lines and when the chord changes.

Showing chords at changes

Showing git commit hash (or other revision number)

Git is a distributed version-control system. Lilypond itself is developed using Git. It's useful to keep your .ly files in a Git repository: it ensures you can get back old versions of your files if you take a piece in the wrong direction, it makes it easy to share your work with others and incorporate each other's changes, and it lets you look back to see when you made particular changes. But if you're printing out your Lilypond parts, it's easy to get confused about which is the latest version, or what source a print-out was generated from.

The usual workaround is to use the date, but this only tells you when the PDF was generated, not when the source was written. This snippet is some trivial Scheme code that declares a \commit variable containing the current HEAD of the Git repository. (It's simple to change it to show the hash of the file, or the date of the HEAD commit, or the revision number from Subversion, CVS, or whatever else you use. It just runs a command and expects the output to be one line.)

Please ignore the displayed output of the snippet. It's there because all snippets need to produce output. The interesting stuff is in the file itself.

Showing git commit hash (or other revision number)

Showing rests in ChordNames

Here is how to show rests in the ChordNames context.

Showing rests in ChordNames

Showing the same articulation above and below a note or chord

By default, LilyPond does not allow the same articulation (e.g., an accent, a fermata, a flageolet, etc.) to be displayed above and below a note. For example, c4_\fermata^\fermata only shows a fermata below. The fermata above gets simply ignored.

However, one can stick scripts (just like fingerings) inside a chord, which means it is possible to have as many articulations as desired. This approach has the advantage that it ignores the stem and positions the articulation relative to the note head. This can be seen in the case of the flageolets in the snippet. To mimic the behaviour of scripts outside a chord, 'add-stem-support would be required.

The solution is thus to write the note as a chord and add the articulations inside of <...>, using the direction modifiers ^ and _ as appropriate.

Showing the same articulation above and below a note or chord

Simple lead sheet

When put together, chord names, a melody, and lyrics form a lead sheet:

Simple lead sheet

Simultaneous headword

Simultaneous notes

Simultaneous headword

Single staff template with notes and chords

Want to prepare a lead sheet with a melody and chords? Look no further!

Single staff template with notes and chords

Single staff template with notes and lyrics

This small template demonstrates a simple melody with lyrics. Cut and paste, add notes, then words for the lyrics. This example turns off automatic beaming, which is common for vocal parts. To use automatic beaming, change or comment out the relevant line.

Single staff template with notes and lyrics

Single staff template with notes, lyrics, and chords

This template allows the preparation of a song with melody, words, and chords.

Single staff template with notes, lyrics, and chords

Single staff template with notes, lyrics, chords and frets

Here is a simple lead sheet template with melody, lyrics, chords and fret diagrams.

Single staff template with notes, lyrics, chords and frets

Single staff template with only notes

This very simple template gives you a staff with notes, suitable for a solo instrument or a melodic fragment. Cut and paste this into a file, add notes, and you're finished!

Single staff template with only notes

Skip properties

The skip command is merely an empty musical placeholder. It does not produce any output, not even transparent output.

The s skip command does create Staff and Voice when necessary, similar to note and rest commands. For example, the following results in an empty staff.

Skip properties

Skips

An invisible rest (also called a `skip') can be entered like a note with note name `s' or with \skip duration.

Skips

Skips in lyric mode

The s syntax for skips is only available in note mode and chord mode. In other situations, for example, when entering lyrics, using the \skip command is recommended.

Skips in lyric mode

Skips in lyric mode (2)

Although s skips cannot be used in \lyricmode (it is taken to be a literal s, not a space), double quotes ("") or underscores (_) are available.

So for example:

Skips in lyric mode (2)

Slashed beamed grace notes

A known limitation of LilyPond (as of version 2.14) is that a multi-note beamed acciaccatura will be printed without a slash, and therefore looks exactly the same as a multi-note beamed appoggiatura. Here is a way to obtain slashed appogiaturas, even when several notes are beamed together.

Slashed beamed grace notes

Slashed Sixth in chordmode

If you need a slashed sixth degree, commonly found in figured bass, but in chordmode, here is a very basic way of formatting the markup to get it done.

Slashed Sixth in chordmode

Slashed Sixth in figured bass

.

Slashed Sixth in figured bass

Slides in tablature

Slides can be typeset in both Staff and TabStaff contexts.

Slides in tablature

Slur with two turning points

A slur normally can only have one turning point. In special situations, one may need two or more turning points, however. This can be achieved by linking two (or more) slur stencils together. The control points need to be specified manually: for two segments this is a set of seven points, of which the fourth is shared by both segments. To ease working with the function, the control points are shown as light blue crosses if the second argument is ##t.

For a more refined solution to the problem, see Shaping Bezier Curves, needing version 2.19.48 or higher.

Slur with two turning points

Smiley

Put some funny icons in your score or in a markup.

syntax is \smiley #'type' #'size', or \smileyNoteHead #'type'.

Smiley supports svg output.

Smiley

Snap-pizzicato markup ("Bartok pizzicato")

A snap-pizzicato (also known as Bartok pizzicato) is a strong pizzicato where the string is plucked vertically by snapping and rebounds off the fingerboard of the instrument (Wikipedia). It is denoted by a circle with a vertical line going from the center upwards outside the circle. While Lilypond does not have a pre-defined command to created this markup, it is easy to create a definition and place it directly into the lilypond file.

Snap-pizzicato markup ("Bartok pizzicato")

Snap-pizzicato or Bartok pizzicato

A snap-pizzicato (also known as Bartok pizzicato) is a strong pizzicato where the string is plucked vertically by snapping and rebounds off the fingerboard of the instrument (Wikipedia). It is denoted by a circle with a vertical line going from the center upwards outside the circle.

Snap-pizzicato or Bartok pizzicato

Spacing notes using an invisible staff

When entering partially typeset music (i.e. for students to be completed by hand), you may need the spacing that correspond to the timing of notes: all measures have same length, etc. It can be implemented by adding an invisible staff with a lot of fast notes.

Spacing notes using an invisible staff

Spacing out percent repeats with hidden notes

If you don't like the spacing used for percent repeats, you can enlarge the percent bars by suitably adding hidden notes.

Spacing out percent repeats with hidden notes

Specifying instrument changes as markups

This is just a small useful macro when you need to specify multiple instrument changes on a same staff. Just write \inst "Name before the note the markup should be attached to.

Specifying instrument changes as markups

Specifying number of measures per line

If you want to specify the number of measures per line, this Scheme engraver provides an alternative to inserting \breaks within your file or using an extra voice for line breaks. This is a convenient method for music that changes meter, and a quick way to duplicate the layout of a model.

The function takes a list of numbers describing a pattern which will repeat throughout the score. The example shows how to specify four measures per line. More numbers in the list will create a pattern of greater complexity. For example, \consists #(bars-per-line-engraver '(2 3 4)) defines lines of two, three, and four bars in succession. If the lengths add up to the length of the score, you've specified the length of each line individually.

The spacing engine will sometimes override your specifications if a line is too cramped as a result. To insist on your pattern, use the override of 'line-break-permission which is commented out in the example.

Specifying number of measures per line

Square balloons

Elements of notation can be marked and named with the help of a square balloon. The primary purpose of this feature is to explain notation.

Square balloons

Squeeze and split staff

Draw curved staves as an alternative to arrows when staff's splited.

Squeeze and split staff

Staff brackets

Staffs can be nested in various combinations. Here, StaffGroup and ChoirStaff produce similar straight brackets, whereas GrandStaff produces curly brackets. In InnerStaffGroup and InnerChoirStaff, the brackets are shifted leftwards.

Staff brackets

Staff containers

In this preliminary test of a modern score, the staff lines are washed out temporarily. This is done by making a tuned StaffContainer, which \skips some notes without printing lines either and creates a \new Staff then in order to create the lines again. (Be careful if you use this; it has been done by splitting the grouping Axis_group_engraver and creating functionality into separate contexts, but the clefs and time signatures may not do what you would expect.)

Staff containers

Staff headword

Staff headword

Staff headword

Staff line positions

The vertical positions of staff lines may be specified individually, by setting the line-positions property of the StaffSymbol.

Staff line positions

Stand-alone two-column markup

Stand-alone text may be arranged in several columns using \markup commands:

Stand-alone two-column markup

Start TrillSpanner with UpPrall glyph

Adds an upprall glyph to the beginning of a trillspanner.

Start TrillSpanner with UpPrall glyph

Staves based on a whole tone scale (or other interval)

staffLineLayoutFunction is used to customize the default vertical positions of notes on the staff. It can be used to create a staff based on a whole tone scale, with a whole tone interval between each adjacent note position (line or space). For staves based on other intervals simply change the number 2 in the formula to the number of semitones in the interval you want. (Staves based on whole tone scales are used in certain alternative notation systems. For a staff based on semitones you can simply set staffLineLayoutFunction to ly:pitch-semitones.)

Staves based on a whole tone scale (or other interval)

Stem and beam behavior in tablature

The direction of stems is controlled the same way in tablature as in traditional notation. Beams can be made horizontal, as shown in this example.

Stem and beam behavior in tablature

Stemlets

In some notational conventions beams are allowed to extend over rests. Depending on preference, these beams may drop 'stemlets' to help the eye appreciate the rhythm better, and in some modern music the rest itself is omitted and only the stemlet remains.

This snippet shows a progression from traditional notation, to beams over the rest, to stemlets over the rest, to stemlets alone. Stemlets are generated by overriding the 'stemlet-length property of Stem, while rests are hidden by setting 'transparent = ##t.

Some \markup elements are included in the source to highlight the different notations.

Stemlets

Strict beat beaming

Beamlets can be set to point in the direction of the beat to which they belong. The first beam avoids sticking out flags (the default); the second beam strictly follows the beat.

Strict beat beaming

Strikethrough text

Here is how to print text with a horizontal line drawn in the middle, much like what you can get in HTML or CSS.

Strikethrough text

String number extender lines

Make an extender line for string number indications, showing that a series of notes is supposed to be played all on the same string.

String number extender lines

String quartet template (simple)

This template demonstrates a simple string quartet. It also uses a \global section for time and key signatures

String quartet template (simple)

String quartet template with separate parts

The String quartet template snippet produces a nice string quartet, but what if you needed to print parts? This new template demonstrates how to use the \tag feature to easily split a piece into individual parts.

You need to split this template into separate files; the filenames are contained in comments at the beginning of each file. piece.ly contains all the music definitions. The other files – score.ly, vn1.ly, vn2.ly, vla.ly, and vlc.ly – produce the appropriate part.

Do not forget to remove specified comments when using separate files!

String quartet template with separate parts

Stylized movement numbers

Create stylized movement numbers for the instrumentName field (or wherever else a markup can be used).

Stylized movement numbers

Subdividing beams

The beams of consecutive 16th (or shorter) notes are, by default, not subdivided. That is, the three (or more) beams stretch unbroken over entire groups of notes. This behavior can be modified to subdivide the beams into sub-groups by setting the property subdivideBeams. When set, multiple beams will be subdivided at intervals defined by the current value of baseMoment by reducing the multiple beams to the number of beams that indicates the metric value of the subdivision. If the group following the division is shorter than the current metric value (usually because the beam is incomplete) the number of beams reflects the longest possible subdivision group. However, if there is only one note left after the division this restriction isn't applied. Note that baseMoment defaults to one over the denominator of the current time signature if not set explicitly. It must be set to a fraction giving the duration of the beam sub-group using the ly:make-moment function, as shown in this snippet. Also, when baseMoment is changed, beatStructure should also be changed to match the new baseMoment:

Subdividing beams

Suppressing warnings for clashing note columns

If notes from two voices with stems in the same direction are placed at the same position, and both voices have no shift or the same shift specified, the error message warning: ignoring too many clashing note columns will appear when compiling the LilyPond file. This message can be suppressed by setting the 'ignore-collision property of the NoteColumn object to #t. Please note that this does not just suppress warnings but stops LilyPond trying to resolve collisions at all and so may have unintended results unless used with care.

Suppressing warnings for clashing note columns

Sustain pedal cautionary after line break

Add a cautionary indication showing that the sustain pedal should remain pressed after a line break.

Syntax is [music]\sustainSpanOn[music]\sustainSpanOff.

This workaround uses TextSpanner instead of SustainPedal/PianoPedalBracket.

Sustain pedal cautionary after line break

Sustain pedal cautionary after line break (alternative)

Add a cautionary indication showing that the sustain pedal should remain pressed after a line break.

Syntax is \sustainPedal{[music]}.

Sustain pedal cautionary after line break (alternative)

Symbols for flatpicking guitar

In flatpicking guitar the direction of the stroke of the flatpick is notated using arrows.

Here's an example of crosspicking.

Symbols for flatpicking guitar

Synthetic key signatures with double accidentals

In some contemporary music, you run into synthetic scales with double sharps and flats.

If you need to display the synthetic key signature, you can even let DOUBLE-SHARP and DOUBLE-FLAT be printed.

Synthetic key signatures with double accidentals

System separator on both sides of the page

This simple snippet lets you put a system separator both on the left and on the right, instead of only on the left, as is more usual.

System separator on both sides of the page

Tablature layout for viol music

The snippet defines a specialized group of rhythmic and tablature staves able to handle old english viol tablature scores.

The string tunings defaults to the most common viol in d but other usual tunings are also available.

The rhythm part is used to provide only the pace changes, and therefore must be provided as a supplementary voice.

Tablature layout for viol music

Tablatures template

Here is a simple template for fretted strings instruments.

Tablatures template

Table of contents

A table of contents is included using \markuplist \table-of-contents. The TOC items are added with the \tocItem command.

Table of contents

Tacet

This snippet shows how to create a long tacet.

Syntax is \tacet #'length' "Text" R*'rests_number'

Tacet

Tag filter

The \tag command marks music expressions with a name. These tagged expressions can be filtered out later. This mechanism can be used to make different versions of the same music. In this example, the top stave displays the music expression with all tags included. The bottom two staves are filtered: the part has cue notes and fingerings, but the score has not.

Tag filter

tag manipulating functions and additional filter by tag functions

If you're using tags frequently, you may find the available functions quite limited. Here is a collection of additional functions to modify the tags, and to filter by the tags.

tag manipulating: filtering by tags: combined funtions:

tag manipulating functions and additional filter by tag functions

Tam-tam example

A tam-tam example, entered with 'tt'

Tam-tam example

Tambourine example

A tambourine example, entered 'tamb'

Tambourine example

Template for multiple instruments, prints a score and parts

This template is designed for a horn section, by default seven horns. It will print a full score and individual parts for the horns. It includes some overrides - beaming, glissando style, multi-measure rest and numeric time signature. There are also, commented out, overrides for bar numbering. The \paper section is defined for maximum staves per page. And there is a script for adding the current date to the default tagline. This template can be easily modified for more or fewer instruments, or can be used for vocal music as well.

Template for multiple instruments, prints a score and parts

Template: integrating \startTextSpan and \stopTextSpan in a customized TextSpanner

If you want to create a music-function for a customized TextSpanner, you may want to integrate \startTextSpan and \stopTextSpan in this function.

The advantage would be to use it like: \customizedTextSpanner { ... }

The following code tries to show a template for it.

A version to use with 2.16.0 is commented.

Template: integrating \startTextSpan and \stopTextSpan in a customized TextSpanner

tempo (metronome) marks with approximation sign

If you want to display an approximation sign in your (numeric) tempo marks, or if you want to display the tempo number in a different color, or if you want to hide the parentheses in your combined tempo mark (both name and number), this example demonstrates how the translation functions found in .../scm/translation-functions.scm can be adopted, doing it in a tunable way with new optional context properties.

tempo (metronome) marks with approximation sign

tempo mark Scheme function

This is a Scheme function which prints a tempo mark such as Fast (♩ = 222)

tempo mark Scheme function

Temporary stave

An additional stave can be typeset in the middle of a score line. A new context type is created for the temporary staff to avoid printing time and key signatures and clef at the beginning of the extra stave.

Temporary stave

Text headword

Text headword

Text headword

The \fill-line command

The \fill-line command aligns and justifies markup text by setting as many columns as required, in a given space.


In this snippet we use numbers to (beautifully) show how the command works; but when using text beware to use quotes if you want your words to stay together:


\fill-line {The quick brown fox}

results in something like:

The quick brown fox

\fill-line {"The quick brown fox"}

results in something like:

The quick brown fox


The \fill-line command

Three-sided box

This example shows how to add a markup command to get a three sided box around some text (or other markup).

Three-sided box

Tick bar lines

'Tick' bar lines are often used in music where the bar line is used only for coordination and is not meant to imply any rhythmic stress.

Tick bar lines

Tie at end of first repeat

A LaissezVibrer tie can be used to tie a note from the end of the first repeat back to the start of the repeated section. The length of the tie can be tweaked.

Tie at end of first repeat

Time signature in brackets

The time signature can be enclosed within brackets.

Time signature in brackets

Time signature in parentheses

Enclose the time signature in parentheses.

Time signature in parentheses

Time signature in parentheses - method 2

Another way to put the time signature in parentheses.

Time signature in parentheses - method 2

Time signature printing only the numerator as a number (instead of the fraction)

Sometimes, a time signature should not print the whole fraction (for example, 7/4), but only the numerator (digit 7 in this case). This can be easily done by using \override Staff.TimeSignature.style = #'single-digit to change the style permanently. By using \revert Staff.TimeSignature.style, this setting can be reversed. To apply the single-digit style to only one time signature, use the \override command and prefix it with a \once.

Time signature printing only the numerator as a number (instead of the fraction)

Time signature style with note in the denominator (extracted automatically from the \time call)

To write a time signature as e.g. 3/(quarter note) instead of 3/4, you can simply use the format-time-sig-note function defined in the snippet for the TimeSignature's stencil property, and it will automatically extract the time signature and format it with a note in the denominator instead of a number.

Time signature style with note in the denominator (extracted automatically from the \time call)

Time signature with a note in the denominator instead of a number - changing TimeSignature stencil

Here is a way to substitute the "denominator" of the time signature for the note duration corresponding to it. This creates a new Time Signature Stencil, so it should work for all time signatures after using the \override function.

Time signature with a note in the denominator instead of a number - changing TimeSignature stencil

1 2 Next ⇨